The first step that an attacker takes is to perform in-depth research on the target system. This step, commonly referred to as footprinting, is often accomplished using various publicly available resources, such as the target company’s website or Google. Once this research is completed, the attacker will typically begin scanning the IP address (or DNS name) of its target for open ports or running services.
This scanning allows the attacker to determine whether the target is alive and reachable. For example, consider a scenario in which a bank robber is planning to steal from the largest bank in the city, located at 123 Main Street. He spends weeks planning an elaborate heist, only to find out upon arrival at the address that the bank has moved to 555 Vine Street. Worse yet, imagine a scenario in which the robber plans on walking into the bank during normal business hours, intending to steal from the vault, only to get to the bank and discover it is closed that day. Ensuring the target is alive and accessible is the first hurdle that must be crossed.
Another important result of scanning is that it tells the attacker on which ports the target is listening. Returning to our bank robber analogy, consider what would happen if the robber showed up at the bank with absolutely no knowledge of the building’s physical layout. He would have no idea of how to gain access to the building, because he wouldn’t know the weak points in its physical security.
In this section, we’ll discuss a few of the more common scanning techniques used to identify hosts, their open ports, and vulnerabilities on a network.
TIPS So far, this book has referred to the sides of a connection as the transmitter and receiver or as the client and server. This chapter refers to each side of the communication as either the attacker or the victim.
SYN Scan
The type of scanning often done first against a system is a TCP SYN scan, also known as a stealth scan or a half-open scan. A SYN scan is the most common type for several reasons:
1. It is very fast and reliable.
2. It is accurate on all platforms, regardless of TCP stack implementation.
3. It is less noisy than other scanning techniques.
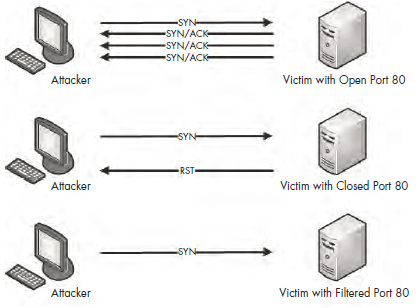
The TCP SYN scan relies on the three-way handshake process to determine which ports are open on a target host. The attacker sends a TCP SYN packet to a range of ports on the victim, as if trying to establish a channel for normal communication on the ports. Once this packet is received by the victim, one of a few things may happen, as shown in Figure 10-1.
Figure 10-1: Possible results of a TCP SYN scan
If a service on the victim’s machine is listening on a port that receives the SYN packet, it will reply to the attacker with a TCP SYN/ACK packet, the second part of the TCP handshake. Then the attacker knows that port is open and a service is listening on it. Under normal circumstances, a final TCP ACK would be sent in order to complete the connection handshake, but in this case, the attacker doesn’t want that to happen, since he will not be communicating with the host further at this point. So, the attacker doesn’t attempt to complete the TCP handshake.
If no service is listening on a scanned port, the attacker will not receive a SYN/ACK. Depending on the configuration of the victim’s operating system the attacker could receive an RST packet in return, indicating that the port is closed. Alternatively, the attacker may receive no response at all. That could mean that the port is filtered by an intermediate device, such as a firewall or the host itself. On the other hand, it could just be that the response was lost in transit. This result typically indicates that the port is closed, but it’s ultimately inconclusive.
The file synscan.pcap provides a great example of a SYN scan performed with the NMAP tool. NMAP is a robust network-scanning application developed by Fyodor. It can perform just about any kind of scan you can imagine. You can download NMAP for free from http://www.nmap.com/download.html.
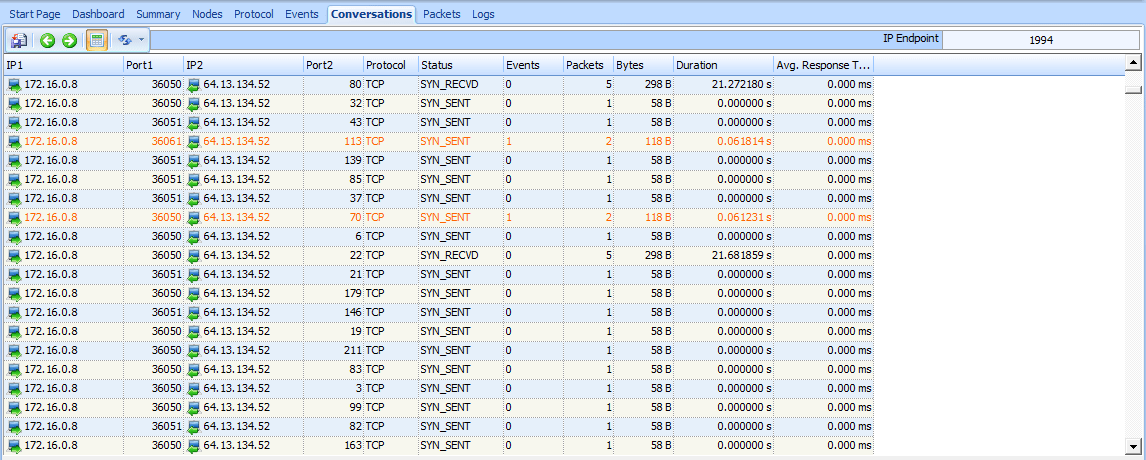
Our sample capture contains roughly 2,000 packets, which tells us that this scan is reasonably sized. One of the best ways to ascertain the scope of a scan of this nature is to view the Conversations window, as shown in Figure 10-2.
There, you should see only one IPv4 conversation between the attacker (172.16.0.8) and the victim (63.13.134.52). You will also see that there are 1,994 TCP conversations between these two hosts —basically a new conversation
for every port pairing involved in the communications.
Figure 10-2: The Conversations window shows the variety of TCP communications taking place.
The scanning is occurring very quickly, so scrolling through the capture file is not the best way to find the response associated with each initial SYN packet. Several more packets might be sent before a response to the original packet
is received. Fortunately, we can create filters to help us find the right traffic.
Using Filters with SYN Scans
As an example of filtering, let’s consider the first packet, which is a SYN packet sent to the victim on port 443 (HTTPS). To see if there was a response to this packet, we can create a filter to show all traffic to and from port 443. Here’s how to do this quickly:
1. Select the first packet in the capture file.
2. Expand the TCP header in the Packet Details pane.
3. Right-click the Destination Port field, select Make Filter.
4. This will make a filter in the filter dialog for all packets with the destination port of 443. Now, because we also want all packets from the source port 443, Re-import packets.
The resulting filter will yield two packets, which are both TCP SYN packets sent from attacker to victim, as shown in Figure 10-3.
Figure 10-3: Two attempts to establish a connection with SYN packets
Since there is no response to either of these packets, it’s possible that the response is being filtered by the victim host or an intermediary device, or that the port is closed. Ultimately, the result of the scan against port 443 is inconclusive.
We can attempt this same technique on another packet to see if we get different results. To do so, Uncheck all filter and re-import packets. Then select the ninth packet in the list. This is a SYN packet to port 53, commonly associated with DNS. Using the method outlined in the previous steps, create a filter based on the destination port and re-import packets so that it applies to all TCP port 53 traffic. When you apply this filter, you should see five packets, as shown in Figure 10-4.
Figure 10-4: Five packets indicating a port is open
The first of these packets is the SYN we selected at the beginning of the capture. The second is an actual response from the victim. It’s a TCP SYN/ACK—the response expected when setting up the three-way handshake. Under normal circumstances, the next packet would be an ACK from the host that sent the initial SYN. However, in this case, our attacker doesn’t want to complete the connection and doesn’t send a response. As a result, the victim retransmits the SYN/ACK three more times before giving up. Since a SYN/ACK response is received when attempting to communicate
with the host on port 53, it’s safe to assume that a service is listening on that port.
Let’s rinse and repeat this process one more time for packet 13. This is a SYN packet sent to port 113, which is commonly associated with the Ident protocol, often used for IRC identification and authentication services. If you apply the same type of filter to the port listed in this packet, you will see four packets, as shown in Figure 10-5.
Figure 10-5: A SYN followed by a RST, indicating the port is closed
The first packet is the initial SYN, which is followed immediately by a RST from the victim. This is an indication that the victim is not accepting connections on the targeted port, and that a service is most likely not running on it.
Identifying Open and Closed Ports
After understanding the different types of response a SYN scan can elicit, the next logical thought is to find a fast method of identifying which ports are open or closed. The answer lies within the Conversations window once again, as shown in Figure 10-6.
Figure 10-6: Finding open ports with the Conversations window
Three scanned ports include five packets in each of their conversations . We know that ports 53, 80, and 22 are open, because these five packets represent the initial SYN, the corresponding SYN/ACK, and the retransmitted SYN/ACKs from the victim.
For five ports, only two packets were involved in the communication . The first is the initial SYN, and the second is the RST from the victim. This indicates that ports 113, 25, 31337, 113, and 70 are closed.
The remaining entries in the Conversations window include only one packet, meaning that the victim host never responded to the initial SYN. These remaining ports are most likely closed, but we’re not sure.
Operating System Fingerprinting
An attacker puts a great deal of value on knowing his target’s operating system. Knowledge of the operating system in use ensures that all of the attack methods employed by the attacker are configured correctly for that system. This also
allows the attacker to know the location of certain critical files and directories within the target file system, should he actually succeed in accessing the system.
Operating system fingerprinting is the name given to a group of techniques used to determine the operating system running on a system without actually having physical access to that system. There are two types of operating system
fingerprinting: passive and active.
Passive Fingerprinting
Using passive fingerprinting, you examine certain fields within packets sent from the target in order to determine the operating system in use. The technique is considered passive because you only listen to the packets the target host is sending and don’t actively send any packets to the host yourself. This is the most ideal type of operating system fingerprinting for attackers, because it allows them to be stealthy.
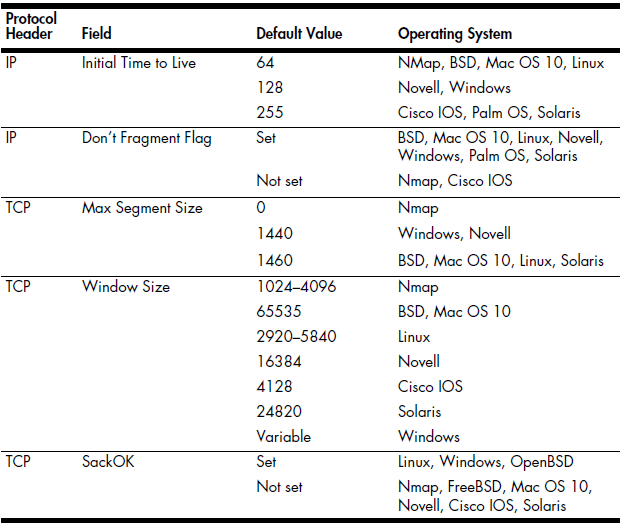
That being said, how can we determine which operating system a host is running based on nothing but the packets it sends? Well, this is actually pretty easy and is made possible by the lack of specificity in the specifications defined by protocol RFCs. Although the various fields contained in TCP, UDP, and IP headers are very specific, typically, no default values are defined for these fields. This means that the TCP/IP stack implementation in each operating system must define its own default values for these fields. Table 10-1 lists some of the more common fields and the default values that can be used to link them to various operating systems.
Table 10-1: Common Passive Fingerprinting Values
The packets contained in the file passiveosfingerprinting.pcap are great examples of this technique. There are two packets in this file. Both are TCP SYN packets sent to port 80, but they come from different hosts. Using only the values contained in these packets and referring to Table 10-1, we should be able to determine the operating system architecture in use on each host. The details of each packet are shown in Figure 10-7.
Using Table 10-1 as a reference, we can create Table 10-2, which is a breakdown of the relevant fields in these packets.
Table 10-2: Breakdown of the Operating System Fingerprinting Packets Protocol
Based on these values, we can conclude that packet 1 was most likely sent by a device running Windows, and packet 2 was most likely sent by a device running Linux.
Keep in mind that the list of common passive fingerprinting identifying fields in Table 10-1 is by no means exhaustive. There are many quirks that may result in deviations from these expected values. Therefore, you cannot fully rely on the results gained from passive operating system fingerprinting.
TIPS One tool that uses operating system fingerprinting techniques is p0f. This tool analyzes relevant fields in a packet capture and outputs the suspected operating system. Using tools like p0f, you can not only get the operating system architecture, but sometimes even the appropriate version or patch level. You can download p0f from http://
lcamtuf.coredump.cx/p0f.shtml.
Active Fingerprinting
When passively monitoring traffic doesn’t yield the desired results, a more direct approach may be required. This approach is called active fingerprinting. It involves the attacker actively sending specially crafted packets to the victim in order to elicit replies that will reveal the operating system in use on the victim’s machine. Of course, since this approach involves communicating directly with the victim, it is not the least bit stealthy, but it can be highly effective.
The file activeosfingerprinting.pcap contains an example of an active operating system fingerprinting scan initiated with the Nmap scanning utility. Several packets in this file are the result of Nmap sending different probes designed to elicit responses that will allow for operating system identification. Nmap records the responses to these probes and builds a fingerprint, which it compares to a database of values in order to make a determination.
TIPS The techniques used by Nmap to actively fingerprint an operating system are quite complex. To learn more about how Nmap performs active operating system fingerprinting, read the definitive guide to Nmap, Nmap Network Scanning, by the tool’s author Gordon “Fyodor” Lyon.


