

A brief introduction to setting up an OpenFlow environment without OpenFlow hardware devices. The controller uses OpenDaylight (abbreviated as ODL), which is currently a mainstream controller project with relatively complete functionalities. Mininet is used to simulate OpenFlow devices, which is far more efficient, concise, and easier to understand than applications based on KVM virtual machines.
1 Environment Preparation
The main and simplest environment preparation is: a PC with VMware station (or VirtualBox) installed to host the VM.
2 Obtaining and Installing ODL
The ODL VM image can be directly downloaded through the address link:http://archive.openflow.org/wk/index.php?title=OpenDayLight_Tutorial. After downloading this image, it can be opened directly with VMware station to use and start ODL. If you want to learn more about the installation details of ODL, you can search for documentation related to ODL, and the specific installation will be updated in the technical documents.
After opening the VM, first enter the OpenDaylight directory:
Language: javascriptCopy
cd opendaylight/opendaylight/distribution/opendaylight/Then enter the OpenDaylight startup directory:
Language: javascriptCopy
cd target/distribution.opendaylight-package/opendaylightExecute:
Language: javascriptCopy
run.shBy entering http://[VM_IP]:8080 in the browser (in the VM environment or local environment), you will be redirected to the following login interface, where [VM_IP] is replaced by the controller IP. The login username: admin, password: admin, login to enter the ODL Web interface to view and operate ODL.

3 Obtaining and Installing Mininet
Mininet mainly virtualizes OpenFlow switches and host nodes, and can construct the topology desired by users through customization. The virtual OpenFlow switch mainly uses an application based on Open vSwitch.
Download Mininet VM image from http://mininet.org/download/, after opening this image, the username is mininet, the password is mininet. Log in to the Mininet virtual machine, then the topology can be created using the mn command. The method to compile and install the Mininet source code will also be provided later.
4 Installing Wireshark Plugin for OpenFlow
It is recommended to install Wireshark on the ODL VM, as the ODL VM is the desktop version and can directly display the Wireshark packet capture data. For the Wireshark version 1.6 to support OpenFlow, the following operations are required (note: this document configuration only supports version 1.6).
4.1 Download and Install OpenFlow
Language: javascriptCopy
$ sudo apt-get install git-core automake m4 pkg-config libtool$ git clone git://openflow.org/openflow.git or git clone git://gitosis.stanford.edu/openflow.git$ cd openflow$ ./boot.sh4.2 Install Compilation Commands
Execute in the openflow directory
Language: javascriptCopy
$ sudo apt-get install gcc$ ./configure$ make$ sudo make install4.3 Install Wireshark Dissector (Scanner)
In the openflow directory, get Wireshark
Language: javascriptCopy
$ sudo apt-get install wireshark libgtk2.0-devInstall and compile:
Language: javascriptCopy
$ cd utilities/wireshark_dissectors/openflowModify the 769th line of the file utilities/wireshark_dissectors/openflow/packet-openflow.c (note: “:set nu” command can display line numbers)
dissector_add(TCP_PORT_FILTER, global_openflow_proto, openflow_handle) Change to: dissector_add_uint(TCP_PORT_FILTER,global_openflow_proto,openflow_handle)
Save, modify, and compile:
Language: javascriptCopy
$ make$ sudo make installPlace the compiled library packet-openflow.so into the Wireshark plugin directory with the following command:
Language: javascriptCopy
$ scp packet-openflow.so /usr/lib/wireshark/libwireshark1/plugins/Check the files in the directory /usr/lib/wireshark/libwireshark1/plugins/ to ensure it contains the packet-openflow.so file.
Execute the command as a root user to open Wireshark:
Language: javascriptCopy
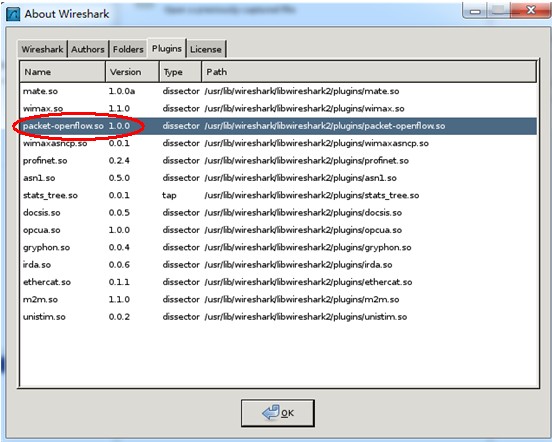
$ wireshark &Enter the Wireshark interface, under the Help menu in “About Wireshark,” to see if there is a packet-openflow in the plugins, the image below indicates successful addition of the plugin.
By inputting of in Filter, it can be recognized (note: green indicates correct input), and thus OpenFlow protocol is supported!

Due to the rapid development of SDN, the Wireshark official website has updated Wireshark with specialized versions (Stable Release (1.12.1) version) that support the OpenFlow protocol and support multiple versions of the protocol, including of1.0, 1.1, 1.2, 1.3, which is conducive to subsequent multi-version protocol research, so it can be directly downloaded for installation and use, with the link address: https://www.wireshark.org/download.html.
Note:
(1) Actually, the ODL VM has Wireshark that supports the OpenFlow protocol, but because the built-in Wireshark parser in the VM has capture issues when tested, a reinstallation of Wireshark supporting the OpenFlow protocol is necessary.
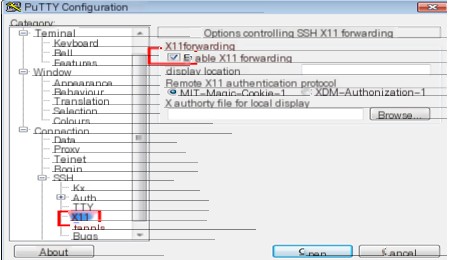
(2) You can also install Wireshark in the VM where Mininet is located, because the Mininet virtual machine is server version, so when using Wireshark, Xming can be combined with Putty, selecting the forwarding feature in X11, remote login to this VM, and capture packets using Wireshark as shown below.
5 Summary
This article mainly serves as preparation for understanding ODL and Mininet in the future, gaining familiarity with their basic concepts by installing ODL and Mininet.