

http://127.0.0.1:3000 Connection: UpgradeUpgrade: websocketSec-WebSocket-Version: 13Sec-WebSocket-Key: w4v7O6xFTi36lq3RNcgctw
- Request line: The request method must be GET, and the HTTP version must be at least 1.1.
- The request must include Host.
- If the request comes from a browser client, it must include Origin.
- The request must include Connection, and its value must contain the “Upgrade” token.
- The request must include Upgrade, and its value must contain the “websocket” keyword.
- The request must include Sec-WebSocket-Version, and its value must be 13.
- The request must include Sec-WebSocket-Key, used to provide basic protection, such as against unintended connections.
Server: Respond to Protocol Upgrade with Sec-WebSocket-Key
The server’s response header must include the following keyword: `Sec-WebSocket-Key
HTTP/1.1 101 Switching ProtocolsConnection:UpgradeUpgrade: websocketSec-WebSocket-Accept: Oy4NRAQ13jhfONC7bP8dTKb4PTU=- Response line: HTTP/1.1 101 Switching Protocols.
- The response must include Upgrade, with the value “websocket”.
- The response must include Connection, with the value “Upgrade”.
- The response must include Sec-WebSocket-Accept, calculated based on the Sec-WebSocket-Key from the request header.
Calculation of Sec-WebSocket-Key/Accept
The Sec-WebSocket-Key value is obtained by encoding a randomly generated 16-byte random number using base64 (see Chapter 4 of RFC4648). For example, the randomly chosen 16 bytes are:
// Hexadecimal numbers 1~160x01 0x02 0x03 0x04 0x05 0x06 0x07 0x08 0x09 0x0a 0x0b 0x0c 0x0d 0x0e 0x0f 0x10The test code is as follows:
const list = Array.from({ length: 16 }, (v, index) => ++index)const key = Buffer.from(list)console.log(key.toString('base64'))// AQIDBAUGBwgJCgsMDQ4PEA==The calculation method for the Sec-WebSocket-Accept value is:
Concatenate the Sec-WebSocket-Key value with 258EAFA5-E914-47DA-95CA-C5AB0DC85B11, calculate the digest using SHA1, and convert it to a base64 string.
There’s no need to worry about the magic string 258EAFA5-E914-47DA-95CA-C5AB0DC85B11; it’s just a GUID, possibly randomly generated when writing the RFC.
The test code is as follows:
const crypto = require('crypto')function hashWebSocketKey (key) { const GUID = '258EAFA5-E914-47DA-95CA-C5AB0DC85B11' return crypto.createHash('sha1') .update(key + GUID) .digest('base64')}console.log(hashWebSocketKey('w4v7O6xFTi36lq3RNcgctw=='))// Oy4NRAQ13jhfONC7bP8dTKb4PTU=The Role of Sec-WebSocket-Key
Previously, its role was briefly mentioned as providing basic protection to reduce malicious connections. Further elaboration is as follows:
- The key can prevent the server from receiving illegal WebSocket connections, such as HTTP requests connecting to WebSocket, in which case the server can directly refuse.
- The key can be used to initially ensure that the server recognizes the ws protocol, but it cannot rule out that some HTTP servers only process the Sec-WebSocket-Key without implementing the ws protocol.
- The key can prevent reverse proxy caching.
- In browsers, when initiating an AJAX request, the Sec-WebSocket-Key and related headers are prohibited, preventing accidental protocol upgrade requests when the client sends AJAX requests.
- It is important to emphasize that Sec-WebSocket-Key/Accept is not used to ensure data security, as its calculation/conversion formula is public and very simple. Its main role is to prevent some unexpected situations.
Backend Service: Sec-WebSocket-Key
Install Node.js with Sec-WebSocket-Key
wget https://nodejs.org/dist/v14.16.0/node-v14.16.0-linux-x64.tar.xztar -xJvf node-v14.16.0-linux-x64.tar.xzln -s /root/node-v14.16.0-linux-x64/bin/node /usr/local/bin/nodeln -s /root/node-v14.16.0-linux-x64/bin/npm /usr/local/bin/npmInstall Dependencies: Sec-WebSocket-Key
npm install wsDeployment of Backend WebSocket Service with Sec-WebSocket-Key
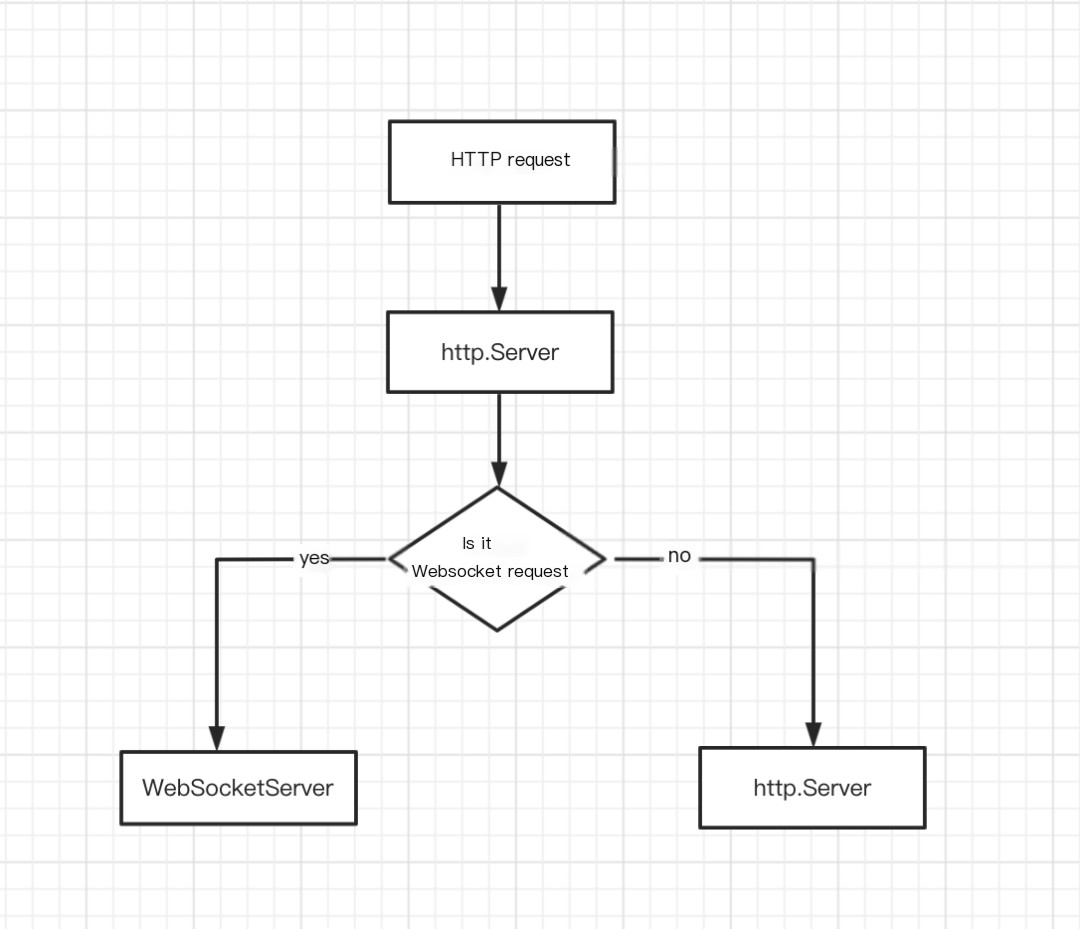
In this experiment, the backend services for HTTP and WebSocket use the same ports 80 and 443. In practical applications, this has the advantage that if HTTP service was originally provided and WebSocket service is added later, no new ports need to be exposed, nor do firewall rules need to be modified.
The key code to bind WebSocketServer and HTTP to the same port is to first obtain the reference of the created http.Server, and then create WebSocketServer based on http.Server.
Whether it is HTTP or WebSocket, the client sends a standard HTTP request, which is first handled by http.Server. WebSocketServer will first determine if the request is a WebSocket request. If it is, it will handle the request; if not, the request will still be handled by http.Server.
 >
>
Server code:
// app.js file// Import related modulesconst WebSocket = require('ws');const http = require('http');// Create http.Server using the http modulehttpserver = http.createServer(function (request, response) { // Send HTTP header // HTTP status: 200 : OK // Content type: text/plain response.writeHead(200, {'Content-Type': 'text/plain'}); // Send response data "Hello World" response.end('Http Message: Hello World');}).listen(80); // Listen on port 80, create WebSocketServer based on http.Server// Create WebSocketServerconst WebSocketServer = WebSocket.Server;const wss = new WebSocketServer({ server: httpserver // Create WebSocketServer based on http.Server});wss.on('connection', function (ws) { ws.send("Websocket Send: Hello World") // Immediately send a message to the client after a successful client connection console.log(`WebSocket connection()`); ws.on('message', function (message) { // Receive message from client console.log(`Websocket Received: ${message}`); })});console.log('WebSocket and Http Server started at port 80...');Start Backend Service
[root@ws1 ws-http-server]# node app.js WebSocket and Http Server started at port 80...Verification
Use the client to verify HTTP and WebSocket services separately. The backend server’s address is 192.168.1.141:
- When the client does not initiate a protocol upgrade request, use the HTTP service to respond to the client.
- When the client initiates a protocol upgrade request, WebSocket will reuse the HTTP handshake channel. After the upgrade is complete, subsequent data exchanges use WebSocket.
Test HTTP Connection
# curl -i http://192.168.1.141 HTTP/1.1 200 OKContent-Type: text/plainDate: Thu, 25 Mar 2021 08:00:40 GMTConnection: keep-aliveKeep-Alive: timeout=5Transfer-Encoding: chunkedHttp Message: Hello WorldTest WebSocket Connection
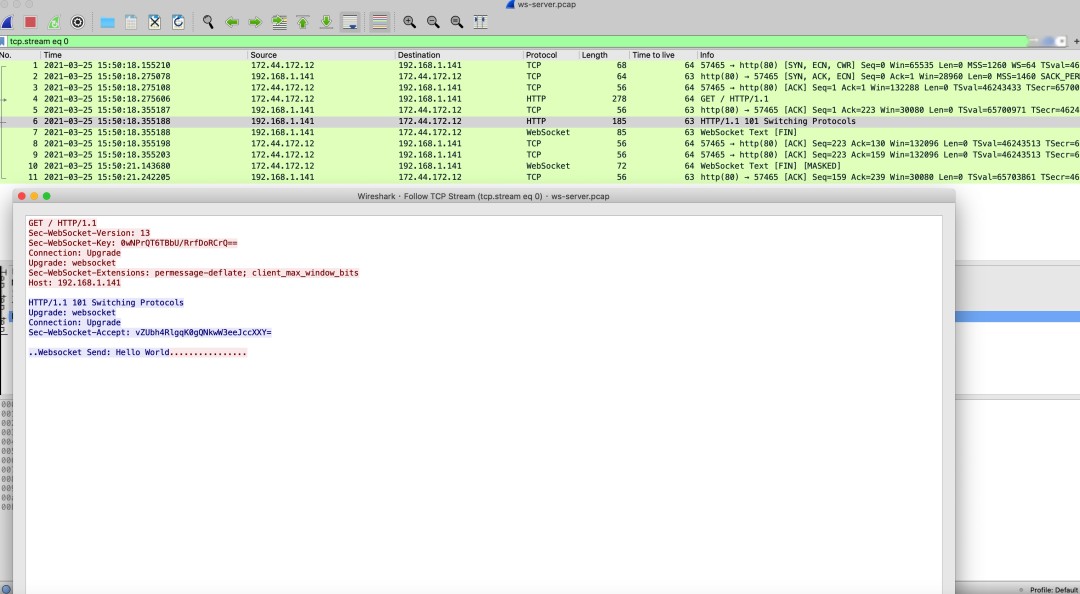
# Method 1: Use wscat (client npm install wscat to install)# wscat --connect ws://192.168.1.141 Connected (press CTRL+C to quit)< Websocket Send: Hello World # Receive message from server> send hello # Send message to server# Method 2: Use curlcurl -i \ --header "Upgrade: websocket" \ --header "Sec-WebSocket-Key: AQIDBAUGBwgJCgsMDQ4PEA==" \ --header "Sec-WebSocket-Version: 13" \ --header "Connection: upgrade" \ # Directly accessing the backend service's WebSocket requires this header http://192.168.1.141 Capture packets to view interaction messages. You can see that WebSocket reuses the HTTP handshake channel. The client negotiates a protocol upgrade with the WebSocket server through an HTTP request. After the protocol upgrade is complete, subsequent data exchanges follow the WebSocket protocol.
Capture packets on the backend server:
tcpdump -i any host 192.168.1.141 and port 80 -nn -w ws.pcapOpen and view with Wireshark software:
 >
>
Nginx Configuration
Generate Self-Signed Certificate
HTTPS certificates are usually applied for on CA sites and issued by CA institutions. In this experiment, we use OpenSSL to generate a self-signed HTTPS certificate.
[root@nginx-plus1 certs]# openssl req -newkey rsa:2048 -nodes -keyout server.key -x509 -days 365 -out server.crt # Add the following information as desiredGenerating a 2048 bit RSA private key....................+++......+++writing new private key to 'server.key'-----You are about to be asked to enter information that will be incorporatedinto your certificate request.What you are about to enter is what is called a Distinguished Name or a DN.There are quite a few fields but you can leave some blankFor some fields there will be a default value,If you enter '.', the field will be left blank.-----Country Name (2 letter code) [XX]:CNState or Province Name (full name) []:ShanghaiLocality Name (eg, city) [Default City]:ShanghaiOrganization Name (eg, company) [Default Company Ltd]:EctOrganizational Unit Name (eg, section) []:EctCommon Name (eg, your name or your server's hostname) []:chengzwEmail Address []:[email protected]Nginx Configuration File
Nginx listens on port 80 for HTTP and ws services, and on port 443 for HTTPS and wss services. Wss is the encrypted ws service.
events{}http { upstream websocket { server 192.168.1.141:80; # Backend server address } server { listen 443 ssl; # SSL related configuration ssl_protocols TLSv1 TLSv1.1 TLSv1.2 SSLv3 SSlv2; ssl_certificate_key /usr/local/nginx/certs/server.key; ssl_certificate /usr/local/nginx/certs/server.crt; location / { proxy_pass http://websocket; # Add WebSocket protocol upgrade HTTP header proxy_set_header Upgrade $http_upgrade; proxy_set_header Connection "upgrade"; } } server { listen 80; location / { proxy_pass http://websocket; proxy_set_header Upgrade $http_upgrade; proxy_set_header Connection "upgrade"; } }}Start Nginx Service
/usr/local/nginx/sbin/nginx # According to the path where nginx is installedVerification
Test HTTP & HTTPS Connection
# HTTP connection# curl -i http://192.168.1.134 HTTP/1.1 200 OKServer: nginx/1.14.2Date: Thu, 25 Mar 2021 08:16:59 GMTContent-Type: text/plainTransfer-Encoding: chunkedConnection: keep-aliveHttp Message: Hello World# HTTPS connection# curl -i https://192.168.1.134 -k HTTP/1.1 200 OKServer: nginx/1.14.2Date: Thu, 25 Mar 2021 08:17:07 GMTContent-Type: text/plainTransfer-Encoding: chunkedConnection: keep-aliveHttp Message: Hello WorldTest ws & wss Connection
# Method 1: Use wscat# ws connection# wscat --connect ws://192.168.1.134 Connected (press CTRL+C to quit)< Websocket Send: Hello World> send hello# wss connection, since it is a self-signed certificate, the -n parameter is required, indicating not to verify the certificate # wscat --connect wss://192.168.1.134 -n Connected (press CTRL+C to quit)< Websocket Send: Hello World> send hello# Method 2: Use curl# ws connectioncurl -i \ --header "Upgrade: websocket" \ --header "Sec-WebSocket-Key: MlRAR6bQZi07587UD4H8oA==" \ --header "Sec-WebSocket-Version: 13" \ http://192.168.1.134HTTP/1.1 101 Switching ProtocolsServer: nginx/1.14.2Date: Thu, 25 Mar 2021 08:18:48 GMTConnection: upgradeUpgrade: websocketSec-WebSocket-Accept: iURIl3uIT+tsPMmZ0x1IVH7EL98=# wss connection, since it is a self-signed certificate, the -k parameter is required, indicating not to verify the certificate curl -i \ --header "Upgrade: websocket" \ --header "Sec-WebSocket-Key: MlRAR6bQZi07587UD4H8oA==" \ --header "Sec-WebSocket-Version: 13" \ https://192.168.1.134 -kHTTP/1.1 101 Switching ProtocolsServer: nginx/1.14.2Date: Thu, 25 Mar 2021 08:20:20 GMTConnection: upgradeUpgrade: websocketSec-WebSocket-Accept: iURIl3uIT+tsPMmZ0x1IVH7EL98=