
Background
When installing a Snort-based NIDS system, it can often feel difficult and prone to errors. Installing Snort isn’t inherently challenging; the difficulties arise from inadequate preparatory work. If unprepared well, you may encounter various issues during the visual alarm configuration, such as:
- Why does Snort report errors during compilation?
- Why does Snort exit immediately after starting?
- What if Snort does not generate alerts?
- What if Snort alarms cannot be stored in the MySQL database?
- What should I do when the ACID interface in the browser appears blank?Seeing others succeed in installation while I repeatedly fail is truly frustrating! Let’s look into methods to tackle these issues.
Part One: Preparatory Work
Here are the preparatory steps required for manually compiling and installing Snort.Step 1: Prepare the software environment. Before installation, a SPAN setup on the switch is necessary. Mid-range and high-end Cisco switches have a SPAN function. SPAN must be a designated port. In a virtual machine environment, you must set the network card to promiscuous mode.Step 2: Install VMware Workstations virtual machine. Set up remote connection tools.Step 3: Obtain installation resources from the book page in the Asynchronous Community.Step 4: Use the image CentOS-6.8-x86_64-mini to install the operating system in the virtual machine.Step 5: After restarting the system, set the system’s IP, gateway, and DNS.During default installation, the network IP is acquired automatically and needs to be changed to a static IP address.#ifconfig -a //View network card configuration information#vi /etc/sysconfig/network-scripts/ifcfg-eth0 //Edit the network card configuration fileDEVICE=”eth0″BOOTPROTO=”dhcp”HWADDR=”00:0C:29:BA:53:4E”IPV6INIT=”yes”NM_CO***OLLED=”yes” //Several sensitive words have been restricted to asterisks here.ONBOOT=”yes”TYPE=”Ethernet”UUID=”685d0725-02ab-41b9-b9bf-6a52fc68c0f8″
The method to change to a static IP address is to change “dhcp” in BOOTPROTO=”dhcp” to “static,” and then add the following content (internal network IP configuration):IPADDR=192.168.91.29NETMASK=255.255.255.0GATEWAY=192.168.91.2DNS1=192.168.91.2DNS2=8.8.8.8 //DNS address configuration is based on local network provider
Finally save and exit, restarting the network service.Step 6: Copy software to the designated directory.Copy the four files: libdnet-1.12.tgz, daq-2.0.4.tar.gz, snort-2.9.7.0.tar.gz, snortrules-snapshot-2970.tar.gz to the /usr/local/src/ directory in the CentOS 6.8 system.After these six steps, the preparatory work for Snort installation is completed. Additionally, refer to the Snort installation configuration roadmap in the appendix of the book “Open Source Security Operations Platform OSSIM Troubleshooting: Advanced,” figures 1 and 2. The names and purposes of network installation packages are detailed in tables 1, 2, and 3 of the appendix, which along with the roadmap allow beginners to clearly complete the experiments described in this article.
Part Two: Compile and Install Snort
After the preparation is complete, proceed with the formal installation of Snort. Compiling and installing Snort involves the following 10 steps.Step 1: Install the basic environment and dependency packages.#yum install -y gcc gcc-c++ flex bison zlib libxml2 libpcap pcre* tcpdump git libtool curl man make
Note, if pcre isn’t installed, the following issues will appear during pre-compilation, such as performing ./configure and encountering errors:ERROR! Libpcre library not found, go get it from http://www.pcre.org
Step 2: Extract the Libdnet, DAQ, and Snort installation packages.During the server installation configuration process, it’s possible to download the latest version of the source package from the official site, but this will lead to various dependency package issues and unsuccessful installations. Some software (such as Snort) requires the DAQ (Data AcQuisition) library to be installed before installation can proceed, and only after Libdnet is fully installed can DAQ be installed; otherwise, there will be errors about missing dependency files. Proceed as follows:#cd /usr/local/src#tar -zxvf libdnet-1.12.tgz#tar -zxvf daq-2.0.4.tar.gz#tar -zxvf snort-2.9.7.0.tar.gz
Libdnet, DAQ, and Snort must be installed sequentially.● Install libdnet-1.12.tgz.#cd /usr/local/src/libdnet-1.12/#./configure#make && make install
● Install DAQ.#cd daq-2.0.4#./configure#make && make install
● Install Snort 2.9 (Libdnet and DAQ must be installed correctly before installing Snort).#cd /usr/local/src/snort-2.9.7.0#./configure –enable-sourcefire#make && make install
Step 3: Add users and groups.Create users and groups, setting permissions. The unpacked file permissions are related to the root when using root identity; thus, they need to be changed to Snort user ownership and relevant permissions.#groupadd -g 40000 snort //Add a new Snort group#useradd snort -u 40000 -d /var/log/snort -s /sbin/nologin -c SNORT_IDS -g snort//Add the Snort user to the Snort group and disallow system login
Step 4: Create the directory /var/log/snort and set its properties.#mkdir /var/log/snort#chown –R snort:snort /var/log/snort
Step 5: Configure Snort.● Create a new directory /etc/snort/.#mkdir /etc/snort/
● Extract snortrules-snapshot-2970.tar.gz into the /etc/snort/ directory.#cd /etc/snort
tar –zxvf /usr/local/src/snortrules-snapshot-2970.tar.gz –C .(This step is crucial)
#cp /etc/snort/etc/sid-msg.map /etc/snort
● After downloading the Snort compressed package, unpack it and copy to the /etc/snort/ directory.#cd /etc/snort/#cp /usr/local/src/snort-2.9.7.0/etc/* .
● Change the ownership of all files in the current directory.#cd /etc/snort#chown -R snort:snort *
● Create the white and black list rule files.#touch /etc/snort/rules/white_list.rules /etc/snort/rules/black_list.rules
Create two files, white_list.rules and black_list.rules, in /etc/snort/rules.● Edit the snort.conf configuration file, modifying the following lines.#vi /etc/snort/snort.conf
Set the network variable, changing line 45 from ipvar HOME_NET any to ipvar HOME_NET 192.168.x.x subnet, writing in CIDR format. Multiple subnets can also be added, as seen in the example below.ipvar HOME_NET [192.168.0.0/16,172.16.0.0/16]Change line 48 ipvar EXTERNAL_NET any to ipvar EXTERNAL_NET!$HOME_NETLine 104 var RULE_PATH ../ruls to var RULE_PATH /etc/snort/rulesLine 105 var SO_RULE_PATH ../so_rules to var SO_RULE_PATH /etc/snort/so_rulesLine 106 var PREPROC_RULE_PATH ../preproc_rules to var PREPROC_RULE_PATH/etc/snort/ preproc_rulesLine 113 var WHITE_LIST_PATH ../rules to var WHITE_LIST_PATH /etc/snort/rulesLine 114 var BLACK_LIST_PATH ../rules to var BLACK_LIST_PATH /etc/snort/rules
● Set the log save path.config logdir:/var/log/snort/
● Configure the output plugin.Snort can write logs from the preprocessor into a database through the database plugin (spo_database.c and spo_database.h), but the configuration below writes alerts into the alert file on the one hand, and the preprocessor output logs into a unified2 format binary file on the other, for use by Barnyard2.Change line 521 to the following:output unified2:filename snort.log,limit 128
Save and exit after making the modifications.Step 6: Create the directory snort_dynamicrules and set permissions.#mkdir -p /usr/local/lib/snort_dynamicrules#chown -R snort:snort /usr/local/lib/snort_dynamicrules#chmod -R 755 /usr/local/lib/snort_dynamicrules
Step 7: Create a shortcut file named Snort in the /usr/sbin/ directory.#cd /usr/sbin#ln -s /usr/local/bin/snort snort
Step 8: Add test rules.#vi /etc/snort/rules/local.rules
Add the following content:alert icmp any any -> $HOME_NET any (msg:”ICMP Packet Detected”;sid:1000003;rev:1;)
Step 9: Test Snort.#snort -T -i eht0 -u snort -g snort -c /etc/snort/snort.conf
If configured correctly, the system displays the following content after starting.pcap DAQ configured to passive.Acquiring network traffic from “eth0”.Set gid to 113Set uid to 109–== Initialization Complete ==–,,_ –> Snort! <-o” )~ Version 2.9.3.1 IPv6 GRE (Build 40)”” By Martin Roesch & The Snort Team: http://www.snort.org/snort/snort-teamCopyright (C) 1998-2012 Sourcefire, Inc., et al.Using libpcap version 1.1.1Using PCRE version: 8.02 2010-03-19Using ZLIB version: 1.2.3.4Rules Engine: SF_SNORT_DETECTION_ENGINE Version 1.16 Preprocessor Object: SF_GTP (IPV6) Version 1.1 Preprocessor Object: SF_SIP (IPV6) Version 1.1 Preprocessor Object: SF_SMTP (IPV6) Version 1.1 Preprocessor Object: SF_IMAP (IPV6) Version 1.0 Preprocessor Object: SF_DNS (IPV6) Version 1.1 Preprocessor Object: SF_REPUTATION (IPV6) Version 1.1 Preprocessor Object: SF_DCERPC2 (IPV6) Version 1.0 Preprocessor Object: SF_MODBUS (IPV6) Version 1.1 Preprocessor Object: SF_SSH (IPV6) Version 1.1 Preprocessor Object: SF_SDF (IPV6) Version 1.1 Preprocessor Object: SF_POP (IPV6) Version 1.0 Preprocessor Object: SF_SSLPP (IPV6) Version 1.1 Preprocessor Object: SF_FTPTELNET (IPV6) Version 1.2 Preprocessor Object: SF_DNP3 (IPV6) Version 1.1 Snort successfully validated the configuration!Snort exiting
With the “Snort successfully validated the configuration!” prompt, it indicates that the installation and configuration were successful.Step 10: Test with the ping command.The purpose of testing with the ping command is to generate alarms. The ping command uses the ICMP protocol, and in IDS the Libpcap function captured packets are also ICMP packets. Operate on the Snort host below:#snort -i eth0 -c /etc/snort/snort.conf -A fast
Simultaneously, log files are recorded in /var/log/snort/alert and /var/log/snort/snort.log. Use the following command to view them.#cd /var/log/snort/#tail -f /var/log/snort/alert
Receiving an alert file means the experiment was successful, the next step is to store these alerts in the database, which is easy to make mistakes in.
Note: If proper paths aren’t set in steps 6 and 7, a fatal error will occur when starting Snort, as it won’t be able to find the dynamic rules file, causing the program to exit unexpectedly.ERROR:parser.c(5047)
Part Three: Storing Snort Alarms in MySQL Database
Storing Snort alarms in the MySQL database requires the following steps.Step 1: Install MySQL database and PHP extension.#yum install -y mysql-server mysql-devel php-mysql php-pear php-gd libtool php-imap php-ldap php-mbstring php-odbc php-pear php-xml php-pecl-apc#chkconfig –level 235 mysqld on //Set MySQL service to be on at run levels 2, 3, and 5#/etc/init.d/mysqld start
Step 2: Assign a password to the database administrator root.#/usr/bin/mysqladmin -u root password ‘123456’
Note, use this password for the root user login on phpMyAdmin.Step 3: Create Snort database and set read permissions.#mysql -u root -p
Enter the password “123456” set in step 2.mysql>create database snort;mysql>use snort;mysql>create user ‘snort’@’localhost’ IDENTIFIED BY ‘123456’;
In the above commands, “123456” is the password for the Snort user in MySQL.Next, create a database user named snort with the password “123456” and grant permissions on the database named “snort” (first extract the barnyard2-1.9.tar.gz package).mysql>grant create,select,update,insert,delete on snort.* to snort@localhost identified by ‘123456’;mysql>set password for ‘snort’@’localhost’=password(‘123456’); //Set access password for user snortmysql>source /usr/local/src/barnyard2-1.9/schemas/create_mysql; //This command cannot be repeatedmysql>show tables;mysql>flush privileges; //Refresh database permissions mysql>exit
Note: First extract the barnyard2-2-1.13 package; ensure the Snort database is selected before executing this; the path to barnyard2-2-1.13 must be correct (use absolute paths).Step 4: Install and configure Barnyard2.Barnyard2’s role is to read the binary event files produced by Snort and store them in MySQL. Snort’s configuration file includes a plugin that allows Snort alerts to be recorded in MySQL, but this makes the system’s data grow rapidly. When the IDS system detects malicious behavior, it will write data into the database using INSERT statements, making updates very slow. Therefore, directly outputting Snort to the database becomes inefficient as data volume increases, making the use of an external proxy like Barnyard2 to output alerts necessary.●Source package installation.#cd /usr/local/src/#tar zxvf barnyard2-1.9.tar.gz#cd barnyard2-1.9/#./configure –with-mysql –with-mysql-libraries=/usr/lib64/mysql //These configuration parameters are critical, do not make mistakes
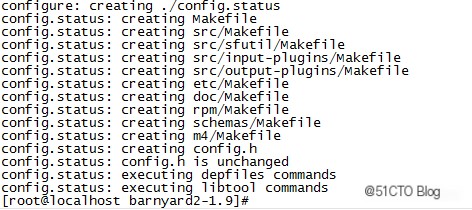
#make //Once the following content is seen, continue installation