

1. Overview
This article provides an overview and analysis of fuzz testing techniques, introducing the structure, principles, and pit file writing methodology of the open-source fuzz testing framework, Peach. The aim is to assist those interested in fuzz testing to quickly get started with Peach. Finally, experiments are conducted using common HTTP protocol and industrial Modbus protocol as examples. At the end of the text, tools and related materials used in this article are collected for download.
2. Fuzz Testing
2.1. Concepts
Fuzz testing (also known as fuzzing) is a type of security testing technique that identifies security vulnerabilities in software by generating malformed input data to induce anomalies such as crashes. This approach is highly regarded among researchers in the field of vulnerability analysis in information security due to its capabilities, including thorough exploration of all input data, comprehensive code coverage, automation of testing processes, and effectiveness in uncovering security issues within software.
Currently, fuzzing technology is one of the most effective methods in the field of software testing and vulnerability discovery. Fuzzing is particularly well-suited for uncovering 0Day vulnerabilities and is a preferred technique among many hackers or black hats for discovering software vulnerabilities. Although fuzzing cannot directly achieve an intrusion effect, it can easily identify software or system vulnerabilities. By using these as a starting point for deeper analysis, finding an intrusion path becomes more manageable. This is why hackers favor fuzzing technology.
2.2 Principle
1. Fuzzing, first and foremost, is an automation technique where software automatically executes relatively random test cases. Due to its reliance on automated execution by computer software, the efficiency of testing is magnitudes higher compared to human execution. For instance, a highly skilled tester might manage a maximum of only dozens of test cases in a day and rarely reach 100. In contrast, a fuzzing tool can effortlessly execute hundreds of test cases in just a few minutes.
2. The essence of fuzzing lies in its use of random functions to generate random test cases. Randomness implies non-repetition and unpredictability, which may lead to unexpected inputs and results.
3. According to the “law of large numbers” in probability theory, as long as we repeat enough times with strong randomness, those rare events with extremely low probability will inevitably occur. Fuzzing is a quintessential application of the law of large numbers — with a sufficient number of test cases and randomness, those deeply hidden and hard-to-detect bugs can become inevitable phenomena.
2.3 Implementation Method
In the fuzzing engine algorithm, there are primarily 2 methods for generating test cases:
1) Based on mutations: Generate new test cases by mutating known data samples.
2) Based on generation: Model and generate test cases according to known protocol or interface specifications.
In general fuzzing tools, both generation strategies are often integrated. The core requirement of mutation-based algorithms is to learn from existing data models, analyze the existing data, and then generate random data to be used as test cases.
2.4 Implementation process
An implementation process for Fuzz testing based on network protocols is as follows:
1. Obtain normal packets of the protocol to be tested
2. Replace certain parts of this packet with mutated data
3. Use a packet sender to transmit the packet to the target application
4. Observe the responses from the target application
Under normal circumstances, a packet sniffer is used to capture packets of data during the typical interaction between a client and the device under test, which serves as the sample of normal data packets. Random data can be altered in various ways. For instance, you could scramble the entire data packet or replace a certain part of it. Regardless of the method used to mutate the data, the key is to insert a substantial amount of random data into the packet, send it to the target application, and then observe the target application’s behavioral response.
2.5 Common fuzzing frameworks
This translation maintains the terminology used in the context of web security and fuzzing. If you have the full content of a WordPress post related to fuzzing frameworks that needs translation, feel free to share it!
When researching network protocol fuzz testing, the two major frameworks, Sulley and Peach, are the most common Fuzz frameworks. Peach, in comparison to Sulley, offers the following advantages:
1. Functionality: Sulley and Peach both accomplish the same functional points. Peach can perform fuzz testing on various protocols and files, whereas Sulley can only test network protocols.
2. From a development perspective: Peach focuses on writing XML files, which are relatively easy to understand, but the rest of it is rarely modifiable. Sulley uses Python code for testing and allows the development of plugins and monitors, making it suitable for in-depth development.
3. Maintenance: Sulley is currently unmaintained, while Peach has comparatively more resources and researchers involved.
4. Installation and Deployment: Sulley’s configuration environment is relatively complex, whereas Peach’s configuration environment is relatively simple.
3. Peach Introduction
3.1 About Peach
Peach, created and developed by Michael Eddington of Deja vu Security, is a fuzz testing framework that adheres to the MIT open-source license. It is the first comprehensive open-source fuzzing tool, featuring process monitoring and fuzzer creation, with the latter implemented using XML language. The primary development of Peach has spanned 7 years, resulting in three main versions. Initially written in Python and released in 2004, the second version was launched in 2007, and Peach 3 was released in early 2013, with the entire framework rewritten in C#.
Peach supports fuzz testing for file formats, ActiveX, network protocols, APIs, etc.; the key to Peach Fuzz is writing the Peach Pit configuration file.
3.2 Installation and Deployment
To use Peach3 on Windows, you need to have Microsoft.NET4 and windbg pre-installed; on Linux and OS X, you need to install the Mono package.
Peach is not open-source software but is free software that follows the MIT license. Like the BSD license, the MIT license imposes no restrictions on the use and modification of Peach.
I’m using the portable version of Windows, in[https://github.com/TideSec/Peach_Fuzzing/](https://github.com/TideSec/Peach_Fuzzing/)The “peach” folder contains the latest collected versions of the peach software package, available in four versions: Windows (x86), Windows (x64), macOS, Linux, and Python. You can download and use them.
3.3 Architecture
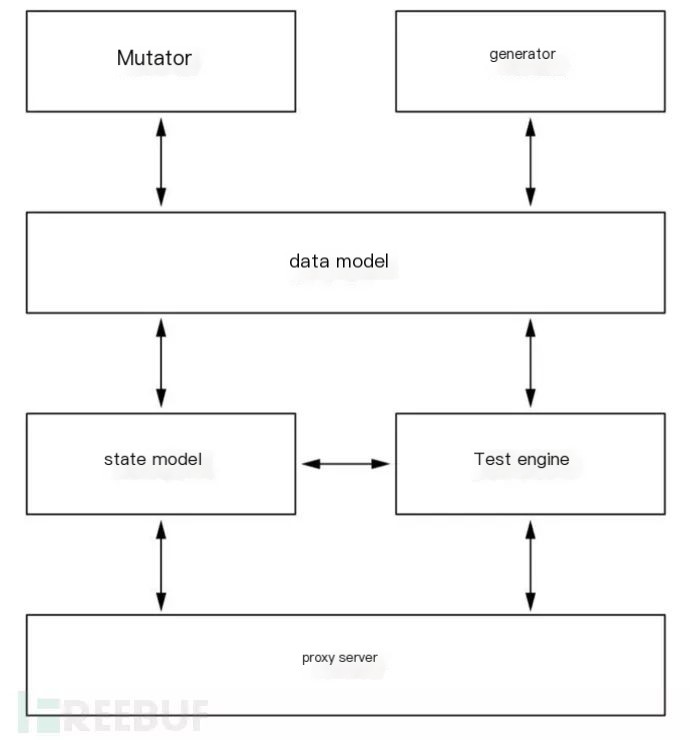
Peach Fuzzer is an open-source fuzz testing framework that includes data models (data types, mutator interfaces, etc.), state models (data model interfaces, states, actions—inputs and outputs, etc.), agents (including local debuggers like WindowsDebugger and network monitors like PcapMonitor, etc.), and test engines (agent interfaces, state model interfaces, publishers, loggers, etc.).
Peach includes the following advanced concepts:
1) Data Model: Used to represent the data structures required for inputs and outputs. Data models can be constructed as needed. Within a data model, users can set data variables and assign them data types, such as string type or integer type. They can also set numerical values for these data variables and specify whether the variable undergoes mutation operations through the mutator’s interface. Additionally, data models can include data blocks, with each data block encompassing multiple data variables. Relationships between data variables can also be established, such as size of type relationships.
2) Mutators: Includes mutation strategies; various data types have different mutation strategies.
3) Generators: The Peach Generator can produce string data and integer values, among other simple data types. It can also generate complex, hierarchical binary data and chain simple data generators together to create more complex data types.
4) State Model: In each test case, based on the state model, Peach initializes the state machine according to user configuration and maintains this finite state machine. Each state includes one or more actions. Within each state, the Peach state machine will execute each action sequentially. Users can set corresponding execution conditions for the actions. If all actions are completed within a state and the system remains in the current state, the execution of this state machine is considered terminated.
5) Proxy: During Peach fuzz testing, the Peach test engine communicates with the Peach proxy to monitor the status of the target being tested and to exert execution control. Users must configure a Peach monitor for the Peach proxy to oversee the state of the program under test and carry out execution controls, such as starting or stopping the target program. Upon completing each test iteration or test sub-case, the Peach proxy will relay any abnormal status information (e.g., crashes) of the target program being monitored by the Peach monitor back to the Peach test engine. If the target program executes normally to completion, it will return a normal termination flag to the Peach test engine.
6) Test Engine: Utilizing the Peach parser, the test engine processes the user-input configuration files, usually in PIT format. Based on these files, the engine creates the necessary components and initializes them, such as setting up state machines within a state model. The Peach test engine then enters the main loop to execute test cases. Within the test engine, the publishers provide a transparent interface for any generator. Common publishers include file publishers and TCP network publishers, acting as transmission forms for the generated data. Users (developers or end users) can connect their generators to various outputs. The logger allows configuration of the log path and filename, and it records the state information during test execution in log files.
3.4 Usage Process
Peach’s test subjects encompass nearly all common fuzzing targets, such as file structures, COM, network protocols, and APIs.
The main steps to perform fuzzing using Peach are as follows:
1. Create Model
2. Select/Configure Publisher
3. Configure Proxy/Monitor
4. Configure Logging
3.5 Command Parameters

-1: Execute the first test.
-a: Start the Peach agent. If "channel" is not specified, it defaults to the local agent (default support, no need for explicit start); "channel" can be specified as "tcp" for a remote agent.
-c: Count the number of test cases.
-t: Validate the correctness of the Peach Pit XML file.
-p: Parallel Fuzz. The total number of machines running Peach is M, and this is the Nth one.
--debug: Toggle debug information.
--skipto: Specify the number of test cases to skip in Fuzzing.
--range: Specify the range of test cases for Fuzzing.
3.6 Pit File Format
Peach refers to the file used for data definition as the Peach pit file. When using Peach, the main task is essentially to define such an XML file that instructs the Peach testing platform on how to perform the tests. The Peach pit file generally always includes the following sections:
<?xml...version, encoding, etc...>
<Peach ...version, author introduction, etc...>
<Include ...external files included/>
<DataModel >Original data structure definition</DataModel>
<StateModel >Test logic, state transition definition, such as what kind of data packet is received and what kind of corresponding data packet is sent</StateModel>
<Agent >Detect exception, crash, etc.</Agent>
<Test >Specify the state, agent, publisher, etc. to be used</Test>
<Run >Fuzzer execution entry point</Run>
</Peach>- 1) The entire file is enclosed within a large tag.
- 2) The second-level tags in the document include Include, DataModel, StateModel, Agent, Test, and Run, totaling 6 types.
- 3) Include the external files, among which defaults.xml and PeachTypes.xml are essential. They contain Peach’s basic methods, classes, data types, etc.
- 4) The DataModel is used to define data structures, and under this tag, there can be multiple levels and various sub-tags. By using these sub-tags, it is relatively easy to define data types, sizes, the relationships between different data blocks, and CRC validation, among others. You can also define multiple DataModels, which can have relationships between each other or none at all.
- 5) The StateModel is used to define the test logic and essentially acts as a finite state machine. It includes subordinate tags like State, where each State can contain several Action tags. The State represents a specific condition, and transitions between different States can occur based on certain conditional judgments. The Action is used to execute commands such as opening files or sending data packets.
- 6) The primary function of an Agent is to monitor the response of the target under test, such as crashes, etc.
- 7) Test This tag domain is relatively straightforward; it generally just specifies which Agent to use, which StateModel, which method to send data, and sometimes designates what method to use for processing (mutating) data.
- 8)Run This tag domain is also relatively simple, specifying which Test to use for the current Fuzz test.
3.7 Include configuration
The `Include` element permits the incorporation of other pit files into the namespace of the current pit file. When referencing the included pit file, it’s done using the namespace prefix and colon format. The format is: `name:DataModel`, as demonstrated below:

Attributes:
Ns—-Required. Namespace prefix.
Src—-Required. Source URL, using the “file:” prefix to denote the filename.
3.8 DataModel Configuration
The Peach Pit document contains at least one DataModel element. The data described by DataModel includes type information, relationship information (size, count, offset), and other information that enables the fuzzer to perform intelligent mutations. DataModel is one of the child elements of the Peach root element and defines the structure of data blocks by adding child elements such as Number, Blob, or String.
Attributes
Name—- Required. A friendly DataModel name is extremely useful when referencing a model or during debugging.
Ref—- Optional. Refers to a DataModel template.
Mutable—- Optional, defaults to true. Indicates whether the element is mutable.
Constraint—- Optional. Defines an expression that helps Peach ascertain if the data element has been appropriately consumed.
Subelement
Block、Choice、Custom、Flag、Flags、Number、Padding、String、XmlAttribute、XmlElement、Relation、Fixup、Transformer、Placement
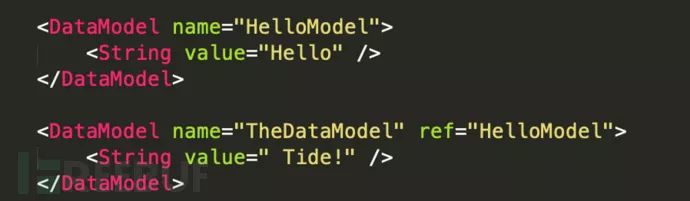
A DataModel named “HelloTide” includes a string and outputs “Hello Tide!” as shown below:

A DataModel can reference other DataModels and can inherit child elements with the ref attribute, as shown below:
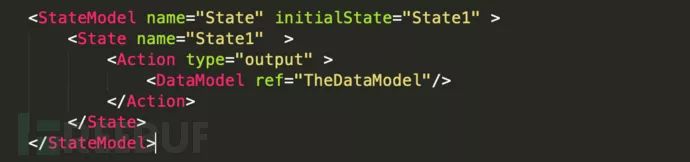
3.9 StateModel Configuration
StateModel recreates the essential state machine logic necessary to test a protocol. It defines how to send and receive data to and from the target. The complexity of StateModel ranges from very simple to extremely complex. It is advisable to keep the state model simple at the outset and expand it as needed.
StateModel includes a sub-element called state, which encapsulates a logical unit working for Peach to implement a larger state model. The state is composed of actions, and each action can perform tasks related to how the logic of a single state is encapsulated.
The Action element can perform various operations within a StateModel. An Action is the primary way to send commands to a Publisher; it can send output, receive input, or establish a connection. Additionally, an Action can transition to other states within the StateModel, transfer data between DataModels, or invoke methods defined by the proxy.
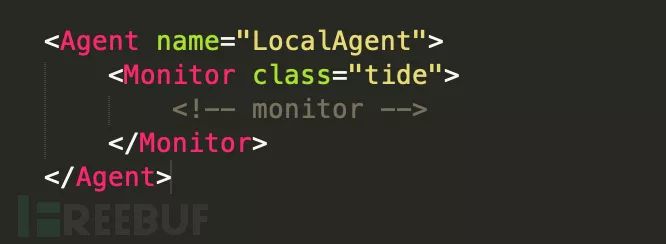
3.11 Agent Configuration
Agents are specialized Peach processes that can run locally or remotely. These processes have one or more monitors, which can perform tasks such as loading debuggers, monitoring memory consumption, or detecting errors. Monitors within the agents can gather information and perform actions on behalf of the fuzzer.
Commonly used proxies include: local proxy, TCP remote proxy, ZeroMQ, and REST Json proxy, with the first two used more frequently.
Local Proxy
The Peach runtime supports a local agent running within the process. If not specified, this is a default agent type. To configure a local agent, follow these steps:
TCP Remote Proxy
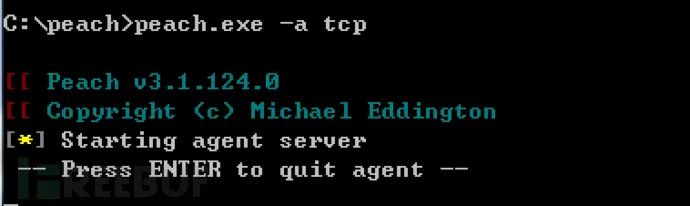
This proxy resides in a separate process on either a local or remote machine and completes connections remotely via TCP. It is a form of RPC (Remote Procedure Call) supported by the local runtime environment. To use the remote proxy, the proxy process must first be initiated.
Proxy Configuration

Running on a remote hostpeach.exe -a tcp

2.12 Monitor Configuration
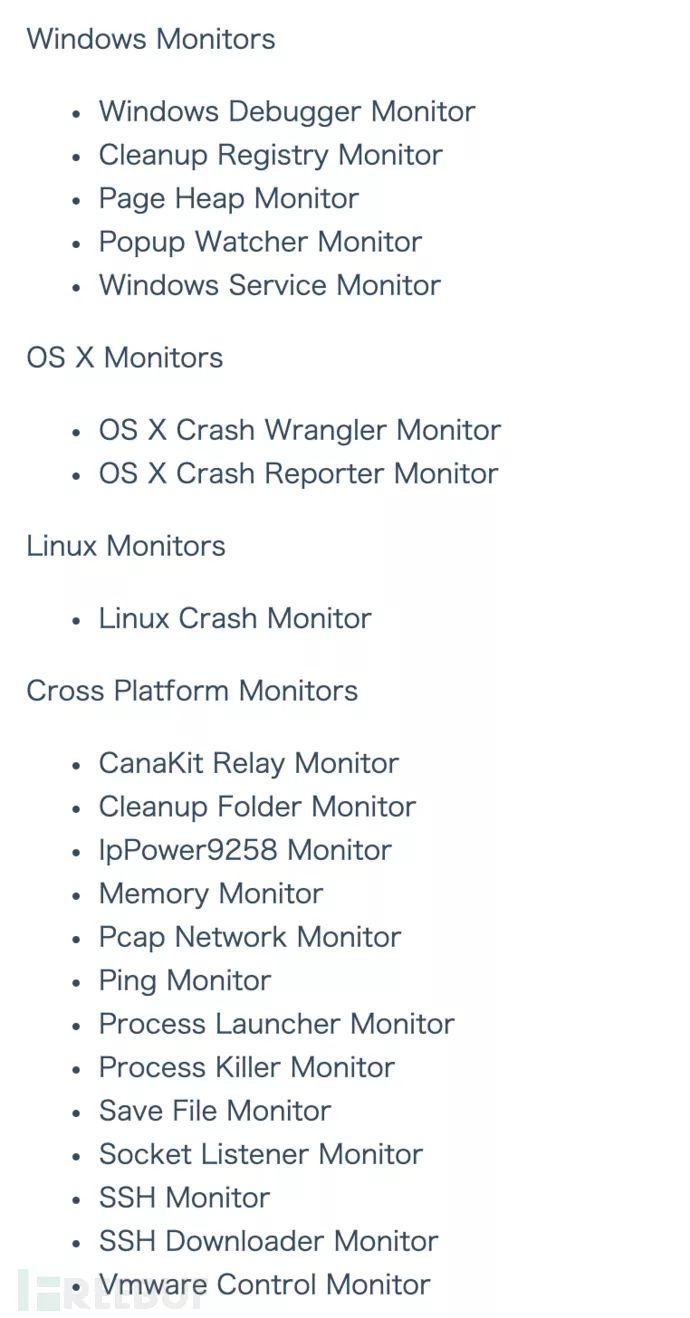
The Monitor primarily includes the following types of monitors: Windows monitors, OSX monitors, Linux monitors, and cross-platform monitors, with each platform offering a variety of different monitors.
The Windows monitors include: Windows Debugger Monitor, cleanup registry monitor, pageheap monitor, PopupWatcher monitor, windowsService monitor, and others.
The OSX monitors include: CrashWrangler Monitor and CrashReporter Monitor
Linux monitors include: LinuxCrash
Cross-platform monitors include: CanaKit relay monitor, Cleanup Folder monitor, IpPower9258 monitor, memory monitor, Pcap monitor, Ping monitor, process monitor, Processkiller monitor, save file monitor, socket monitor, SSH monitor, SSH downloader monitor, VMware monitor, etc.
The official documentation is as follows:
Let’s use a few common examples for reference.
Windows Debugger Monitor
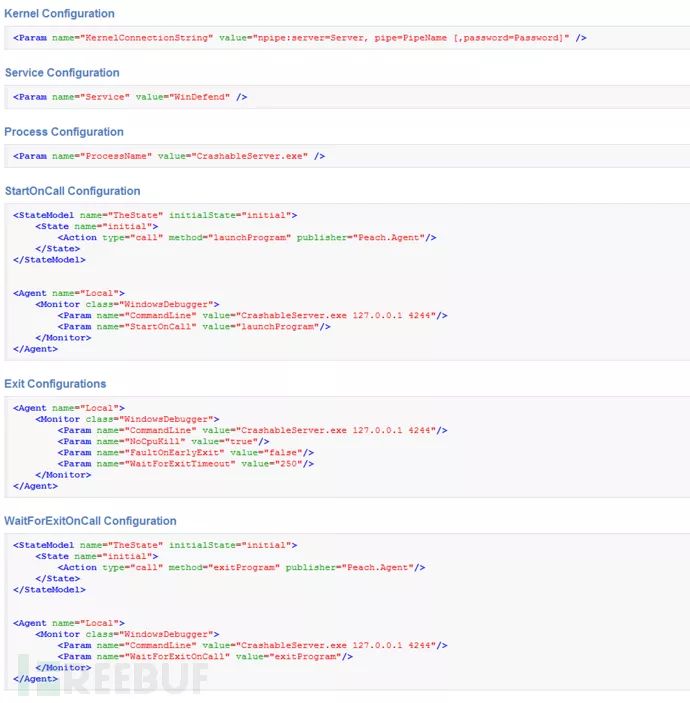
WindowsDebugger Monitor controls a Windows debugging handle. It primarily serves the following purposes: process debugging, service debugging, and kernel debugging.
Required parameters
Commandline---Window names separated by commas. Processname---Triggers an error when a window is found, default is false. Kernelconnectionstring---Connection string for kernel debugging. Service---Name of the Windows service to be mounted. If it stops or crashes, the service will be restarted.Optional Parameters
Symbolspath--- The path or service for symbol tables. Default: "SRV*http://msdl.microsoft.com/download/symbols" Windbgpath--- The installation path of WinDbg. Preferably local. Noncrystalline--- The debugger will not be attached until the match from the state model is completed. Ignorefirstchanceguardpage--- Ignore the first-chance guard page errors. These are sometimes false positives or anti-debugging errors. Default is false. Ignoresecondchanceguardpage--- Ignore second-chance guard page errors. These are sometimes false positives or anti-debugging errors. Default is false. Nocpukill--- Do not preemptively terminate processes based on CPU usage. Default is false. Faultonearlyexit--- Trigger an error if the process terminates early. Default is false. Waitforexitoncall--- Wait for the process to exit if the interval is reached during a state model call, along with any parameter faults. Waitforexittimeout--- Timeout value for waiting for process exit, measured in microseconds. (-1 is infinite) Default is 10000. Restaroneachtest--- Restart the process for each iteration. Default is false.
Other Parameter Examples
CrashWrangler Monitor
The CrashWangler monitor will initiate a process and monitor crashes of interest. This monitor utilizes Apple’s built-in CrashWrangler tool, which can be downloaded from the developer website. To ensure this tool functions correctly, it must be compiled on each machine.
It appears you’re requesting a translation for a WordPress post, but you’ve provided insufficient context or text for translation. Please provide the specific text content from the WordPress post that you need translated, and I will help you with it.
Command---The command to execute. Arguments---Command line arguments, optional; none by default. StartOnCall---Start command for the state model invocation. Optional, none by default. UseDebugMalloc---Use OSX Debug Malloc (slower), optional; defaults to false. ExecHandler---Crash Wrangler execution handler, optional; defaults to exc_handler. ExploitableReads---Are read a/v considered exploitable? Optional, defaults to false. NoCpuKill---Disable process termination based on CPU usage. Optional, defaults to false. CwLogFile---CrashWrangler log file. Optional, defaults to cw.log. CwLockFile---CrashWrangler lock file, optional; defaults to cw.lock. CwPidFile---CrashWrangler PID file, optional; defaults to cw.pid.
LinuxCrash Monitor
The LinuxCrash monitor uses a script to capture erroneous processes, and this script is embedded within the kernel.
Parameters:
Executable --- The target executable program, used to filter crashes, optional, defaults to all. LogFolder --- The folder where the log files are located. Optional, defaults to "/var/peachcrash". Mono --- The full path to the mono executable = the runtime required by the program. Optional, defaults to "/usr/bin/mono"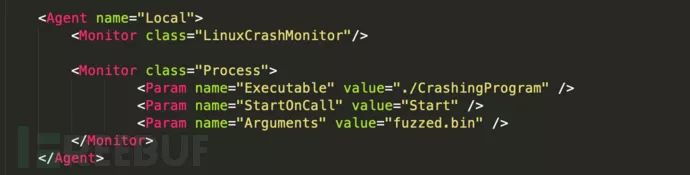
3.13 Test Configuration
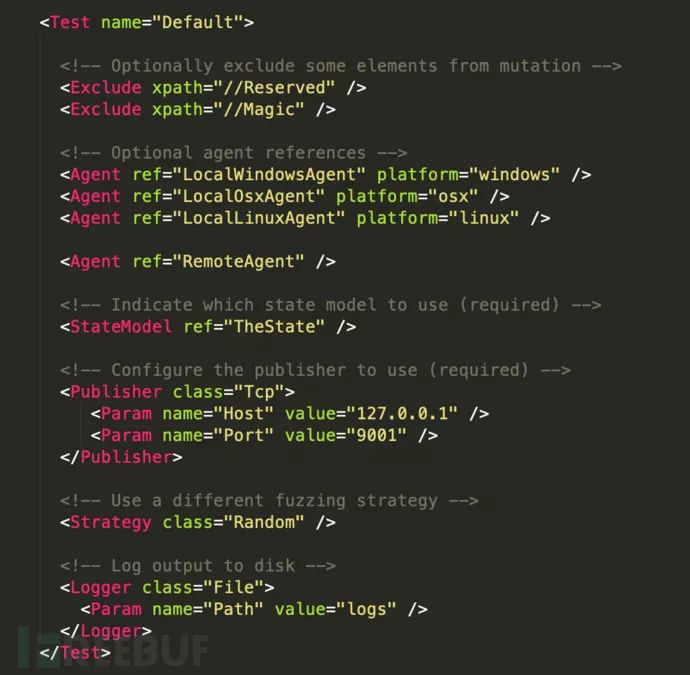
Specify which Agent and StateModel to use, as well as the method the Publisher uses to send data and the method for mutating data. Indicate the path for the log file, etc. There can be multiple Tests, and when in use, specify the Test name to run through the peach command line. If not specified, the default Test named “Default” will be executed. As shown in the following image:
Attributes:
Agent (Optional)
StateModel (Required)
Publisher (Required)
Include (Optional)
Exclude (Optional)
Strategy (Optional)
Logger (Optional, Recommended)
Valid child elements:
Agent (Optional)
StateModel (Required)
Publisher (Required)
Include (Optional)
Exclude (Optional)
Strategy (Optional)
Logger (Optional, Recommended)
I’m here to help with translating WordPress posts! Please provide the content of the post you would like to translate, and I’ll help translate the text while preserving the HTML structure.
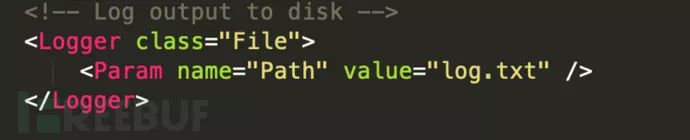
3.14 Loggers Configuration
Peach has a scalable record system that allows users to store the records they want. By default, Peach uses a standalone file system logger.
3.15 Strategy Configuration
Strategy (Mutation Strategies) includes:
Random: By default, it randomly selects up to 6 elements (this can be adjusted using the parameter MaxFieldsToMutate) to mutate using a random mutator.
Sequential: Peach will apply all available Mutators to each element in sequence.
RandomDeterministic: Default Peach rules. This rule applies relatively random (determined by the number of elements in the list) sequence obfuscation to the Iterations list generated by Mutators in the pit XML file. Consequently, the number of test cases generated each time an XML file is executed and their order remain consistent, ensuring the precision of skipto functionality.
Peach3 includes elements for addition, deletion, alteration, swapping, experience values, and mutators such as bitwise and two-byte operations.
Fuzz testing
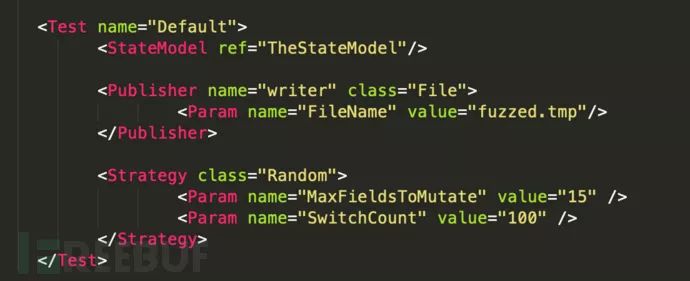
Based on the aforementioned pit parameters, I created a HelloTide example to understand the basic parameter configuration and structure of a pit file.
The PIT file for HelloTide has been uploaded to GitHub:[https://github.com/TideSec/Peach_Fuzzing/blob/master/pit-xml-samples/HelloTide.xml](https://github.com/TideSec/Peach_Fuzzing/blob/master/pit-xml-samples/HelloTide.xml)
<?xml version="1.0" encoding="utf-8"?><Peach xmlns="http://peachfuzzer.com/2012/Peach" xmlns:xsi="http://www.w3.org/2001/XMLSchema-instance"
xsi:schemaLocation="http://peachfuzzer.com/2012/Peach ../peach.xsd">
<DataModel name="TheDataModel">
<String value="Hello Tide!" />
</DataModel>
<StateModel name="State" initialState="State1" >
<State name="State1" >
<Action type="output" >
<DataModel ref="TheDataModel"/>
</Action>
</State>
</StateModel>
<Test name="Default">
<StateModel ref="State"/>
<Publisher class="Console" />
<Logger class="File">
<Param name="Path" value="log.txt" />
</Logger>
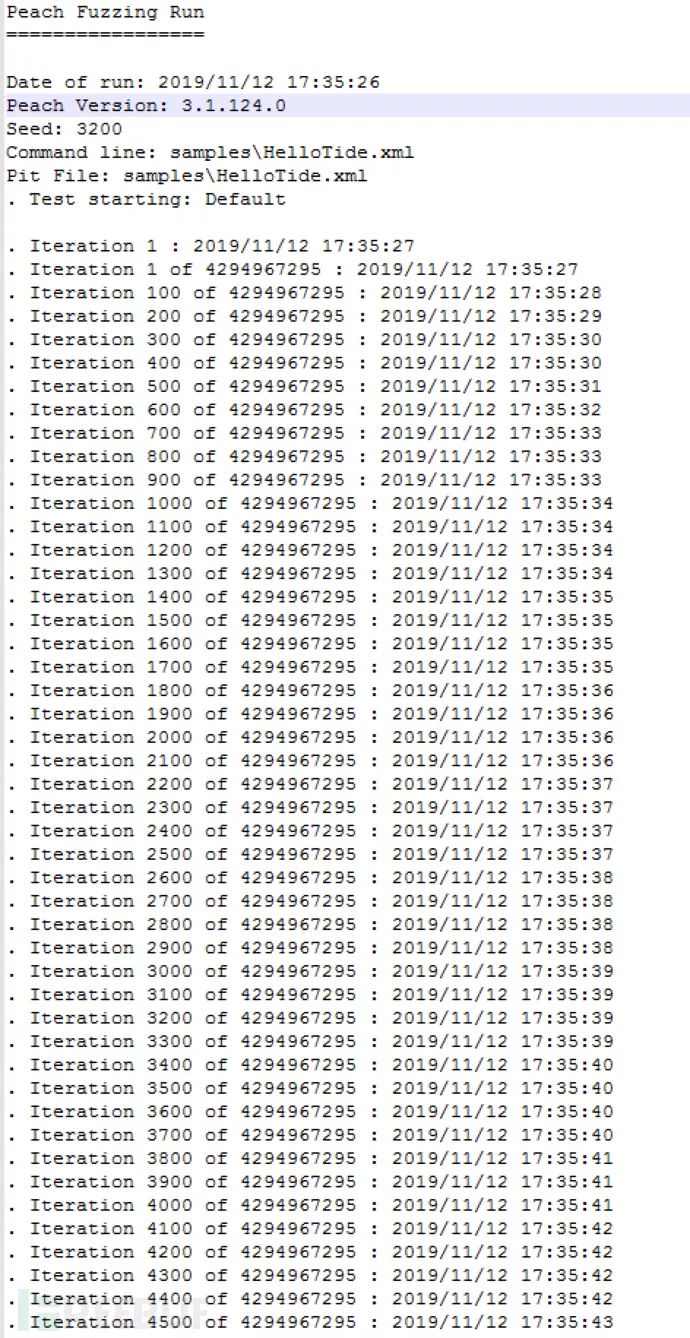
</Test></Peach>Run in cmdpeach.exe samples\HelloTide.xml, after execution, Peach will use this original string as a template to mutate and produce multiple malformed data outputs, including overly long strings, illegally terminated strings lacking NULL terminators, formatted strings, and others that might cause program errors, and then print them sequential
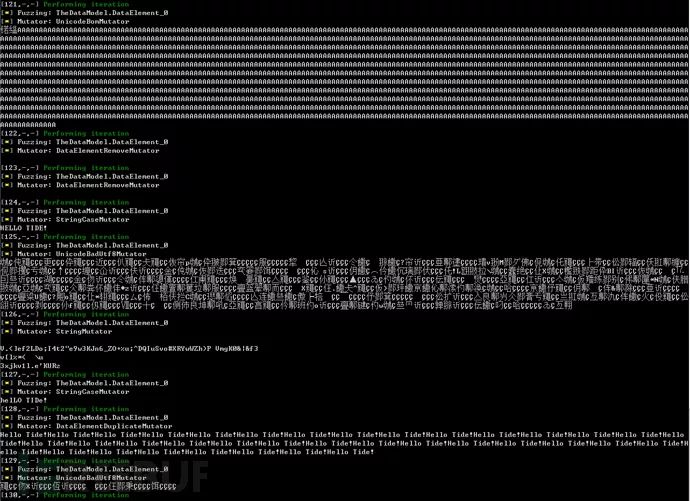
Log records are as follows.
Peach Application – HTTP Protocol Fuzz Testing
Some Peach tutorials focus on fuzzing images or audio-visual files, and as a web developer, I’m more familiar with the HTTP protocol. Therefore, I attempted to conduct Peach fuzz testing on HTTP.
Test Objective
This test primarily focuses on evaluating the robustness of the HTTP protocol. By customizing the Peach pit file, we aim to assess whether fuzz testing of the HTTP protocol can lead to non-responsiveness or other anomalies in the HTTP service.
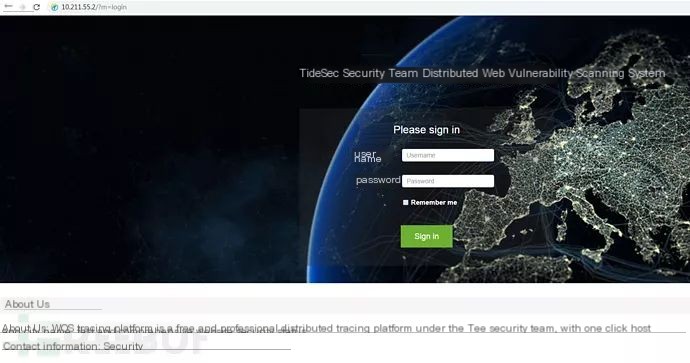
The chosen target is a previously written scanner login interface.[https://github.com/TideSec/WDScanner](https://github.com/TideSec/WDScanner), using phpstudy to set up. Since the main goal is to test the HTTP protocol, any web application will suffice.
Analyze Protocol
Since we’re dealing with the protocol fuzzing, the first thing we need to do is to understand the communication protocol between the client and the server. Simply downloading software capable of capturing packets at the application layer will meet our needs. In this case, I’m using Wireshark.
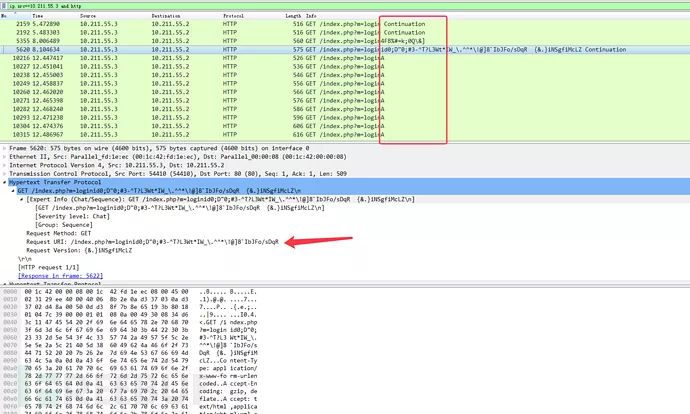
Capture Login Packet:
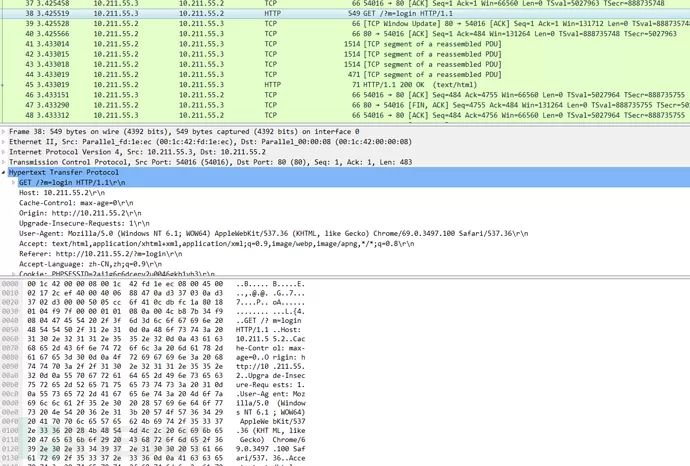
HTTP request packet

Custom PIT File
For the HTTP protocol, improve the PIT file.httpfuzz.xml
The pit file for HTTPFuzz has been uploaded to GitHub:[https://github.com/TideSec/Peach_Fuzzing/blob/master/pit-xml-samples/httpfuzz.xml](https://github.com/TideSec/Peach_Fuzzing/blob/master/pit-xml-samples/httpfuzz.xml)
<?xml version="1.0" encoding="utf-8"?><Peach xmlns="http://peachfuzzer.com/2012/Peach" xmlns:xsi="http://www.w3.org/2001/XMLSchema-instance"
    xsi:schemaLocation="http://peachfuzzer.com/2012/Peach ../peach.xsd">

    <DataModel name="DataLogin">
        <String value="GET /index.php?m=login" mutable="false" token="true"/>
        <String value=" HTTP/1.1" />  <!-- Without mutable="false" it means that the value is to be fuzzed -->
        <String value="\r\n" />

        <String value="Content-Type: " mutable="false" token="true"/>
        <String value="application/x-www-form-urlencoded" mutable="false" token="true"/>
        <String value="\r\n" mutable="false" token="true"/>

        <String value="Accept-Encoding: " mutable="false" token="true"/>
        <String value="gzip, deflate" mutable="false" token="true"/>
        <String value="\r\n" mutable="false" token="true"/>

        <String value="Accept: " mutable="false" token="true"/>
        <String value="text/html,application/xhtml+xml,application/xml;q=0.9,image/webp,image/apng,*/*;q=0.8,application/signed-exchange;v=b3" mutable="false" token="true"/>
        <String value="\r\n" mutable="false" token="true"/>

        <String value="User-Agent: " mutable="false" token="true"/>
        <String value="Mozilla/5.0 (Windows NT 6.1; Win64; x64) AppleWebKit/537.36 (KHTML, like Gecko) Chrome/75.0.3770.100 Safari/537.36" mutable="false" token="true"/>
        <String value="\r\n" mutable="false" token="true"/>

        <String value="Host: 10.211.55.2" mutable="false" token="true"/>
        <String value="\r\n" mutable="false" token="true"/>

        <String value="Conection: " mutable="false" token="true"/>
        <String value="Keep-Alive" mutable="false" token="true"/>
        <String value="\r\n" mutable="false" token="true"/>

    </DataModel>


    <StateModel name="StateLogin" initialState="Initial">
        <State name="Initial">
            <Action type="output">
                <DataModel ref="DataLogin"/>
            </Action>
        </State>
    </StateModel>


    <Test name="Default">

        <StateModel ref="StateLogin"/>
        <Publisher class="TcpClient">
            <Param name="Host" value="10.211.55.2"/>
            <Param name="Port" value="80"/>
        </Publisher>

        <Logger class="File">
            <Param name="Path" value="C:\peach\logs"/>
        </Logger>

        <Strategy class="Sequential" />

    </Test>   </Peach>
In the pit file, regarding numerical valuesHTTP/1.1and\r\nExecuting fuzz testing with the fuzzing strategy set to Sequential.
Execute Test
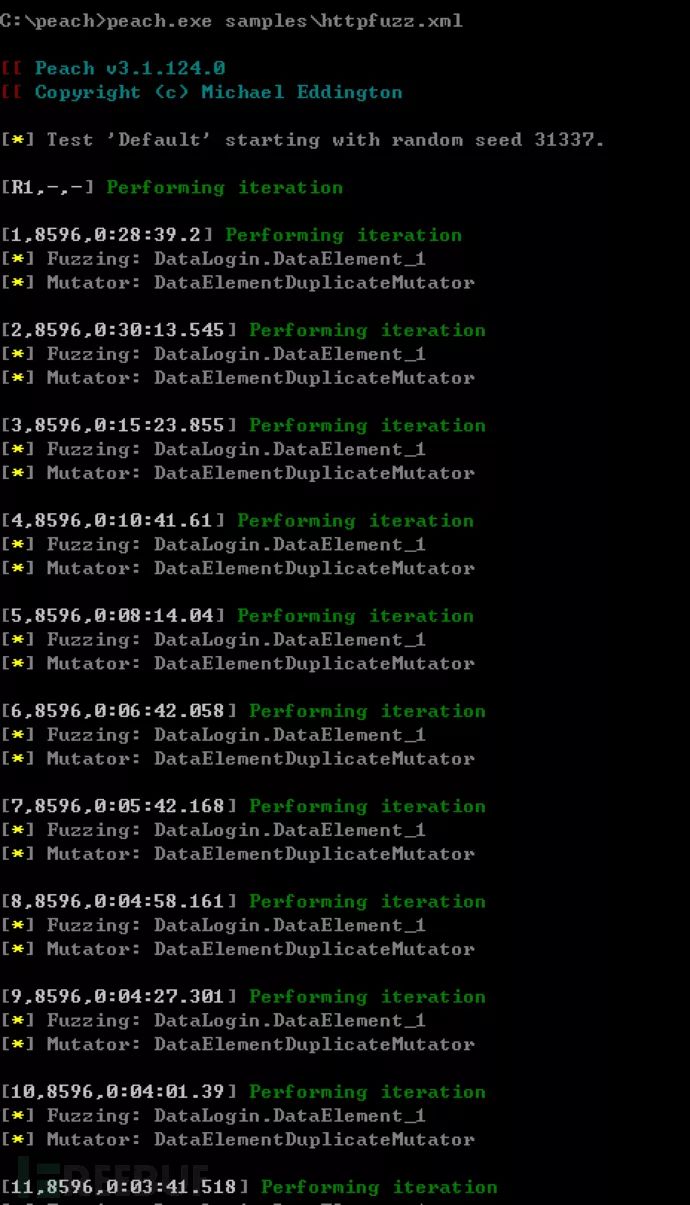
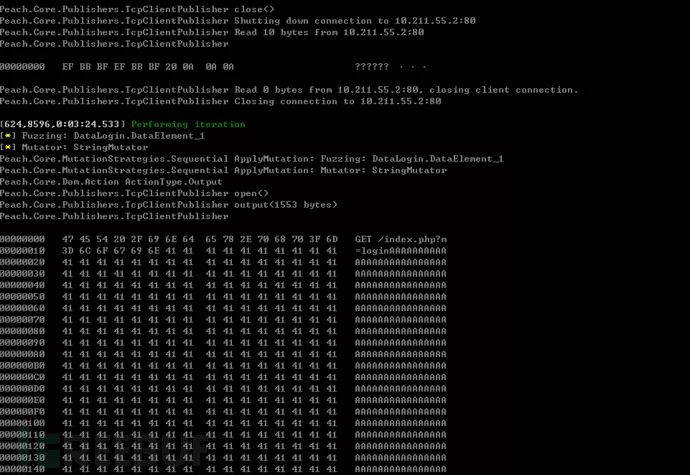
Execute in cmd:peach.exe samples\httpfuzz.xml
Test Results
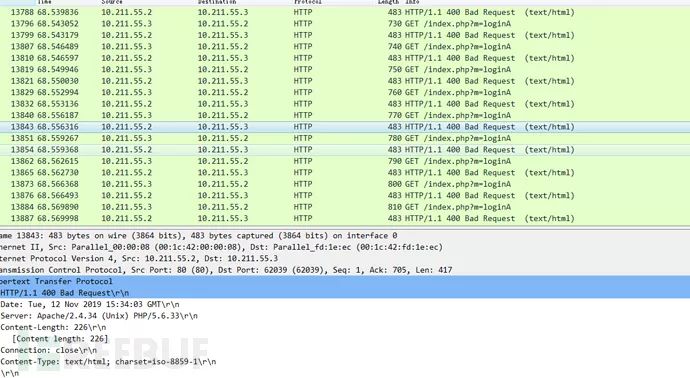
In Wireshark, you can see the packets being sent; Peach automatically handlesHTTP/1.1and\r\nGenerated a large amount of fuzz data.
When in use, you can also add parameters to peach.-debugEnable debug mode to directly view the transmitted data packets.
The wisdom of others
In reviewing various materials, I found that my above implementation is relatively straightforward and crude. I discovered a more elegant solution for implementing HTTP fuzz in a Pit file online.
The `pit` file for `httpfuzz1` has been uploaded to GitHub.[https://github.com/TideSec/Peach_Fuzzing/blob/master/pit-xml-samples/httpfuzz1.xml](https://github.com/TideSec/Peach_Fuzzing/blob/master/pit-xml-samples/httpfuzz1.xml)
<?xml version="1.0" encoding="utf-8"?><Peach xmlns="http://peachfuzzer.com/2012/Peach" xmlns:xsi="http://www.w3.org/2001/XMLSchema-instance" xsi:schemaLocation="http://peachfuzzer.com/2012/Peach /peach/peach.xsd"><DataModel name="Headermodel">
    <String name="Header" />
    <String value=": "/>
    <String name="Value" />
    <String value="\r\n" /> </DataModel><DataModel name="HttpRequest">
    <Block name= "RequestLine">
        <String name="Method"/>
        <String value=" "/>
        <String name="RequestUri"/>
        <String value=" "/>
        <String name="HttpVersion"/>
        <String value="\r\n"/>
    </Block>

    <Block name="HeaderHost" ref="Headermodel">
        <String name="Header" value="Host" />
    </Block>

    <Block name="HeaderContentLength" ref="Headermodel">
        <String name="Header" value="Content-Length" />
        <String name="Value">
            <Relation type="size" of="httpBody.content"/>
        </String>
    </Block>

    <Block name="httpBody">
        <String name="content" value="length is 12" />
    </Block> </DataModel>


 <Data name="HttpGet" >
    <Field name="RequestLine.Method" value="GET"/>
    <Field name="RequestLine.RequestUri" value="http://10.211.55.2" />
    <Field name="RequestLine.HttpVersion" value="HTTP/1.1"/>
    <Field name="HeaderHost.Value" value="http://10.211.55.2"/>
    <Field name="httpBody.content" value="\r\nfuzz"/>
 </Data>

 <Data name="HttpOptions" ref="HttpGet">
    <Field name="RequestLine.Method" value="OPTIONS"/>
    <Field name="RequestLine.RequestUri" value="*" />
    <Field name="HeaderHost.Value" value="" />
 </Data>

 <StateModel name="State1" initialState="Initial">
    <State name="Initial">
        <Action type="output">
            <DataModel ref="HttpRequest"/>
            <Data ref="HttpGet"/>
        </Action>
    </State> </StateModel> <StateModel name="State2" initialState="Initial">
    <State name="Initial">
        <Action type="output">
            <DataModel ref="HttpRequest" />
            <Data ref="HttpOptions" />
        </Action>
    </State> </StateModel><Test name="Default">
        <StateModel ref="State1"/>

        <Publisher class="TcpClient">
                <Param name="Host" value="10.211.55.2" />
                <Param name="Port" value="80" />
        </Publisher>
        <Logger class="File">
            <Param name="Path" value="C:\peach\logs"/>
        </Logger></Test></Peach>
The effect is similar to the above, with more noticeable data distortion. You can try it out yourself.
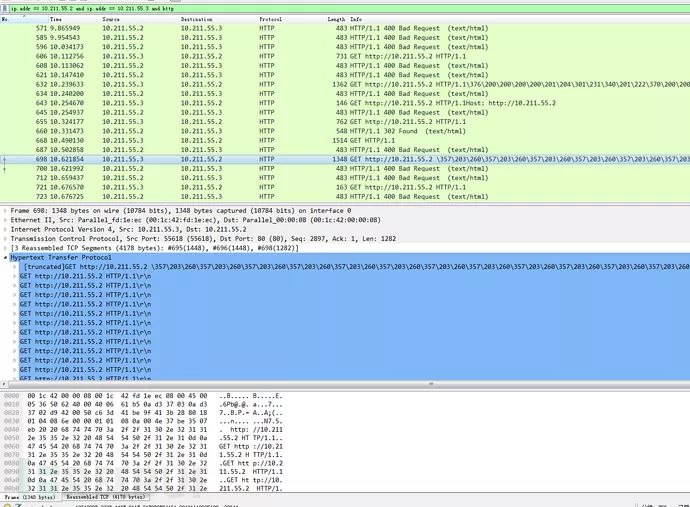
Test Conclusion
Unfortunately, after running for quite a while, no malformed data was found that could cause the HTTP service to crash, and the returned packets were mostly 400 errors.
Peach Application—Fuzz Testing for Industrial Control Protocols
I express my heartfelt gratitude for the reference materials on fuzz testing of the Modbus protocol obtained from the course content provided by several industrial control experts from the Beacon Laboratory at the World Information Security Conference in October 2019!
Another member of our Tide Security team has also written an article on industrial control system fuzz testing, which can also be referenced.[https://mp.weixin.qq.com/s/h9JWw1lZpfCmlQYZbBJIYA](https://mp.weixin.qq.com/s/h9JWw1lZpfCmlQYZbBJIYA)
In the realm of industrial control protocols, Modbus is one of the most common. There is already ample information available about the Modbus protocol, so I won’t reiterate it here. Those who are not very familiar with it can refer to existing resources.[https://www.cnblogs.com/luomingui/archive/2013/06/14/Modbus.html](https://www.cnblogs.com/luomingui/archive/2013/06/14/Modbus.html)。
After gaining a certain understanding of the Modbus protocol, we begin to perform fuzz testing on the Modbus protocol.
Set up the environment
In theory, one should use actual industrial control PLC devices for testing because simulation software cannot handle these malformed Modbus protocols. Real devices might crash if they cannot respond to the requests. However, due to a lack of funds and equipment on hand, I am still left with using a simulator.
Modbus Simulation Software + Collection Software Download:[https://github.com/TideSec/Peach_Fuzzing](https://github.com/TideSec/Peach_Fuzzing)
On a virtual machine, launch the Modbus simulation software to emulate a Modbus service (relevant software is available for download at the end of the document).
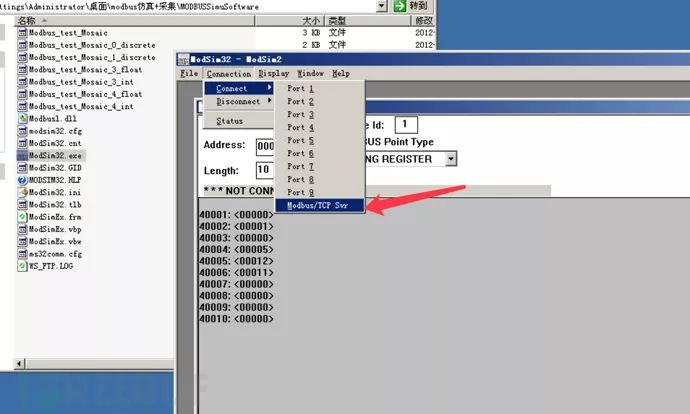
Open the scraper on your own computer.
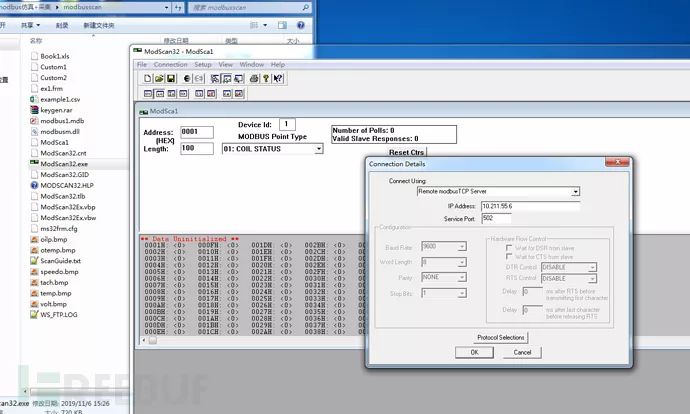
Analyze data
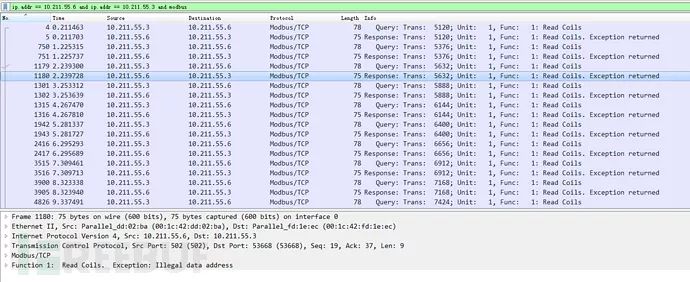
When the collector connects to the simulator, Modbus protocol data can be captured using Wireshark.
Right-click on any Modbus protocol packet and copy the hex stream.
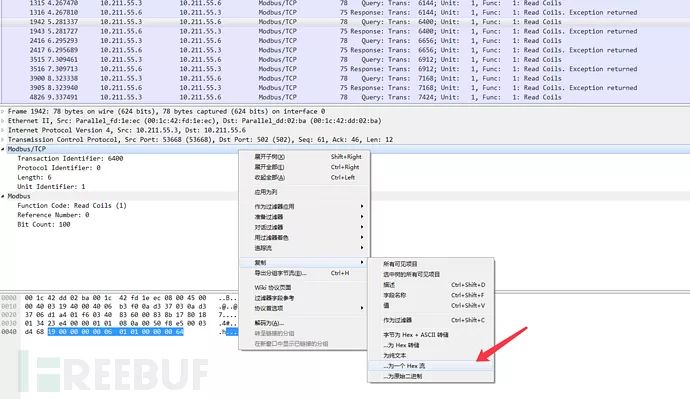
The exported data is190000000006010100000064This is also the message format for the Modbus protocol.
Configuring pit
The PIT file for Modbus fuzz has been uploaded to GitHub:[https://github.com/TideSec/Peach_Fuzzing/blob/master/pit-xml-samples/modbus.xml](https://github.com/TideSec/Peach_Fuzzing/blob/master/pit-xml-samples/modbus.xml)
<?xml version="1.0" encoding="utf-8"?><Peach xmlns="http://peachfuzzer.com/2012/Peach" xmlns:xsi="http://www.w3.org/2001/XMLSchema-instance"
 xsi:schemaLocation="http://peachfuzzer.com/2012/Peach ../peach.xsd">

 <DataModel name="send_data">
  <Block name="mod">
   <Number name="01" size="16" value="19 00" valueType="hex" signed="false" mutable="false"/>
   <Number name="02" size="16" value="00 00" valueType="hex" signed="false" mutable="false"/>
   <Number name="03" size="16" value="00 06" valueType="hex" signed="false" mutable="false"/>
   <Number name="04" size="16" value="01 01" valueType="hex" signed="false"/>  <!-- Without mutable="false" it means that the value is to be fuzzed -->
   <Number name="05" size="16" value="00 00" valueType="hex" signed="false"/>
   <Number name="06" size="16" value="00 64" valueType="hex" signed="false"/>
  </Block>
 </DataModel>

 <StateModel name="TheState" initialState="initialState">
   <State name="initialState">
    <Action type="output">
      <DataModel ref="send_data" />
    </Action>
  </State>
 </StateModel>

<!--Use socket to listen on port -->
 <Agent name="Local">
  <Monitor class="Socket">
   <Param name="Host" value="10.211.55.6" />
   <Param name="port" value="502" />
  </Monitor>
 </Agent>

 <!--log保存-->
 <Test name="Default">
  <Agent ref="Local" />
  <StateModel ref="TheState" />
  <Logger class="File">
   <Param name="Path" value="C:\peach\logs" />
  </Logger>

  <Publisher class="tcp.Tcp">
   <Param name="Host" value="10.211.55.6" />
   <Param name="Port" value="502" />
  </Publisher>

 </Test></Peach>
Executing the test
Execute in the CMD.peach.exe -debug samples\modbus.xmlutilized debug mode.
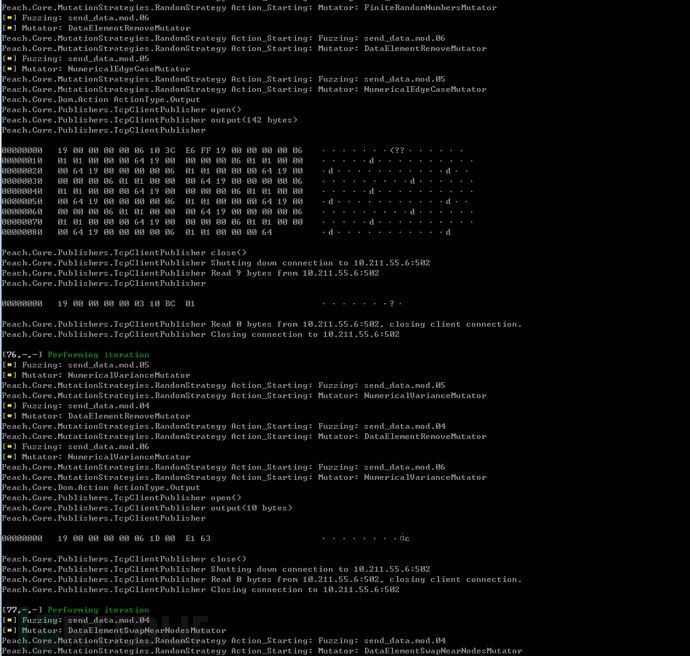
View data
Capture packets in Wireshark and notice a lot of malformed data.
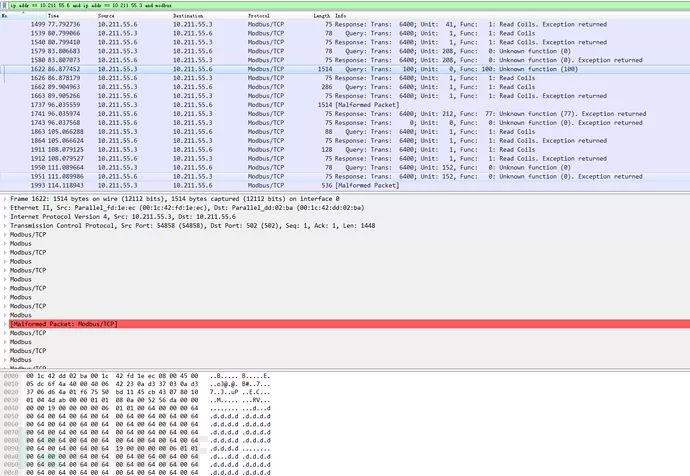
Because the PIT file specifies that only the last three sets of data are fuzzed, the first 12 bits remain unchanged.
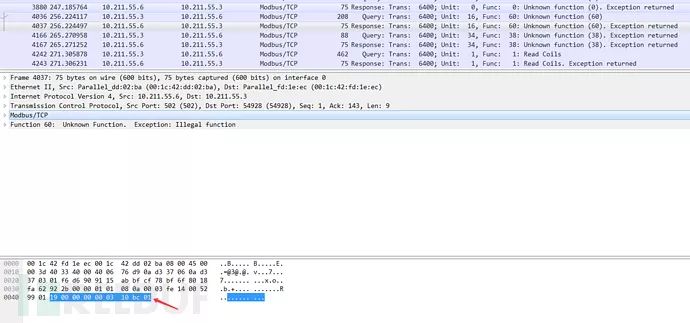
Fuzzing Data for Specific Function Codes

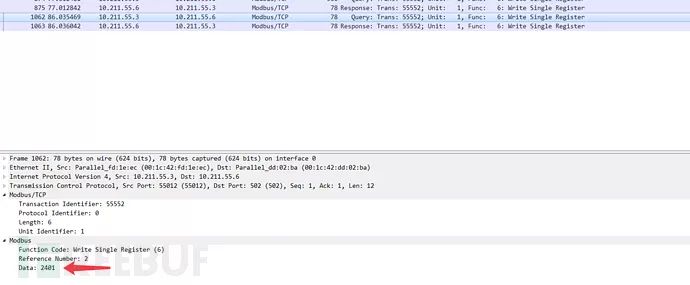
Server-side modified data
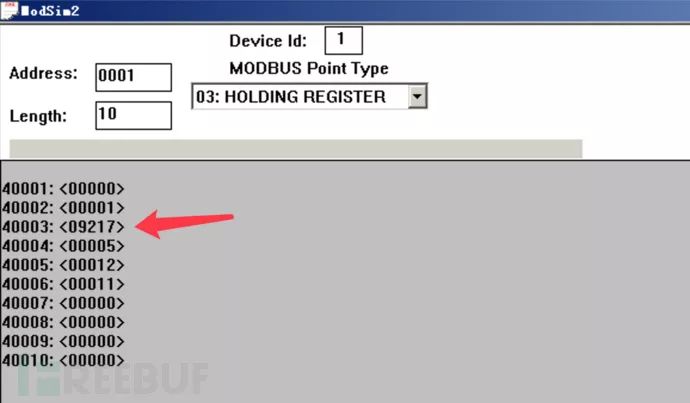
The hexadecimal value 2401 converts to decimal as 9217.
Test Conclusion
Because the emulator can only accept fixed protocol formats and data types, it cannot respond to malformed protocols and data. Therefore, we couldn’t identify any Modbus protocol implementation vulnerabilities in the “device.” However, during fuzz testing with certain function codes, we occasionally managed to successfully alter the server’s data.
To enhance testing efficiency, when assessing protocol security, we can focus on testing the specific fields of interest with particular significance, rather than testing every single field. This approach helps avoid unnecessary work, allowing us to complete the most effective testing within a limited time frame.
Summarize
Peach fuzz testing can be used for security testing of files, ActiveX controls, network protocols, and more to identify format errors or application logic errors caused by malformed input data. However, this requires a deep familiarity with the protocol being tested, as well as an understanding of its file format or message specifications to write an accurate and efficient Peach pit file.
Writing PIT files requires a great deal of patience and meticulous attention to detail. Initially, the failure rate is extremely high, and the reasons can be elusive. If it weren’t for writing this article, I might have given up on Peach many times. It’s not well-suited for someone like me who only knows how to use AhD’s web scripts. Perhaps it’s best to just give up…
Finally, I have compiled all the software and literature resources mentioned in this post and uploaded them to GitHub. Here’s the link:[https://github.com/TideSec/Peach_Fuzzing](https://github.com/TideSec/Peach_Fuzzing)