This article is excerpted from “Guide to Domain Penetration and Defense”
NTLM (New Technology LAN Manager) authentication protocol is one of the main protocols Microsoft employs for Windows authentication. Early SMB protocols transmitted passwords in plain text over the network, leading to security issues. As a result, the LM (LAN Manager) authentication protocol was introduced, which was so simplistic that it was easily compromised. Later, Microsoft introduced the NTLM authentication protocol, along with the updated NTLM V2 version. The NTLM protocol is applicable for authentication among machines within a workgroup, as well as for domain environment authentication. NTLM protocol provides authentication for upper-layer Microsoft applications such as SMB, HTTP, LDAP, SMTP, and more.
Concepts of SSP and SSPI
Before diving into the NTLM protocol, we need to understand two fundamental concepts: SSPI and SSP .
1. SSPI
SSPI (Security Service Provider Interface or Security Support Provider Interface) is a set of interfaces defined by Windows that outline functions related to security, which include but are not limited to:
· Authentication mechanisms.
· Session Security mechanisms provided for other protocols. Session Security refers to communication security, ensuring data integrity checks as well as data encryption and decryption.
The SSPI interface defines security-related functions designed to obtain authentication, information integrity, and information privacy, forming a set of interface functions without implementing specific content.
2. SSP
SSP (Security Service Provider) is the implementation of SSPI. Microsoft has implemented several SSPs to provide security functions, including but not limited to:
· NTLM SSP: Introduced in Windows NT 3.51 (msv1_0.dll), providing NTLM challenge/response authentication for client-server domains and non-domain authentication (SMB/CIFS) before Windows 2000.
· Kerberos SSP: Introduced in Windows 2000, updated in Windows Vista to support AES (kerberos.dll), is the preferred mutual authentication method between client-server domains in Windows 2000 and later versions.
· Digest SSP: Introduced in Windows XP (wdigest.dll), provides challenge/response authentication based on HTTP and SASL between Windows and non-Windows systems where Kerberos is unavailable.
· Negotiate SSP: Introduced in Windows 2000 (secur32.dll), defaults to Kerberos, but opts for NTLM if it’s unavailable. Negotiate SSP provides single sign-on capabilities, often referred to as Integrated Windows Authentication (especially with IIS). In Windows 7 and above, NEGOExts introduces negotiation using installed custom SSPs for client and server authentication.
· Cred SSP: Introduced in Windows Vista and available on Windows XP SP3 (credssp.dll), provides single sign-on (SSO) and network level authentication for remote desktop connections.
· Schannel SSP: Introduced in Windows 2000 (Schannel.dll), updated in Windows Vista to support stronger AES encryption and ECC [6]. This provider uses SSL/TLS records to encrypt data payloads.
· PKU2U SSP: Introduced in Windows 7 (pku2u.dll), provides peer authentication using digital certificates between systems not belonging to a domain.
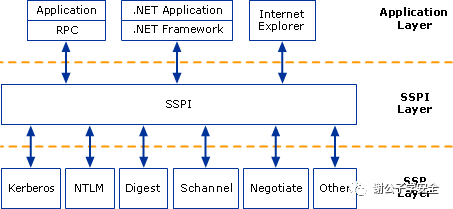
Because SSPI defines API related to Session Security, any SSP can be used by upper-layer applications for authentication with remote services. Upon authentication, an SSP generates a random key for the connection, known as the Session Key. Upper-layer applications can selectively use this key for signing or encrypting data sent to or received from the server. At the system layer, SSP serves as a dll to implement security functions like authentication. Various SSPs have different authentication mechanisms, such as NTLM SSP using a challenge/response authentication system, while Kerberos SSP uses ticket-based authentication. Custom SSPs can be developed, registered in the operating system to support personalized authentication methods. The relationship between SSP, SSPI, and various applications is illustrated as shown.
Related:
SSPI
(https://docs.microsoft.com/zh-cn/windows/win32/secauthn/sspi)
Microsoft Provided SSP Packages (https://docs.microsoft.com/zh-cn/windows/win32/secauthn/ssp-packages-provided-by-microsoft)
02 LM Hash Encryption Algorithm
LM (LAN Manager) authentication is a protocol introduced by Microsoft, utilizing LM Hash encryption algorithm. Essentially, LM Hash employs DES encryption, and despite its vulnerability to cracking, Windows retained it for compatibility purposes, although it has been disabled by default from Windows Vista and Windows Server 2008 onwards. Plaintext passwords for LM Hash are limited to 14 characters. To discontinue LM Hash usage, set user passwords to more than 14 characters.
If the LM Hash value is: aad3b435b51404eeaad3b435b51404ee, it indicates that the LM Hash is either empty or disabled.
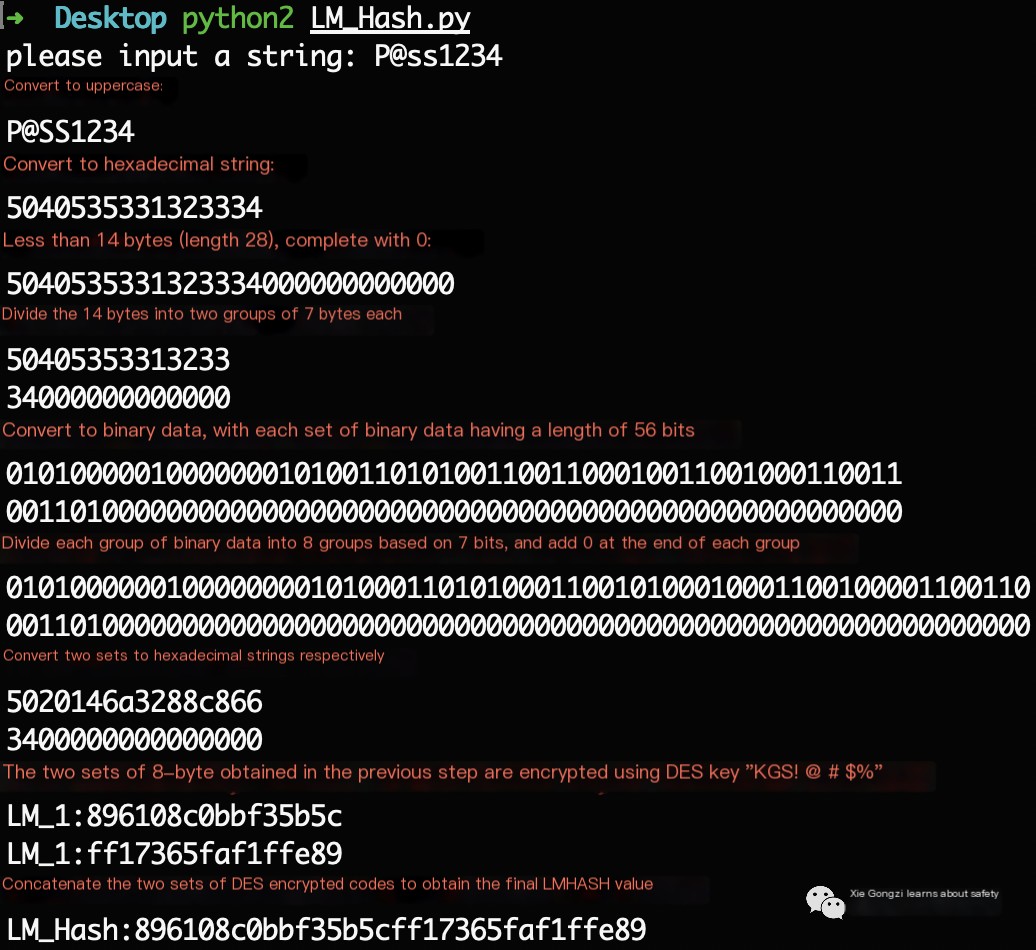
The encryption process of LM Hash is as follows, demonstrated using the password P@ss1234:
1) Convert the user’s plaintext password to uppercase and then to a hexadecimal string.
P@ss1234 -> Uppercase = P@SS1234 -> Convert to Hexadecimal = 5040535331323334
2) If the hexadecimal string is shorter than 14 bytes (length 28), pad it with zeros.
5040535331323334 -> Pad with zeros to 14 bytes (length 28) = 5040535331323334000000000000
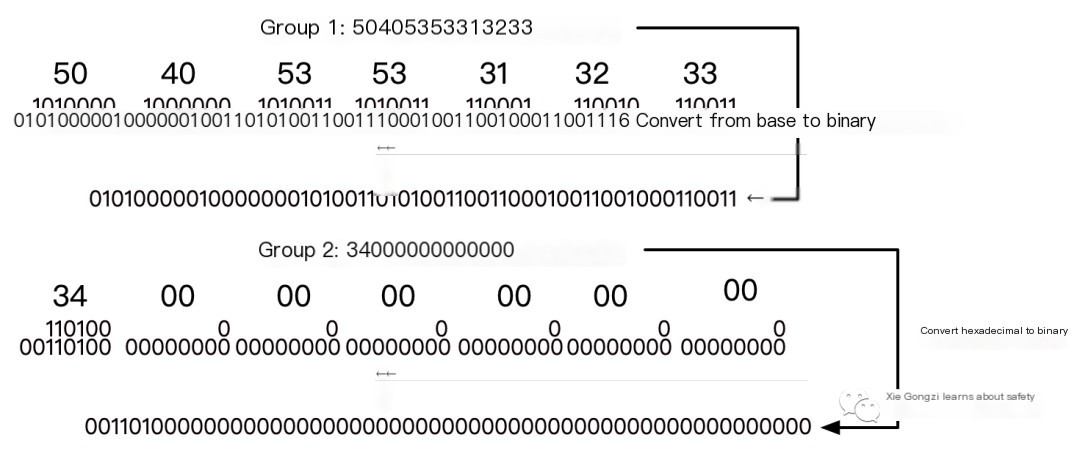
3) Split the 14-byte string into two groups, each 7 bytes long, and convert them into binary data, each having a length of 56 bits. Illustrated as shown.
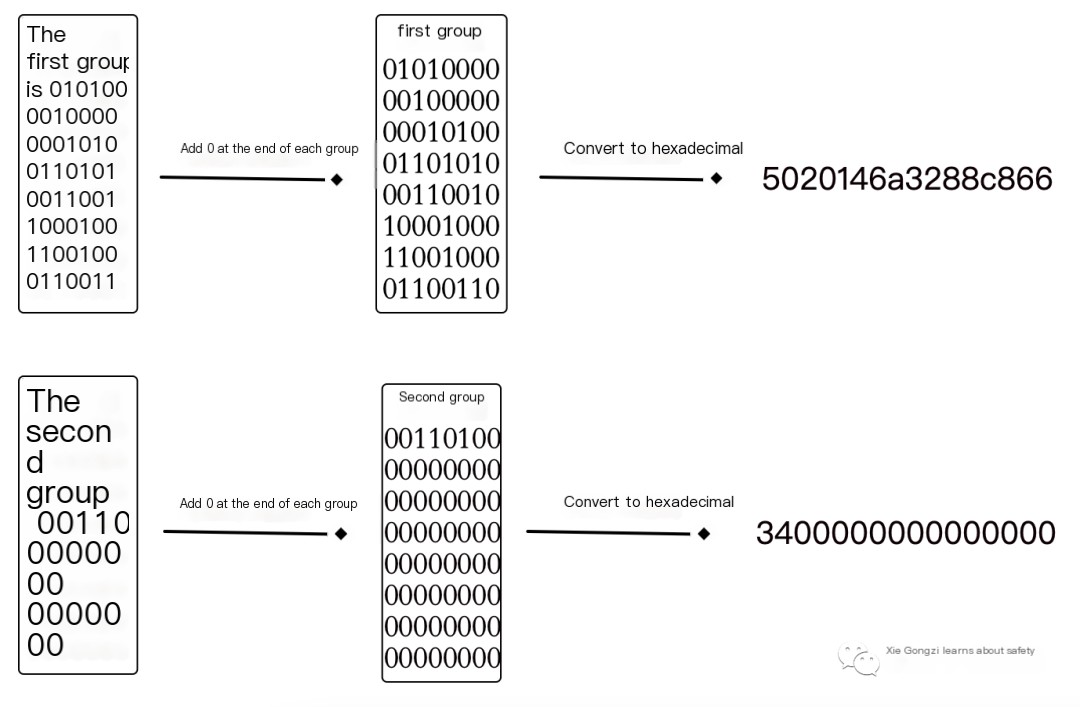
4) Split each binary data set into 8 groups of 7 bits, add a 0 to each group, and convert them into 8-byte-long hexadecimal data, respectively. Illustrated as shown.
5) Treat these two hexadecimal data sets as DES encryption keys to encrypt the string “KGS!@#%”, then concatenate the two encrypted results to get the final LM HASH value. Illustrated as shown. “KGS!@#%” in hexadecimal notation is: 4B47532140232425
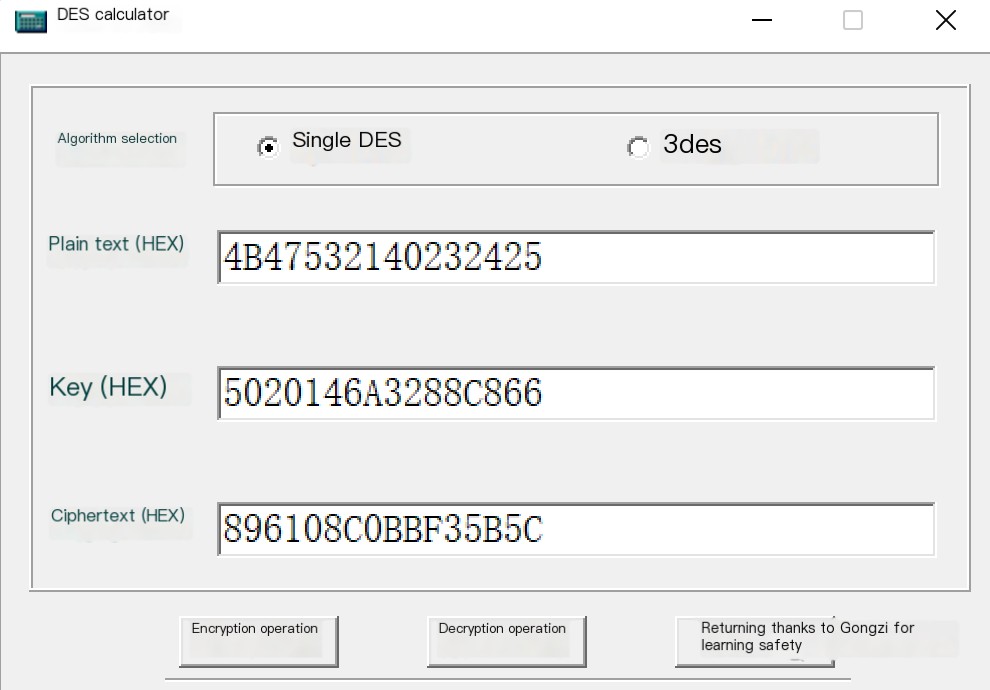
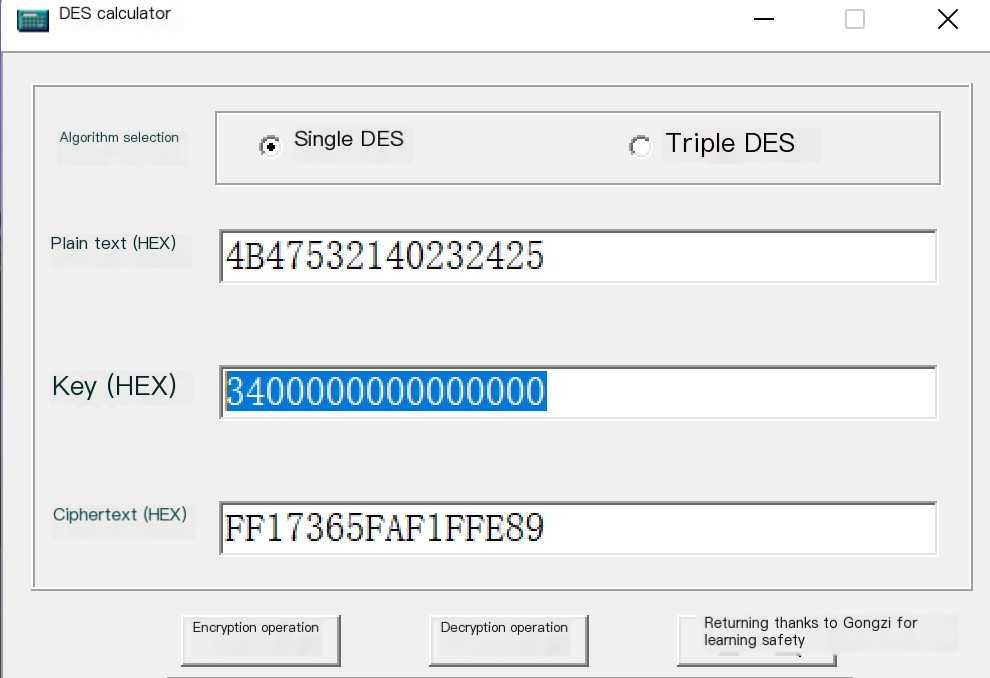

LM Hash Encryption Code Execution Effect as Shown in the Image
03
NTLM Hash Encryption Algorithm
To address the inherent security weaknesses found in the LM Hash encryption and authentication scheme, Microsoft introduced the NTLM (New Technology LAN Manager) Hash in Windows NT 3.1 in 1993.
The image below outlines the support for LM Hash and NTLM Hash across different Windows versions. From Windows Vista and Windows Server 2008 onward, Microsoft disabled LM Hash by default, opting to store only the NTLM Hash, leaving the LM Hash field as a fixed placeholder: aad3b435b51404eeaad3b435b51404ee.
Support for LM and NTLM across various Windows versions is illustrated in the diagram.

The NTLM Hash algorithm was designed by Microsoft to enhance security while ensuring compatibility, employing a hash encryption approach.
NTLM Hash is encrypted using the MD4 encryption algorithm.
Let’s take a look at the encryption process of NTLM Hash.
1
NTLM Hash Encryption Process
The NTLM Hash encryption process is as follows. The NTLM Hash is created by encrypting a plaintext password through three steps:
NTLM Hash = md4(unicode(hex(password)))
- First, the user’s password is converted to a hexadecimal format.
- The hexadecimal string is then encoded from ASCII to Unicode.
- Finally, the Unicode-encoded hexadecimal string undergoes standard MD4 one-way hash encryption.
Below you can see how the password “P@ss1234” is incrementally encrypted into an NTLM Hash: 74520a4ec2626e3638066146a0d5ceae.
 P@ss1234 ->  Convert to Hexadecimal = 5040737331323334
5040737331323334 ->  ASCII to Unicode Encoding = 50004000730073003100320033003400
50004000730073003100320033003400 ->  MD4 Encryption = 74520a4ec2626e3638066146a0d5ceae
NTLM Hash encryption code execution effect as shown in the image
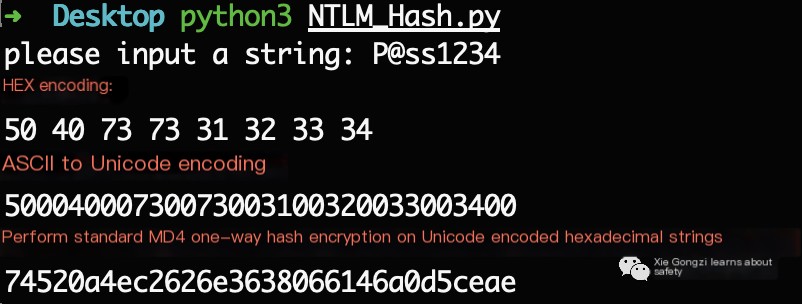
Alternatively, a single Python command can achieve the same result, as demonstrated below.
python3 -c 'import hashlib,binascii; print("NTLM_Hash:"+binascii.hexlify(hashlib.new("md4", "P@ss1234".encode("utf-16le")).digest()).decode("utf-8"))'
As shown in the image, a straightforward Python command can perform NTLM Hash encryption:

2
NTLM Hash Storage in Windows Systems
Once a user’s password is encrypted with the NTLM Hash, it is stored in the %SystemRoot%\system32\config\SAM file, as depicted in the image.
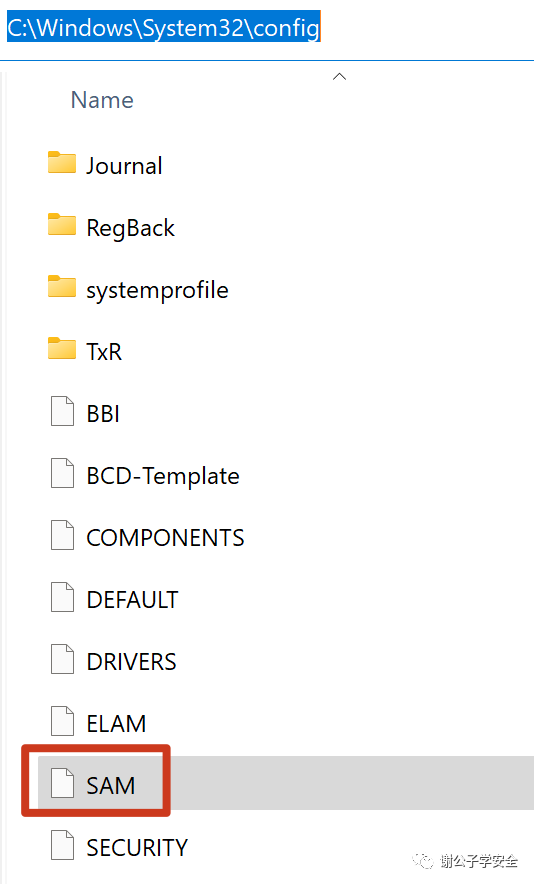
During local authentication, all operations are performed locally. The system converts the entered password to an NTLM Hash and compares it with the NTLM Hash stored in the SAM file. A match confirms the correctness of the password. Conversely, a mismatch denotes an incorrect password. When logging off, restarting, or locking the screen, the operating system triggers the winlogon.exe to display the login interface, which includes the input box. Upon input reception, winlogon.exe passes the password to the lsass.exe process, which retains a copy of the plaintext password, encrypts it into an NTLM Hash, and validates it against the SAM database. The tool, Mimikatz, enables the extraction of plaintext passwords or password hashes from the lsass.exe process. The use of Mimikatz to capture credentials from the memory of lsass.exe is shown in the image.
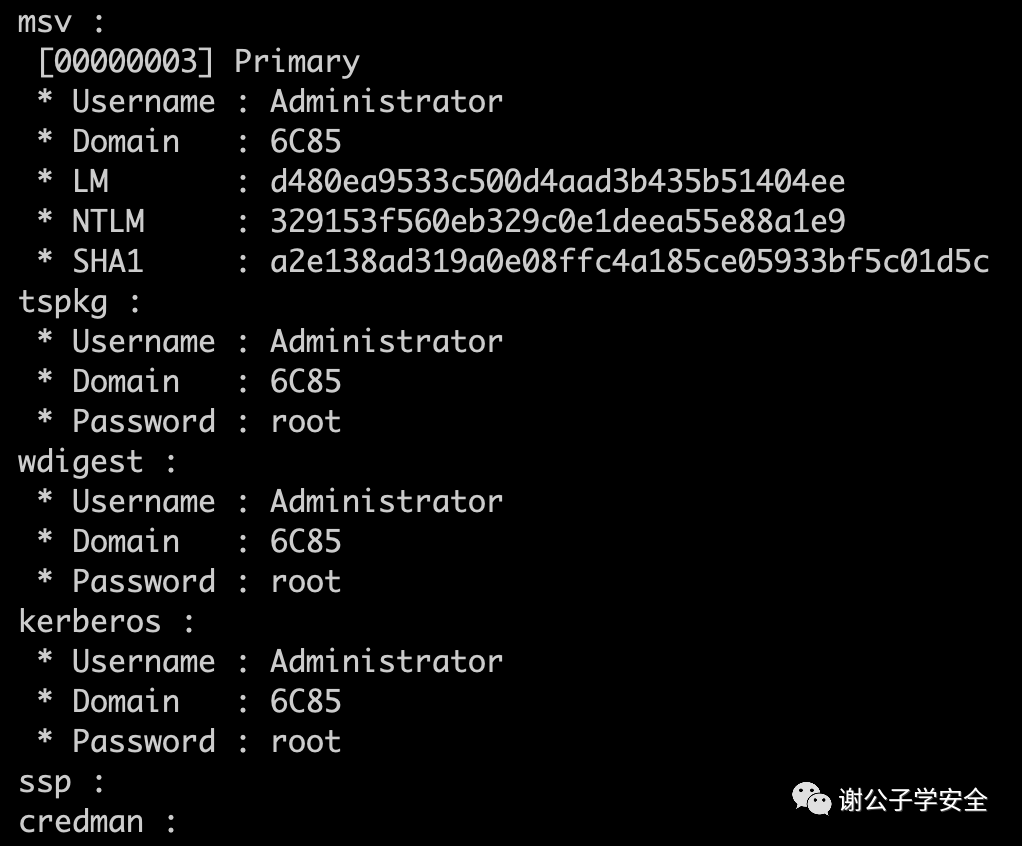
Using MSF or Cobalt Strike, the format of the dumped password hash appears as follows, with the first section being the username, the second section being the user’s SID value, the third section being the LM Hash, and the fourth section being the NTLM Hash, while the rest is empty.
xxxxxxxxxx Username:User SID value:LM Hash:NTLM Hash:::
Since Windows Vista and Windows Server 2008 default-disabled LM Hash, the third section is consistently empty, while the fourth section, NTLM Hash, represents the encrypted user credentials.
Illustration of using CobaltStrike’s hash dumping feature to extract credentials from the target machine’s memory is as shown in the image.

04
NTLM Protocol Authentication
The NTLM authentication protocol employs a Challenge/Response verification mechanism, consisting of three types of messages:
• Type 1 (Negotiation);
• Type 2 (Challenge);
• Type 3 (Authentication).
NTLM authentication protocol has two versions: NTLM v1 and NTLM v2, with NTLM v2 being predominantly utilized. The most significant difference between NTLM v1 and NTLM v2 lies in the Challenge value and encryption algorithm, with both utilizing the NTLM Hash encryption.
1
NTLM Authentication in a Workgroup Environment
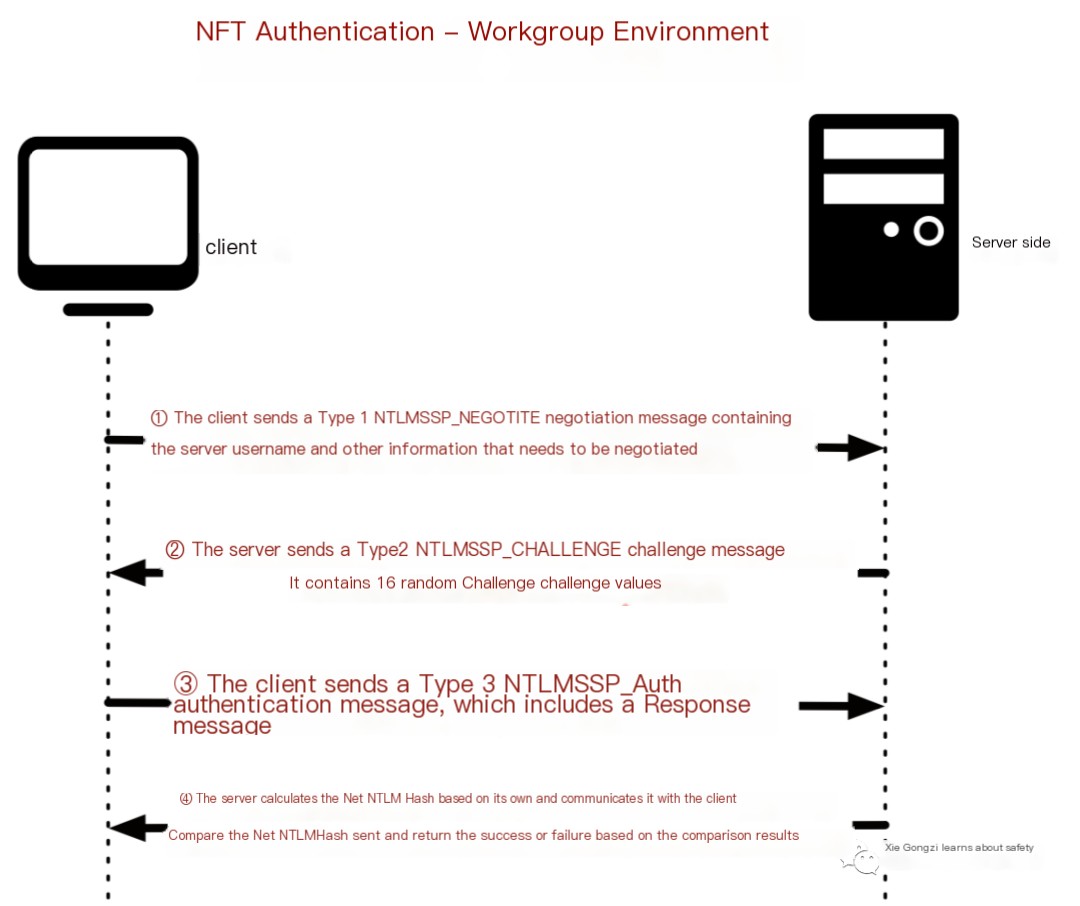
The NTLM authentication process in a workgroup environment is depicted in the diagram.
NTLM Hash = md4(unicode(hex(password)))
The NTLM authentication process in a workgroup environment is divided into the following four steps:
1) When the client needs to access a service on the server, authentication is required. Upon the client entering the server’s username and password, the client will cache the server password’s NTLM Hash value. The client then sends a request to the server, which employs NTLM SSP to generate an NTLMSSP_NEGOTIATE message (known as Type 1 NEGOTIATE message).
2) Upon receiving the Type 1 message from the client, the server reads its contents and selects from the available features, encryption levels, and security services it supports. The server then passes this information to NTLM SSP, obtaining an NTLMSSP_CHALLENGE message (known as Type 2 Challenge message), which it sends back to the client. This Type 2 message contains a 16-bit random value, generated by the server and known as the Challenge value, which the server caches.
3) On receiving the Type 2 message from the server, the client reads the supported features and extracts the Challenge value. It encrypts the Challenge value using the cached NTLM Hash of the server password to produce a Response message. This Response, along with additional information, is encapsulated into an NTLMSSP_AUTHentication message (known as Type 3 AUTHENTICATE message), which is forwarded to the server.
text
④: Upon receiving the Authenticate message, the server extracts the Net-NTLM Hash. It then performs a series of encryption operations on the Challenge value using the server’s NTLM Hash of its own password, computing its version of the Net-NTLM Hash. It compares this computed Net-NTLM Hash with the one sent by the client. If they match, it verifies that the client entered the correct password, thus completing authentication successfully; otherwise, authentication fails. This outlines the NTLM authentication workflow in a workgroup environment. Let’s use WireShark to capture packets of the NTLM authentication process.
1 NTLM Authentication Packet Capture in Workgroup Environment
Since NTLM is merely a low-level authentication protocol, it must be embedded within an upper-layer application protocol. The transmission of its messages relies on the upper-layer protocol utilizing NTLM, such as SMB or HTTP. The following experiment demonstrates NTLM verification via an SMB service. The experimental setup is as follows:
Client (WIN7): 10.211.55.6;
Server (6C85): 10.211.55.7.
The NTLM authentication topology in a workgroup environment is shown in the figure.
Using the correct username and password to authenticate with the SMB protocol to 10.211.55.7, you can see successful authentication, as shown in the figure.
During the authentication process, packet capture is conducted using WireShark, as illustrated.
When using an incorrect username and password for authentication via the SMB protocol to 10.211.55.7, authentication failure is observable.
Again, packet capturing during this authentication process is shown using WireShark.
Upon examining each authentication packet, we find that NTLM authentication packets reside within the GSS-API, as depicted within the SMB authentication packet’s GSS-API layer.
What exactly is the GSS-API?
The GSS-API (Generic Security Service Application Program Interface) is a universal interface that provides a mechanism-independent, platform-independent, language-agnostic, and portable security service. When developers write applications, they can apply a universal security mechanism without customizing the security implementation for any specific platform, security mechanism, protection type, or transfer protocol. The SSPI is a proprietary variant of the GSS-API, extended with many Windows-specific data types. It generally produces and accepts tokens compatible with the GSS-API. Since NTLM SSP implements SSPI, it effectively implements GSS-API, and registering as an SSP brings the advantage of SSPI’s security-related functions. Consequently, higher-level protocols (like SMB, HTTP, LDAP) can manage tasks such as authentication without concerning themselves with protocol details, merely by invoking related functions. While typically embedded within an upper-layer protocol, unlike Kerberos, which can also operate as a standalone application layer protocol, NTLM’s authentication traffic is embedded within these upper-layer protocols.
Now, let’s scrutinize the contents of the WireShark packet captures.
1) Negotiation
Let’s first examine the initial four packets, as shown.
The initial four packets contain some session information for the SMB protocol, with a prominent focus on the Security mode. As seen in the Graphic, the Security mode indicates Signing enabled is True, whereas Signing required is False, signifying that even though the client supports signing, it negotiates without signing!
Note: The default in workgroup environments is no signing.
2) Negotiate Package
Next, let’s evaluate the fifth packet, shown in Figure 1-18.
The fifth packet is the NTLM Negotiate packet, Types 1, sent from the client to the server to initiate NTLM authentication. It primarily aims to validate basic rules through indicated flags and optionally provide the client’s workstation name and its membership domain for the server to assess the client’s eligibility for local authentication.
Type 1 message mainly comprises the structure shown.
The core of the Type 1 Negotiate package is illustrated below.
Negotiation Flags fields which require the negotiation of flags are depicted, as shown.
3) Challenge Package
Next, observe the sixth packet, displayed as follows.
The sixth packet is a Type 2 Challenge message, sent by the server to the client, incorporating a list of server-supported and agreed capabilities.
The core structure of the Type 2 Challenge message is shown.
In the Type 2 message, a Challenge value exists; in NTLM v2, it’s a random 16-byte string.
The Challenge value is: f9e7d1fe37e7ae12, as illustrated.
4) Authenticate Package
Finally, seizing a glance at the seventh packet, as shown.
The seventh packet is the Auth message the client sends to the server. This contains the client’s response to the Type 2 Challenge, indicating that the client has knowledge of the account password. The Auth message also specifies the target of the authentication account (domain or server name) and username, including the client’s workstation name.
Auth message primarily comprises the structure shown.
The core structure of the Auth message is illustrated as follows.
The most crucial part of the Auth message is the Type 3 Response. The Response message stems from encrypting the Challenge with the server password’s NTLM Hash, resulting in the derived Net-NTLM Hash. Within the Type 3 Response message, there are six types of responses:
· LM Response: Sent by older clients, regarded as the ‘primitive’ response type.
· NTLM v1 Response:
This is sent by a client based on NT, including Windows 2000 and XP.
· NTLM v2 Response: A newer type of response introduced in Windows NT Service Pack 4. It replaces the NTLM response on systems where NTLMv2 is enabled.
· LMv2 Response: Replaces the LM response on NTLMv2 systems.
· NTLMv2 Session Response: This scheme changes the semantics of the LM NTLM response when negotiating NTLMv2 session security without NTLMv2 authentication.
· Anonymous Response: Used when an anonymous context is being established; no real credentials are provided, and no actual authentication occurs. A “stub” field appears in the Type 3 message.
All of these six responses use the same encryption process, which is the Challenge/Response mechanism previously discussed. The difference lies in the Challenge value and the encryption algorithm used. The choice of which version of the response to use is determined by the LmCompatibilityLevel, which will be discussed later.
As shown in the image, the NTLM v2 response type can be seen in the Type 3 Response message. The NTProofStr field under the NTLMv2 Response message contains a value that is used as a data signature, specifically a Hash (HMAC-MD5), intended to ensure data integrity.
The following are the calculation formulas for NTLMv2 Hash and NTProofStr.
· NTLMv2 Hash = HMAC-MD5(unicode(hex((upper(UserName)+DomainName))), NTLM Hash)
· NTProofStr = HMAC-MD5(challenge + blob, NTLMv2 Hash)
As depicted, you can see the MIC field under the NTLMv2 Response message. To prevent tampering with packets, Microsoft uses the exportedSessionKey to encrypt the three NTLM messages, ensuring the integrity of the packet. The exportedSessionKey is only known to the account initiating authentication and the target server.
For the MIC, the calculation formula is as follows:
MIC = HMAC_MD5(exportedSessionKey, NEGOTIATE_MESSAGE + CHALLENGE_MESSAGE + AUTHENTICATE_MESSAGE)
5) Success or Failure Return
The eighth packet contains the result, indicating success or failure.
The image shows a packet returned successfully, and another shows a failed packet.
6) Signature
After authentication is complete, it is determined whether follow-up packets need to be signed according to negotiated field values. If signing is required, how is the signature generated?
As shown in the image, we can see the Session Key field in the seventh packet. The Session Key is used to negotiate encryption keys.
The Session Key is derived from the keyExchangeKey and exportedSessionKey through a series of operations.
The keyExchangeKey is obtained through specific calculations involving the user password and serverChallenge, as demonstrated.
The exportedSessionKey is a random number generated by the client, used for encrypting and decrypting traffic.
So how do the client and server negotiate the encryption key through the Session Key?
First, the client generates a random number known as exportedSessionKey, which is then used to encrypt and decrypt traffic. Since the exportedSessionKey is generated by the client and unknown to the server, how is negotiation accomplished? The client uses the keyExchangeKey as a Key to encrypt the exportedSessionKey with the RC4 encryption algorithm, resulting in the Session Key visible in the traffic.
The server, upon obtaining the traffic, uses the user password and Challenge value to calculate the keyExchangeKey, then uses both Session Key and keyExchangeKey to calculate the exportedSessionKey. This exportedSessionKey is then used for encryption and decryption of the traffic. For an attacker without the user’s password, it is impossible to calculate keyExchangeKey, and thus, even after intercepting the traffic, they cannot compute the exportedSessionKey or decrypt the traffic.
Net-NTLM v2 Hash Calculation
Let’s explore how the NTLM v2 Response message is generated:
1) Concatenate uppercase User Name with Domain Name (case-sensitive), perform Hex then encode with double-byte Unicode to obtain data. Use the 16-byte NTLM hash as key, and encrypt data and key with HMAC-MD5 to obtain NTLMv2 Hash.
2) Construct a blob of information.
3) Use the 16-byte NTLMv2 Hash as a key and apply the HMAC-MD5 message authentication code algorithm to encrypt a value (concatenation of type 2 Challenge and Blob). Obtain a 16-byte NTProofStr (HMAC-MD5).
4) Concatenate NTProofStr with Blob to form the Response.
This is how the NTLM v2 version Response message is generated. When using tools like Responder to capture NTLM Response messages, we are capturing data in the Net-NTLM hash format.
The format of the Net-NTLM v2 hash is as follows:
username::domain:challenge:HMAC-MD5:blob
The meanings of each part are as follows:
· username (the user’s name accessing the server): administrator
· domain (domain information): WIN7
· challenge (challenge value returned by the server in packet 6): f9e7d1fe37e7ae12
· HMAC-MD5 (NTProofStr in packet 7): 202beed8c64468318318bad6e8ae8326
· blob (corresponding blob data is the latter half of NTLMv2 Response in packet 7 without NTProofStr):
010100000000000000d248080d47d701684da093c89fd679000000000200080036004300380035000100080036004300380035000400080036004300380035000…
(long binary data continues)
So, the final Net-NTLM v2 Hash value is as follows:
Administrator-level permissions are crucial in understanding NTLM in a domain environment. From the two formulas below, we can calculate the NTLMv2 Hash, NTProofStr, and Response.
- NTLMv2 Hash = HMAC-MD5(unicode(hex((upper(UserName)+DomainName))), NTLM Hash)
- NTProofStr = HMAC-MD5(challenge + blob, NTLMv2 Hash)
By inputting the relevant values, we compute the values for NTLMv2 Hash, NTProofStr, and Response, as shown in the example.
2
NTLM Authentication in Domain Environments
The diagram illustrates the NTLM authentication process in a domain environment.
The process of NTLM authentication in a domain environment can be divided into the following six steps:
1) The client seeks to access a service on the server, requiring authentication. Therefore, after the client inputs the server’s username and password, it caches the server’s NTLM Hash. The client then sends a request utilizing NTLM SSP to generate an NTLMSSP_NEGOTIATE message (referred to as Type 1 NEGOTIATE message).
2) Upon receiving the Type 1 message from the client, the server reads the content, selects acceptable service features, encryption level, and security services, then inputs this into NTLM SSP to generate an NTLMSSP_CHALLENGE message (known as Type 2 Challenge message), which is sent back to the client. This Type 2 message contains a 16-byte random value generated by the server, known as the Challenge value, which the server caches.
3) The client receives the Type 2 message from the server, retrieves the server-supported features, extracts the Challenge value, encrypts it using the cached server password’s NTLM Hash, and forms the Response message. This message can extract the Net-NTLM Hash. The client finalizes by encapsulating the Response and additional information into an NTLMSSP_AUTH message (called Type 3 Authenticate message) and sends it to the server.
4) The server receives the NTLMSSP_AUTH message from the client and, via the Netlogon protocol, establishes a secure channel with the domain controller to send the verification message.
5) The domain controller receives the verification message from the server, extracts the Net-NTLM Hash, retrieves the user’s NTLM Hash from the database, performs a series of encryption operations on the Challenge, computes its own Net-NTLM Hash, and compares it with the server’s Net-NTLM Hash. Matching values indicate correct password entry by the client, resulting in successful authentication, which the domain controller reports back to the server. Otherwise, it indicates authentication failure.
6) The server responds to the client based on the domain controller’s returned result. This concludes the NTLM authentication process in a domain environment.
We will use WireShark to capture the NTLM authentication process:
1
Capturing NTLM Authentication in a Domain Environment
As NTLM is a low-level authentication protocol, it must be embedded within a higher-layer application protocol, with message transfer depending on protocols like SMB, HTTP, etc.
This experiment is based on SMB service utilizing NTLM. The experimental environment is as follows:
Client (WIN7): 10.211.55.6
Server (MAIL): 10.211.55.5
Domain Controller (AD01): 10.211.55.4
The diagram shows the topology for NTLM authentication in a domain environment.
The diagram also shows a successful authentication data packet.
The diagram shows an unsuccessful authentication data packet.
Since the fields in the packet mean the same within a workgroup, they won’t be elaborated further here.
3
Differences Between NTLM v1 and NTLM v2
NTLM v1 and NTLM v2 are different versions of the NTLM authentication protocol, with NTLM v2 being more commonly used.
The most notable differences between NTLM v1 and NTLM v2 are the Challenge value and the encryption algorithm, both using the NTLM Hash for encryption.
Challenge Value:
NTLM v1: 8 bytes
NTLM v2: 16 bytes
Encryption Algorithm for Net-NTLM Hash:
NTLM v1: DES encryption algorithm
NTLM v2: HMAC-MD5 encryption algorithm
Let’s see how the NTLM v1 Response message is generated:
1) The 16-byte NTLM hash is space-padded to 21 bytes.
2) Split into three groups, each 7-bit as tri-DES encryption keys.
3) Each encrypts the Challenge value from the server using DES.
4) Concatenate these three encrypted values to obtain the Response. The Net-NTLM v1 hash format follows:
username::hostname:LM response:NTLM response:challenge
As shown in the diagram, we use the tool InternalMonologue.exe to capture the Net-NTLM v1 hash.
4
LmCompatibilityLevel
The LmCompatibilityLevel value determines the challenge/response authentication protocol used for network logon. It impacts the level of authentication protocol used by clients, the negotiated session security level, and the level of authentication accepted by servers. Below are the meanings for different LmCompatibilityLevel values:
We can manually modify the local security policy to adjust the LmCompatibilityLevel value. Open the local security policy → security settings → local policy → security options → Network Security: LAN Manager Authentication Level. By default, it is undefined. Undefined means using the default value.
The diagram shows that “Network Security: LAN Manager Authentication Level” is not defined by default.
To change the response type, select the response type and then apply it, as shown in the diagram:
Alternatively, execute a command to change the value of the registry field HKLM\SYSTEM\CurrentControlSet\Control\Lsa\lmcompatibilitylevel to modify the response type. By default, the lmcompatibilitylevel field does not exist.
The diagram shows no lmcompatibilitylevel field under HKLM\SYSTEM\CurrentControlSet\Control\Lsa:
The values corresponding to the lmcompatibilitylevel field in the registry HKLM\SYSTEM\CurrentControlSet\Control\Lsa are shown in the diagram:
You can modify the registry lmcompatibilitylevel value to 2 using the following command:
As shown in the figure, you can see that the command to modify the registry was successfully executed!
Next, check the HKLM\SYSTEM\CurrentControlSet\Control\Lsa\lmcompatibilitylevel field again. As shown in the figure, you can see that the field now exists, and its value is 2.
05
Security Issues with the NTLM Protocol
From the NTLM authentication process described above, we can see that in the Type 3 Auth authentication message, the hash of the user’s password is used for calculation. Therefore, when we obtain only the hash of the user’s password without the plaintext, we can perform a Pass The Hash (PTH) attack, also known as a hash pass attack. Similarly, in the Type 3 message, there exists a Net-NTLM Hash, which allows attackers to perform a man-in-the-middle attack and replay the Net-NTLM Hash, a method also referred to as NTLM Relay attack. Additionally, due to inherent flaws in the encryption process of the NTLM v1 protocol, it is possible to brute force the Net-NTLM v1 Hash to obtain the NTLM Hash. With the NTLM Hash, lateral movement can be conducted.
1
Pass The Hash
Pass The Hash (PTH) is a method for lateral movement within internal networks. The main reason is that the NTLM authentication process utilizes the NTLM Hash of a user’s password for encryption. Therefore, when the NTLM Hash is obtained without revealing the plaintext, a hash pass attack can be launched against other machines with the same password across the internal network. Subsequently, using port 135 or 445, lateral movement can be initiated to machines using the same password. Detailed attack specifics of Pass The Hash will be elaborated in section 4.9.
2
NTLM Relay
Strictly speaking, it should be called Net-NTLM Relay. It occurs in the third step of NTLM authentication where the Net-NTLM Hash exists in the Response message. Once attackers acquire the Net-NTLM Hash, a man-in-the-middle attack can be executed, replaying the Net-NTLM Hash. This technique is commonly referred to as the NTLM Relay attack. Detailed attack specifics on NTLM Relay will be elaborated in section 4.7.
3
Cracking Net-NTLM v1 Hash
Due to inherent flaws in the NTLM v1 authentication protocol encryption process, once a Net-NTLM v1 Hash is captured, it can be cracked into an NTLM Hash regardless of password strength. This is particularly effective in domain environments, as the hash can be used to connect remotely to target machines. If the domain controller allows sending NTLM v1 responses, NTLM authentication can be conducted with the domain controller to capture its Net-NTLM v1 Hash, crack it into an NTLM Hash, and use the domain controller’s machine account and hash to export all user hashes within the domain.
However, since Windows Vista, Microsoft defaulted to the NTLM v2 authentication protocol. Downgrading to NTLM v1 requires manual modification and administrative privileges on the target host.
The following operation enables the target host to support NTLM v1 responses:
Open Local Security Policy-> Security Settings-> Local Policies-> Security Options-> Network Security: LAN Manager Authentication Level. As shown in the figure:
Then modify it to send only NTLM responses, as illustrated:
Alternatively, the following registry modification command can be executed:
 # Modify registry to enable Net-NTLM v1:
reg add HKLM\SYSTEM\CurrentControlSet\Control\Lsa\ /v lmcompatibilitylevel /t REG_DWORD /d 2 /f

# Ensure Net-NTLMv1 is successfully enabled by modifying two registry keys
reg add HKLM\SYSTEM\CurrentControlSet\Control\Lsa\MSV1_0\ /v NtlmMinClientSec /t REG_DWORD /d 536870912 /f
reg add HKLM\SYSTEM\CurrentControlSe
As shown in the figure, the command to modify the registry was executed successfully!
Next, we use Responder to capture the target host’s Net-NTLM v1 Hash.
Note that in new versions of Responder, the Challenge value is arbitrary. Modify the Responder.conf file’s Challenge value to 1122334455667788. As illustrated:
Then, execute the following command with Responder to listen for Net-NTLM v1 Hash, and employ printer vulnerability or Petitpotam to trigger the domain controller to authenticate forcibly to our machine, allowing capture of the domain controller’s Net-NTLM v1 Hash.
responder -I eth0 --lm -rPv
As shown in the figure, Responder captured the domain controller’s Net-NTLM v1 Hash.
Subsequently, employ the ntlmv1.py script with the following command to analyze the Net-NTLM v1 Hash and obtain the NTHASH.
python3 ntlmv1.py --ntlmv1 AD01$::XIE:8EE7FF2234CA7E2887069AB8046F05E631C9F8607CC528FF:8EE7FF2234CA7E2887069AB8046F05E631C9F8607CC528FF:1122334455667788
As shown in the figure, execute the ntlmv1.py script to analyze the Net-NTLM v1 Hash and obtain the NTHASH.
Next, submit the obtained NTHASH to https://crack.sh/get-cracking/, entering the NTHASH and email to receive results or convert it into another format for cracking.
 NTHASH:8EE7FF2234CA7E2887069AB8046F05E631C9F8607CC528FF
or
$NETNTLM$1122334455667788$8EE7FF2234CA7E2887069AB8046F05E631C9F8607CC528FF
As shown in the figure, input the NTHASH and email for cracking.
After several seconds, an email from the cracking site arrives in our inbox.
The key value is the target’s NTLM Hash. As shown in the figure:
Then, using the NTLM Hash value, execute the following command with a domain controller machine account to export all user hashes in the domain.
python3 secretsdump.py xie/AD01\[email protected] -hashes aad3b435b51404eeaad3b435b51404ee:efab19d515b5ff969709df4cfcf387ef -dc-ip 10.211.55.4 -just-dc-user krbtgt
As shown in the figure, export the krbtgt user hash:
– END –
References:
https://docs.microsoft.com/en-us/windows/win32/secauthn/sspi
https://docs.microsoft.com/en-us/windows/win32/secauthn/ssp-packages-provided-by-microsoft
http://davenport.sourceforge.net/ntlm.html
Here are some related articles you might find useful:
– [Windows Server](https://cloud.tencent.com/developer/article/1645398)
– [NTLM Authentication Overview](https://mp.weixin.qq.com/s/FbA1BshhyQFWsW4nAgxQFw)
– [In-depth Guide to NTLM Protocol](https://www.cnblogs.com/backlion/p/10843067.html)
– [How NTLM Works in Windows](https://www.cnblogs.com/backlion/p/10843067.html)
Explore more on [Windows Server](/developer/tag/10311) and [Windows](/developer/tag/10806).


