
0x00 MHN Introduction to Honeypot
A Honey Network is a strategic security tool used to detect and analyze potential cyber threats by creating decoy systems, known as honeypots, to lure attackers.
MHN (Modern Honey Network): An open-source honeypot that simplifies the deployment of honeypots, facilitating the collection and analysis of honeypot data. Deployed using ThreatStream, data is stored in MongoDB, with intrusion detection system sensors Snort, Kippo, Conpot, and Dionaea installed. Collected information can be displayed through a web interface. According to official sources, the systems currently tested and supported for deploying MHN server include Ubuntu 14.04, Ubuntu 16.04, and CentOS 6.9.
GitHub Address(https://github.com/threatstream/mh)
0x01 Supported Honeypot Types
- Snort
- Suricata
- Dionaea
- Conpot
- Kippo
- Amun
- Glastopf
- WordPot
- ShaockPot
- P0f
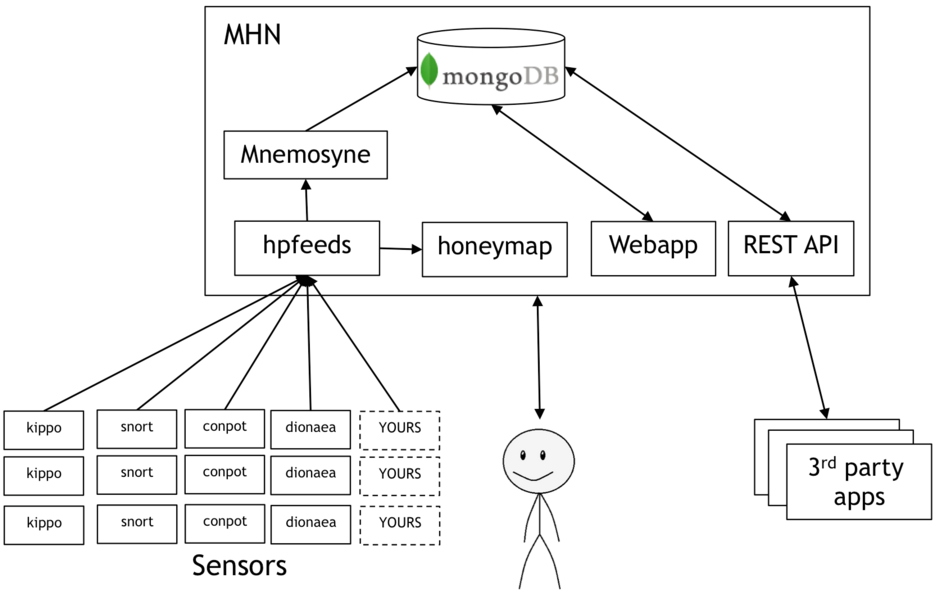
0x02 MHNArchitecture
0x03 MHNInstallation and Usage
1. Ubuntu Installation of MHN Management Console
# Operating system: Update Ubuntu 16.04 system and install using automated script
sudo apt update

sudo apt upgrade -y

sudo apt-get install git -y

cd /opt

sudo git clone https://github.com/threatstream/mhn.git

cd mhn /

sudo ./install.sh
# Configure server information, the email and password here will be the password for the web backend upon completion
Do you wish to run in Debug mode?: y/n n
Superuser email: [email protected]
Superuser password: (again):
Server base url ["http://155.138.147.248"]:
Honeymap url [":3000"]: http://155.138.147.248:3000
Mail server address ["localhost"]:
Mail server port [25]:
Use TLS for email?: y/n n
Use SSL for email?: y/n n
Mail server username [""]:
Mail server password [""]:
Mail default sender [""]:
Path for log file ["/var/log/mhn/mhn.log"]:
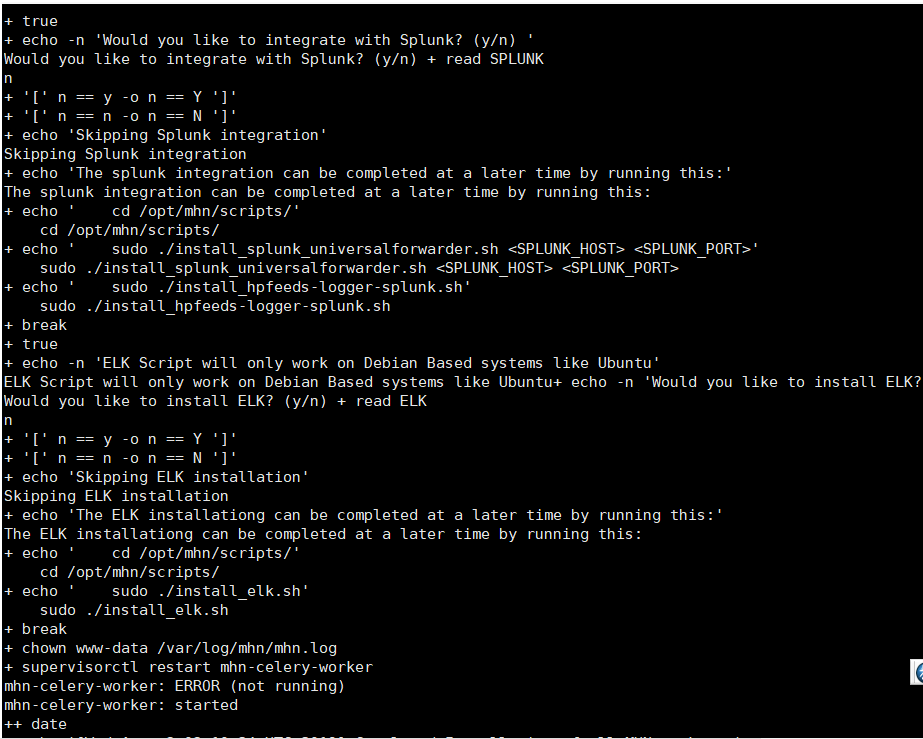
Would you like to integrate with Splunk? (y/n)n
Would you like to install ELK? (y/n)n# Configure Splunk and ELK, here I choose not to configure
2. MHN Configuration
2.1 Agent Deploy Honeypot
Select the type of honeypot you need to deploy from the Deploy option, copy the deployment script to install.
For instance, to deploy a Conpot honeypot, execute the following script in its system:
wget "http://155.138.147.248/api/script/?text=true&script_id=15" -O deploy.sh && sudo bash deploy.sh http://155.138.147.248 lfDWqAN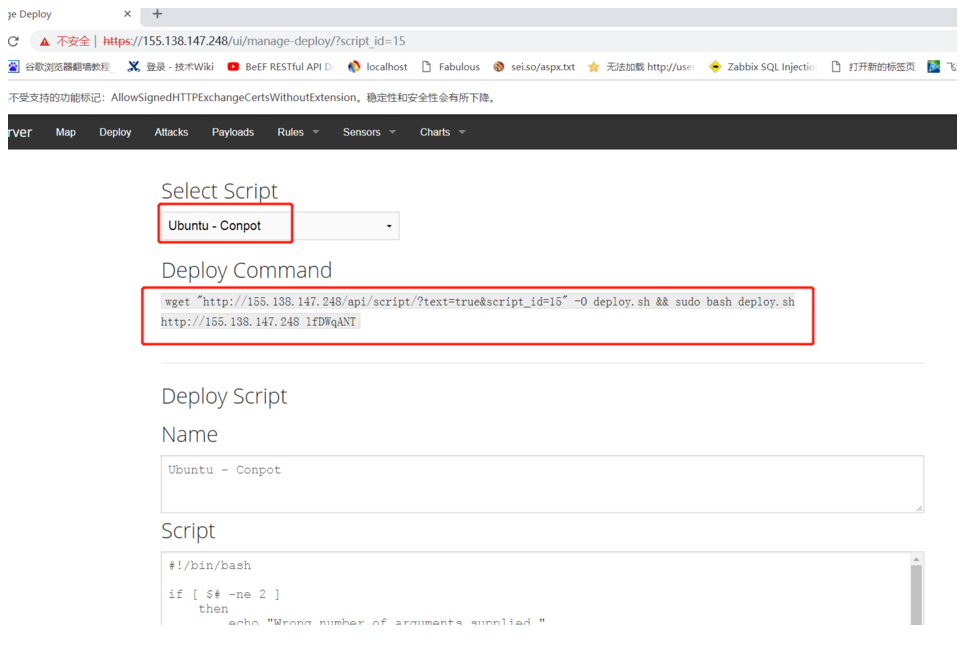
2.2 Integration of Splunk and ArcSight
Splunk
cd /opt/mhn/scripts/
sudo ./install_hpfeeds-logger-splunk.sh
sudo ./install_splunk_universalforwarder.sh
tail -f /var/log/mhn/mhn-splunk.log
This will log events as values to /var/log/mhn-splunk.log. The Splunk Universal Forwarder should monitor this log
ArcSight
cd /opt/mhn/scripts/

sudo ./install_hpfeeds-logger-arcsight.sh
tail -f /var/log/mhn/mhn-arcsight.log
2.3 Disable Data Reporting
By default, the MHN Server will report analysis data to Anomali. To disable this configuration, run the following commands:
cd mhn/scripts/
sudo ./disable_collector.sh
3. Deploying Honeypots using MHN
SSH Honeypot Testing
# Honeypot deployment machine: 155.138.151.176
# Deploy honeypot: dionaea wget “http://155.138.147.248/api/script/?text=true&script_id=4” -O deploy.sh && sudo bash deploy.sh http://155.138.147.248 lfDWqANT
# Attempt brute force attack hydra -l root -P password.txt mssql://155.138.151.176
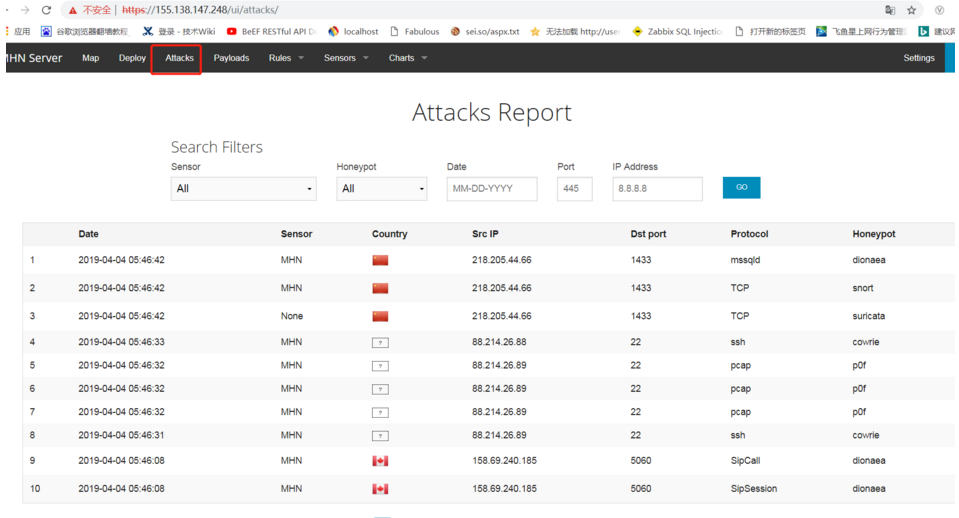
4. Interface Function Display
1. The following interface shows the attacker’s source IP address, destination port, protocol involved, honeypot type, and other attack report information.
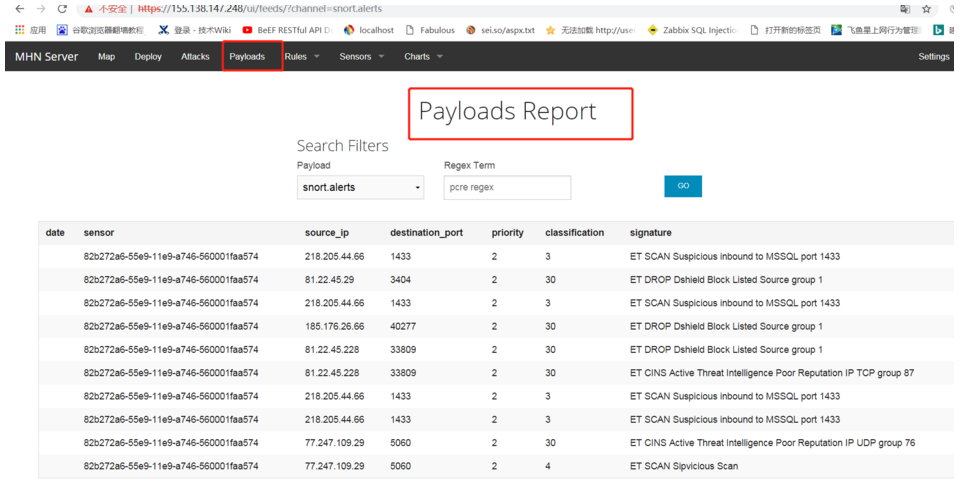
2. The following figure lists the attack payload report information (sensor, source IP address, destination port, etc.)
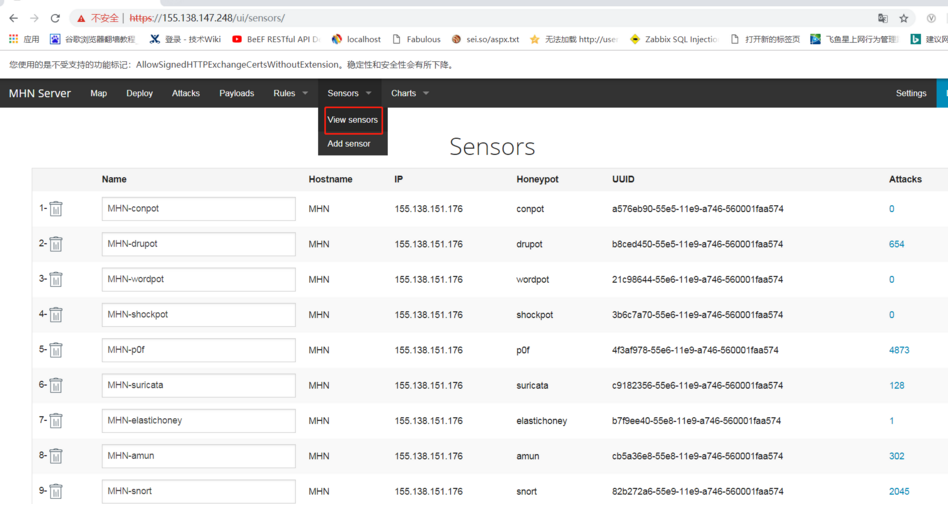
3. The following figure lists installed agent sensors
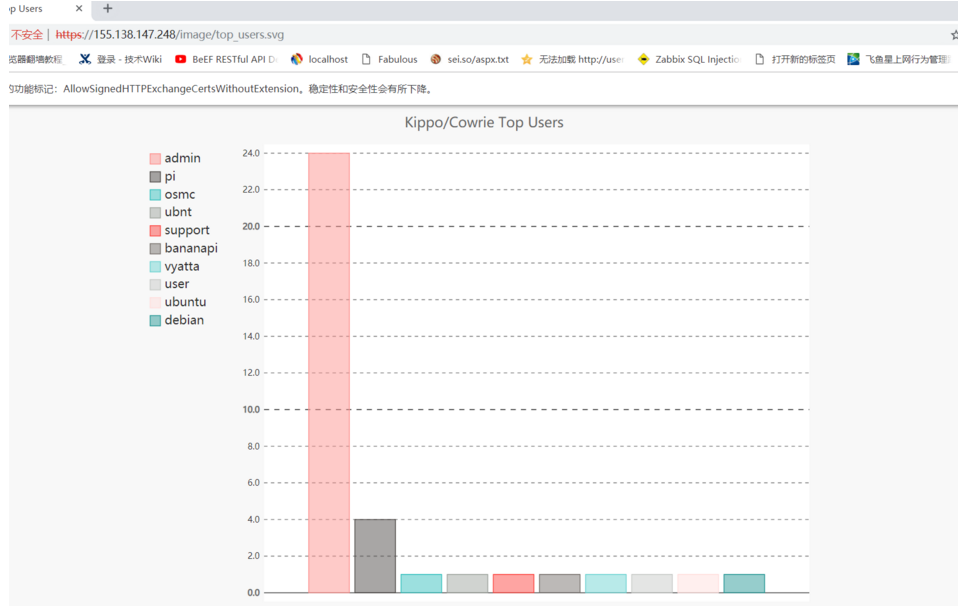
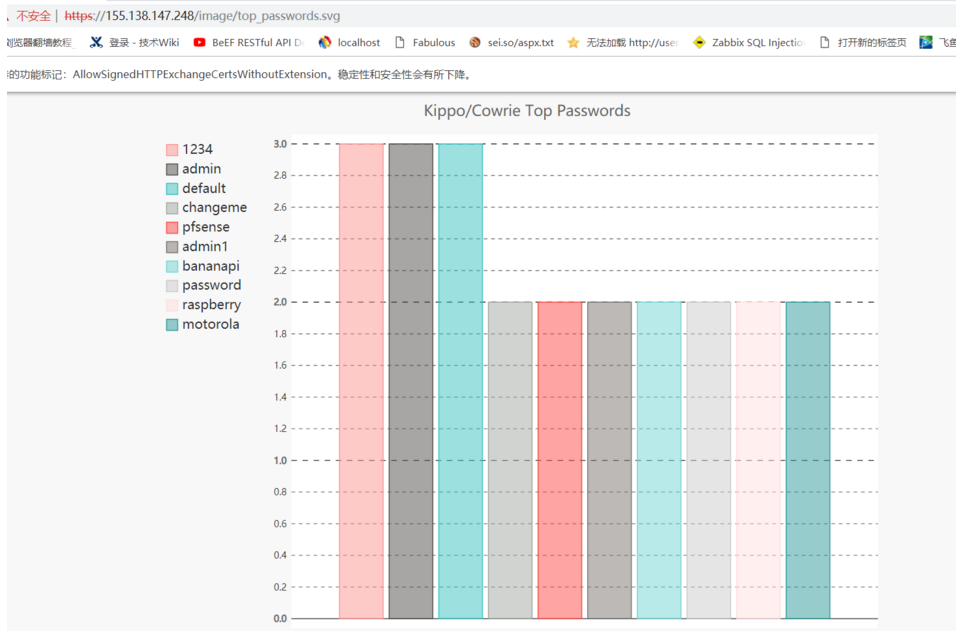
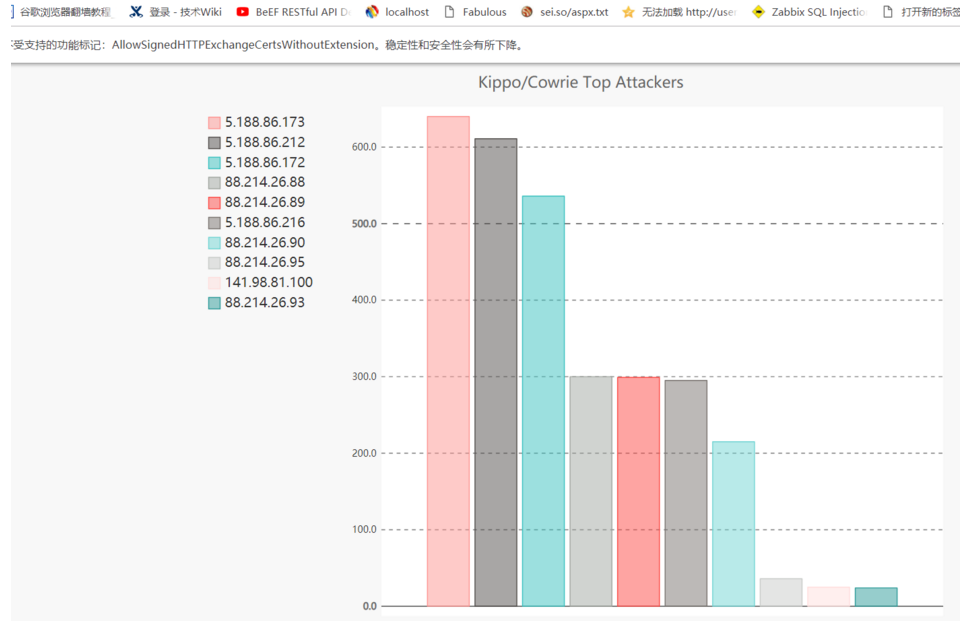
4. The figure below lists the top usernames and password dictionaries of attackers, etc.
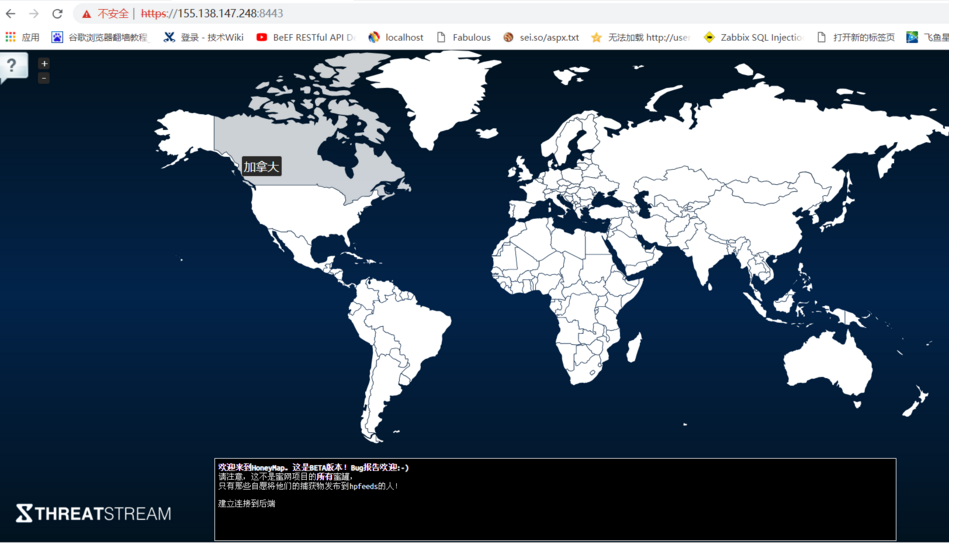
5. Access the following link to view a real-time attack map (honeymap)
0x05Troubleshooting and Security Settings
1.Check System Operational Status
root@mhn:/opt/mhn/scripts# sudo /etc/init.d/nginx status   #check nginx status

 * nginx is running

root@mhn:/opt/mhn/scripts# sudo /etc/init.d/supervisor status    #check supervisor status

 is running

root@mhn:/opt/mhn/scripts#sudo supervisorctl status  #check all honeypot system component status

geoloc                           RUNNING    pid 31443, uptime 0:00:12

honeymap                         RUNNING    pid 30826, uptime 0:08:54

hpfeeds-broker                   RUNNING    pid 10089, uptime 0:36:42

mhn-celery-beat                  RUNNING    pid 29909, uptime 0:18:41

mhn-celery-worker                RUNNING    pid 29910, uptime 0:18:41

mhn-collector                    RUNNING    pid 7872,  uptime 0:18:41

mhn-uwsgi                        RUNNING    pid 29911, uptime 0:18:41

mnemosyne                        RUNNING    pid 28173, uptime 0:30:08

root@mhn:/opt/mhn/scripts#sudo supervisorctl restart all   #restart all honeypot system components

Under normal conditions, the status of each service will be as follows:

geoloc                           RUNNING    pid 31443, uptime 0:00:12

honeymap                         RUNNING    pid 30826, uptime 0:08:54

hpfeeds-broker                   RUNNING    pid 10089, uptime 0:36:42

mhn-celery-beat                  RUNNING    pid 29909, uptime 0:18:41

mhn-celery-worker                RUNNING    pid 29910, uptime 0:18:41

mhn-collector                    RUNNING    pid 7872,  uptime 0:18:41

mhn-uwsgi                        RUNNING    pid 29911, uptime 0:18:41

mnemosyne                        RUNNING    pid 28173, uptime 0:30:08
2. Honeymap’s status is FATAL Solution
First, remove the old version of Golang

sudo rm -rf /usr/bin/go

sudo apt-get remove golang-go

sudo apt-get remove --auto-remove golang-go

Install Golang. If you install via apt-get install golang, you will encounter errors due to low Golang version, so download the compiled package directly

wget https://storage.googleapis.com/golang/go1.9.linux-amd64.tar.gz

Extract, then perform the following configuration

sudo tar -xzf go1.9.linux-amd64.tar.gz -C /usr//local/  //Make sure the package name matches your own

Import environment variables:


export GOROOT=/usr/local/go

export GOARCH=amd64

export GOOS=linux

export GOBIN=$GOROOT/bin/

export GOTOOLS=$GOROOT/pkg/tool/

export PATH=$GOBIN:$GOTOOLS:$PATH


Install the dependency plugin net and restart all honeypot system components

cd /opt/honeymap/server

export GOPATH=/opt/honeymap/server

mkdir -p $GOPATH/src/golang.org/x/
cd $GOPATH/src/golang.org/x/
git clone https://github.com/golang/net.git net
go install net

sudo supervisorctl restart all
3. mhn-celery-worker status is FATAL Solution
cd /var/log/mhn/

sudo chmod 777 mhn.log

sudo supervisorctl start mhn-celery-worker

If it still doesn't work

cd /var/log/mhn/  #check celery-worker error logs

tail -f mhn-celery-worker.err

The specific error message is as follows

worker.err supervisor: couldn't chdir to /root/mhn/server: EACCES supervisor: child process was not spawned)

Change permissions of the root home directory

chmod 777 -R /root  # Change permissions
4. Manual Password Reset
If email-based password reset isn't suitable, here's another method.
# cd /opt/mhn/server/server/

#apt install sqlite3

# sqlite3 mhn.db

SQLite version 3.7.9 2011-11-01 00:52:41

Enter ".help" for instructions

Enter SQL statements terminated with a ";"

sqlite> select * from user;

1|[email protected]|sklfdjhkasdlfhklsadhfklasdhfkldsahklsd|1|

sqlite>.quit

$ cd /opt/mhn/server/

$ source env/bin/activate

$ cd server

$ python manual_password_reset.py

Enter email address: YOUR_USER@YOUR_SITE.com

Enter new password:

Enter new password (again):

user found, updating password
5. Network Troubleshooting
$ sudo netstat -luntp  #check network port states

Active Internet connections (only servers)

Proto Recv-Q Send-Q Local Address           Foreign Address         State       PID/Program name

tcp        0      0 0.0.0.0:22              0.0.0.0:*               LISTEN      561/sshd

tcp6       0      0 :::21                   :::*                    LISTEN      3763/dionaea

tcp6       0      0 :::22                   :::*                    LISTEN      561/sshd

tcp6       0      0 :::1433                 :::*                    LISTEN      3763/dionaea

tcp6       0      0 :::443                  :::*                    LISTEN      3763/dionaea

tcp6       0      0 :::445                  :::*                    LISTEN      3763/dionaea

tcp6       0      0 :::5060                 :::*                    LISTEN      3763/dionaea

tcp6       0      0 :::5061                 :::*                    LISTEN      3763/dionaea

tcp6       0      0 :::135                  :::*                    LISTEN      3763/dionaea

tcp6       0      0 :::3306                 :::*                    LISTEN      3763/dionaea

tcp6       0      0 :::42                   :::*                    LISTEN      3763/dionaea

tcp6       0      0 :::80                   :::*                    LISTEN      3763/dionaea

udp        0      0 0.0.0.0:68              0.0.0.0:*                           464/dhclient3

udp        0      0 0.0.0.0:40077           0.0.0.0:*                           3763/dionaea

udp6       0      0 :::5060                 :::*                                3763/dionaea

udp6       0      0 :::69                   :::*                                3763/dionaea


$ sudo iptables -L  #check firewall rule status

Chain INPUT (policy ACCEPT)

target     prot opt source               destination


Chain FORWARD (policy ACCEPT)

target     prot opt source               destination


Chain OUTPUT (policy ACCEPT)

target     prot opt source               destination


$ sudo tcpdump -nnNN tcp port 10000  #monitor tcp 10000 data communication

tcpdump: verbose output suppressed, use -v or -vv for full protocol decode

listening on eth0, link-type EN10MB (Ethernet), capture size 65535 bytes

16:46:14.009646 IP 1.2.3.4.42873 > 5.6.6.8.10000: Flags [P.], seq 1180349317:1180349611, ack 2474834734, win 913, options [nop,nop,TS val 85084174 ecr 169636000], length 294

16:46:14.012967 IP 5.6.6.8.10000 > 1.2.3.4.42873: Flags [.], ack 294, win 162, options [nop,nop,TS val 169661444 ecr 85084174], length 0

# netstat -luntp | grep 10000   #check port 10000 state

tcp        0      0 0.0.0.0:10000           0.0.0.0:*

LISTEN      980/python

$sudo  tail -f hpfeeds-broker.err  #check hpfeeds-broker error information

INFO:root:Auth success by mnemosyne.

INFO:root:Auth success by mnemosyne.

INFO:root:Auth success by mnemosyne.

INFO:root:Auth success by mnemosyne.

INFO:root:Auth success by mnemosyne.

INFO:root:Auth success by mnemosyne.

INFO:root:Auth success by cb5a36e8-55e8-11e9-a746-560001faa574.

INFO:root:Auth success by cb5a36e8-55e8-11e9-a746-560001faa574.

INFO:root:Auth success by mnemosyne.

INFO:root:Auth success by mnemosyne.

$sudo  mongo hpfeeds

MongoDB shell version v3.4.20

connecting to: mongodb://127.0.0.1:27017/hpfeeds

MongoDB server version: 3.4.20

Welcome to the MongoDB shell.

For interactive help, type "help".

For more comprehensive documentation, see

 http://docs.mongodb.org/

Questions? Try the support group

 http://groups.google.com/group/mongodb-user

Server has startup warnings:

2019-04-03T07:28:15.543+0000 I STORAGE [initandlisten]

2019-04-03T07:28:15.543+0000 I STORAGE [initandlisten] ** WARNING: Using the XFS filesystem is strongly recommended with the WiredTiger storage engine

2019-04-03T07:28:15.543+0000 I STORAGE [initandlisten] ** See http://dochub.mongodb.org/core/prodnotes-filesystem

2019-04-03T07:28:15.579+0000 I CONTROL [initandlisten]

2019-04-03T07:28:15.579+0000 I CONTROL [initandlisten] ** WARNING: Access control is not enabled for the database.

2019-04-03T07:28:15.579+0000 I CONTROL [initandlisten] ** Read and write access to data and configuration is unrestricted.

2019-04-03T07:28:15.579+0000 I CONTROL [initandlisten]

2019-04-03T07:28:15.579+0000 I CONTROL [initandlisten]

2019-04-03T07:28:15.579+0000 I CONTROL [initandlisten] ** WARNING: /sys/kernel/mm/transparent_hugepage/defrag is 'always'.

2019-04-03T07:28:15.579+0000 I CONTROL [initandlisten] **
6. Set HTTPS Access for MHN and Port Security
Copy the generated SSL key files to /etc/ssl/private/
Copy the following configuration to /etc/nginx/sites-enabled/
/etc/nginx/sites-enabled/mhn-https
server {

    listen               80;

    listen              443 ssl;

    server_name         _;

    ssl_certificate     /etc/ssl/private/mhn.pem;

    ssl_certificate_key /etc/ssl/private/mhn-priv.key;


    if ($ssl_protocol = "") {

        rewrite ^ https://$host$request_uri? permanent;

    }


    location / {

        try_files $uri @mhnserver;

    }


    root /opt/www;


    location @mhnserver {

      include uwsgi_params;

      uwsgi_pass unix:/tmp/uwsgi.sock;

    }


    location  /static {

      alias /opt/mhn/server/mhn/static;

    }

}
/etc/nginx/sites-enabled/honeymap-https
map $http_upgrade $connection_upgrade {

             default upgrade;

             ''      close;

}


server {

             listen   8443 ssl;

             ssl_certificate     /etc/ssl/private/mhn.pem;

             ssl_certificate_key /etc/ssl/private/mhn-priv.key;


             root /opt/honeymap/client;

             index index.html index.htm;


             server_name _;


             location / {

                          try_files $uri $uri/ /index.html;

             }


             location /data/ {

                          proxy_pass http://localhost:3000;

                          proxy_http_version 1.1;

                          proxy_set_header Upgrade $http_upgrade;

                          proxy_set_header Connection $connection_upgrade;

             }

}
/etc/nginx/sites-available/splunk-https
map $http_upgrade $connection_upgrade {

        default upgrade;

        ''      close;

}


server {

        listen   8001 ssl;

        ssl_certificate     /etc/ssl/private/mhn.pem;

        ssl_certificate_key /etc/ssl/private/mhn-priv.key;


        root /tmp;

        index index.html index.htm;


        server_name _;


        location / {

                proxy_pass http://localhost:8000;

                proxy_http_version 1.1;

                proxy_set_header Upgrade $http_upgrade;

                proxy_set_header Connection $connection_upgrade;

        }

}
You need to enable the following ports and allow the firewall rules to run on the MHN server. All other ports can be blocked.
TCP: 443 TCP: 3000
7. Backup Data
Perform data backup on the MHN server
sudo su -

supervisorctl stop all

mongodump  --db hpfeeds

mongodump  --db mnemosyne

tar zcvf mhn-backup.tar.gz dump /opt/mhn/server/mhn.db

supervisorctl start all
Copy mhn-backup.tar.gz to a secure place
8. Data Recovery
Use install.sh to set up MHN, then copy mhn-backup.tar.gz to the /tmp/ directory and execute the following commands
sudo su -

supervisorctl stop all

cd /tmp

tar zxvf mhn-backup.tar.gz

cp /opt/mhn/server/mhn.db /opt/mhn/server/mhn.db

service mongod start
dump.sh script:for FILE in dump/mnemosyne/*.bson;
do
mongorestore --drop --db mnemosyne "$FILE"
done
for FILE in dump/hpfeeds/*.bson;
do
mongorestore --drop --db hpfeeds "$FILE"
donesupervisorctl start all0x06 Summary
Usage
- Honeypots can be present in various environments (data centers, internal networks, cloud environments);
- Honeypot products should be considered after firewalls and intrusion detection, as supplementary products to improve enterprise security levels;
- Honeypots are primarily deployed in enterprise internal networks for early warning and understanding of intrusion situations, such as: detecting PC infections and internal network intrusions, diverting attackers’ attention, etc.;
- Honeypots shouldn’t be set too simply, nor too complex;
Advantages
- Integrates a large number of honeypot systems with a one-click deployment method;
- Supports visual display of honeypot attack effects, integrating well with ArcSight or Splunk;
Disadvantages
- Deployment time can take a long time (not really a downside, as it’s not an issue with a good network speed);
- Doesn’t support centralized management of honeypots;
0x07 References
Build Your Own Honeypot Network In Under An Hour
https://www.cnblogs.com/Eleven-Liu/p/9284417.html