
During the integrated approach to intrusion detection with firewalls, it was discovered that there was limited information available on this topic. After successfully researching Snort Installation, I am sharing it with everyone.
Snort, an excellent open-source host intrusion detection system, can be installed and run on both Windows and Linux platforms. BT5, once a classic penetration tool, is based on Ubuntu and comes pre-installed with many applications such as MySQL, Apache, Snort, and others. Guardian is a Snort plugin that reads Snort alert logs and adds the intrusion IP to Iptables. Iptables is an IP packet filtering system integrated with the latest 3.5 version Linux kernel.
This article details the process of installing Snort NIDS in BT5 and integrating it with the iptables firewall.
Snort Installation Process
0X00 Install LAMP, Snort, and some relevant software
Using Ubuntu’s default command line package manager, apt, to install.
apt-get install libpcap0.8-devlibmysqlclient15-dev mysql-client-5.1 mysql-server-5.1 bison flex apache2libapache2-mod-php5 php5-gd php5-mysql libphp-adodb php-pear pcregrep snortsnort-rules-default iptablesYou might encounter an error here, saying that the MySQL version is too low. Just follow the prompt to change the MySQL version number, and you should be fine.
0X01 Create a Database for Snort in MySQL
There is a default package in the Ubuntu software repository called snort-mysql that provides auxiliary functions. Use the package manager to install this package.
# apt-get install snort-mysqlOnce installed, view the help documentation:
# less /usr/share/doc/snort-mysql/README-database.DebianThe content can be reviewed on your own, as the English is quite simple. It discusses the following configuration process.
A reminder that BT5 has MySQL pre-installed, with root password “toor”.
Follow the instructions in the README document to create a Snort database user and database in MySQL. Use the following commands:
$ mysql –u root –ptoormysql> CREATE DATABASE snort;mysql> grant CREATE, INSERT, SELECT, UPDATE on snort.* to snort@localhost;mysql> grant CREATE, INSERT, SELECT, UPDATE on snort.* to snort;mysql> SET PASSWORD FOR snort@localhost=PASSWORD('snort-db');mysql> exitThe above commands create a Snort database in MySQL and a Snort user to manage the database, with the password set to snort-db.
0X02 Establish the Structure of the Snort DatabaseAccording to the instructions in README-database.Debian, we can establish the structure of the Snort database.
# cd /usr/share/doc/snort-mysql# zcat create_mysql.gz | mysql -u snort -Dsnort -pYou will be prompted to enter the password: snort-db
This will establish the database structure for Snort in MySQL, including all necessary tables used by Snort.
Start MySQL with /etc/init.d/mysql start.
Log in with the Snort user to have a look:
# mysql –u snort –ptoormysql> show databases;+--------------------+| Database |+--------------------+| information_schema || snort |+--------------------+2 rows in set (0.00 sec)mysql> use snort;Database changedmysql> show tables;+------------------+| Tables_in_snort |+------------------+| data || detail || encoding || event || icmphdr || iphdr || opt || reference || reference_system || schema || sensor || sig_class || sig_reference || signature || tcphdr || udphdr |+------------------+16 rows in set (0.00 sec)Bingo, successful.
0X03 Configure Snort to Output Log Files to MySQL Database
Edit the Snort configuration file: /etc/snort/snort.conf
# vim /etc/snort/snort.confIn the configuration file, comment out the HOME_NET related items and then set HOME_NET to the local IP network. Comment out the EXTERNAL_NET related items and set it to a non-local network, as shown below:
#var HOME_NET anyvar HOME_NET 10.10.10.0/24 #var EXTERNAL_NET anyvar EXTERNAL_NET !$HOME_NETComment out the output database related items and set the log output to the MySQL database, as shown below:
output database: log, mysql, user=snort password=snort-db dbname=snort host=localhostThis way, Snort will store records in the Snort database in MySQL.
0X04 Configure Snort to Output Log Files in ASCII Format
Note, this step is crucial for the interaction between Snort and the firewall. The original output format of Snort’s alert logs was:
output log_tcpdump: tcpdump.log This output format is not ASCII, which cannot be used for Guardian for firewall interaction. So, we need to change the output type to the following format:
output alert_fast: alert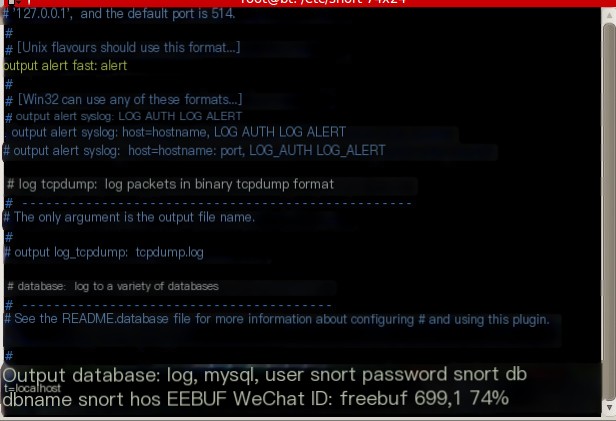 >
>
Alert fast output method: Snort quickly prints alert information on a single line in the specified file. It is a quick alert method because it does not need to print all the information in the packet header. Now you can test whether Snort is working properly:
# snort -c /etc/snort/snort.conf -i eth2 (fill in your network card number)If an ASCII-formed small pig appears, Snort is working fine. You can exit by pressing Ctrl-C; if Snort exits abnormally, check the above configurations for correctness.
0X05 Specify an IP for Exemption from Intrusion Detection
When starting Snort, add the following content to the end to bypass intrusion detection for a particular IP:
snort -c /etc/snort/snort.conf -i eth2 not (host 192.168.219.151 or host 10.10.10.131 )If there are many IPs to be exempted, these contents can be written in a bpf file. Use -F to introduce this file when starting.
 >
>
snort -c /etc/snort/snort.conf -i eth2 -F filters.bpf0X06 Test Whether the Web Server Apache and PHP Work Properly
Configure the php module of Apache, adding the extensions for msql and gd.
# vim /etc/php5/apache2/php.iniextension=msql.soextension=gd.soRestart Apache
# /etc/init.d/apache2 restartCreate a new text file test.php in the /var/www/ directory
# vim /var/www/test.phpEnter the content:
If the above method doesn’t work, you can try the following:
The start and stop files are: /etc/init.d/apache2
Start: apache2ctl -k start
Stop: apache2ctl -k stop
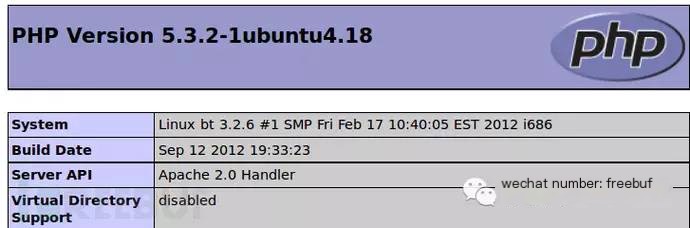
After starting Apache2, enter http://localhost/test.php in the browser. If the configuration is correct, the classic PHP INFO screen will appear, indicating that LAMP is working properly. This page contains a lot of useful information, such as the location information of php.ini.
0X07 Install and Configure Acidbase
Acidbase is one of the best graphical management interfaces for Snort management. Installing Acidbase is simple, just use the Ubuntu package manager to install it:
# apt-get install acidbaseDuring installation, you will need to enter the database used by Acidbase, select MySQL here, root user password toor, and the password for acid-base. The guided interface is well-explained, just follow the prompts.
Copy Acidbase from the installation directory to the www directory, or directly establish a virtual directory pointing to the installation directory in Apache. Copying it here is mainly for security concerns.
cp –R /usr/share/acidbase/ /var/www/Getting closer to success.
The base_conf.php file in the /usr/share/acidbase directory originally points to a symbolic link in /etc/acidbase/. To ensure permission control, delete /usr/share/acidbase/base_conf.php. Acidbase will automatically create a base_conf.php file in this folder after completing the web page configuration. Therefore, we need to give write permission to the Acidbase folder, but remember to change the permissions back after the configuration.
# rm base_conf.phpTemporarily change the permissions of /usr/share/acidbase/ directory to allow others to write, mainly for configuring acidbase.
# chmod 757 acidbase/After copying Acidbase, open localhost/acidbase, and the following page should appear.
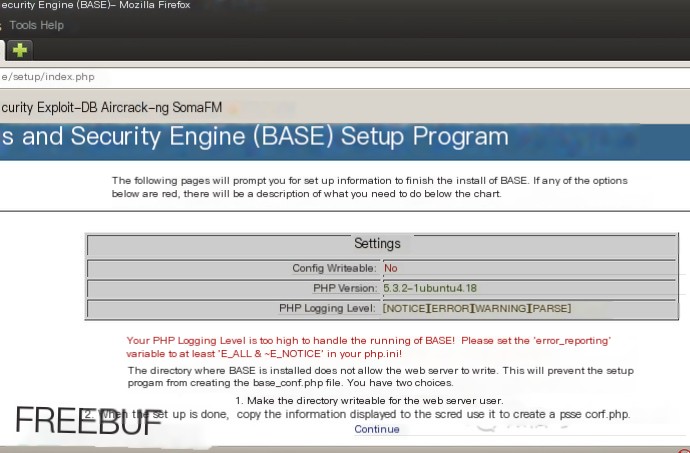
Click continue.
Now you can start configuring Acidbase. Enter http://localhost/acidbase in the browser address bar, and it will navigate to the installation interface. Then click continue and follow the prompts step by step to install:
(1) Set language to simple_chinese, adodb path to /usr/share/php/adodb;(2) Select MySQL as the database, with snort as the database name, localhost as the database host, and snort as the database username with password snort-db;(3) Then click submit query directly.(4) Set the system administrator username and password for Acidbase, with admin as the administrator username and test as the password. Then continue to proceed, and it will complete the installation.(5) After finishing the configuration, you can enter the login interface, enter the username and password, and access the acidbase system.Click create BASE AG
The first success is shown as below!
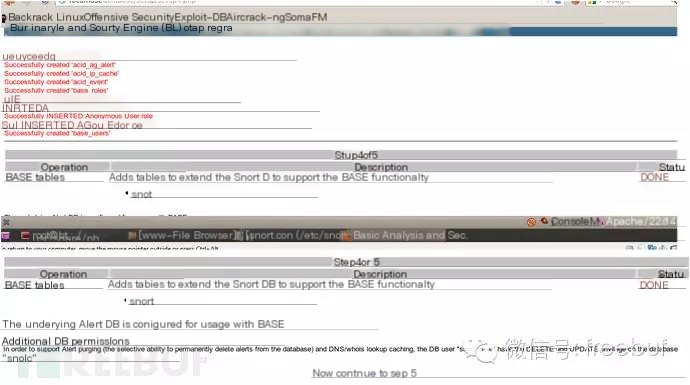
Then click step5 to see this, indicating successful configuration.
Change the permissions of the Acidbase directory back to ensure security, and then start Snort, indicating that the Snort intrusion detection system installation has been completed and started normally:
# chmod 755 acidbase/# snort -c /etc/snort/snort.conf -i eth2Restart apache2ctl after modification, and you’re done. But not completely yet, because there is still the following issue:
0X08 Configure Acidbase to Send Alert Emails
First, download sendmail :
apt-get install sendmailThen make some changes to the php.ini file,
Set sendmail_path = /usr/sbin/sendmail and sendmail_from = [email protected]
Check the following website for specific modification information. There is a lot of useful information here.
http://www.quackit.com/php/tutorial/php_mail_configuration.cfm
Then go into base_conf.php in /usr/share/acidbase/ and find the problem below that I was looking for. Change it to the following format to set the mail parameter values introduction.
$action_email_smtp_host = 'smtp.163.com';$action_email_smtp_localhost = 'localhost';$action_email_smtp_auth = 1;$action_email_smtp_user = 'Enter your email address here, e.g., [email protected]';$action_email_smtp_pw = 'Enter your email password here';$action_email_from = 'Enter the email address in smtp_user here';$action_email_subject = 'BASE Incident Report is the email name';$action_email_msg = '';$action_email_mode = 0;After configuration, restart the Apache2 server. After completion, select any one or more alert messages in BASE, click the option bar at the bottom of the page, fill in the mailbox in the blank box behind, select send alert email. Alert emails will be received soon.
At this point, the work comes to a halt, but it still falls short of the interaction with the firewall. Next, configure Guardian to achieve interaction between Snort and Iptables, provided that Iptables is already installed on the machine.
0X09 Download Guardian
Guardian needs to be downloaded from the official website http://www.chaotic.org/guardian/
After downloading
# tar zxvf guardian-1.7.tar.gzIn the unzipped folder, perform the following script copying operation:
# cp guardian.pl /usr/local/bin # cp scripts/iptalbes_block.sh /usr/local/bin/guardian_block.sh# cp scripts/iptalbes_unblock.sh /usr/local/bin/guardian_unblock.sh # touch /etc/snort/guardian.ignore Create whitelist# touch /etc/snort/guardian.target Create blacklist# touch /var/log/snort/guardian.log Guardian's logNecessary Explanation:
(1) Guardian's executable file guardian.pl(2) The external program that Guardian invokes to block an IP is scripts/iptalbes_block.sh(3) The external program that Guardian invokes to unblock an IP is scripts/iptalbes_unblock.shConfigure Guardian.conf
Guardian’s configuration file is as follows:
Interface eth0HostGatewayByte 1LogFile /var/log/guardian.logAlertFile /var/log/snort/alert IgnoreFile /etc/guardian.ignoreTargetFile /etc/guardian.targetTimeLimit 86400TimeLimit: Unblock the IP after how many seconds, 86400 seconds is 24 hours later to unblock the IP. AlertFile is key, with the prerequisite that Snort outputs alert information in alert_fast format.
After completing the configuration, start Guardian:
/usr/bin/perl /usr/local/bin/guardian.pl -c /etc/guardian.conf0X10 Verify the Interaction Result between IDS and Iptables
There are hosts A and B
Host A IP: 10.10.10.135
Host B IP: 10.10.10.151
Check the firewall status information of host B:
root@bt:/etc/snort# iptables -L -nChain INPUT (policy ACCEPT)target prot opt source destination Chain FORWARD (policy ACCEPT)target prot opt source destination Chain OUTPUT (policy ACCEPT)target prot opt source destination You have new mail in /var/mail/rootUse WVS on host A to scan the website on host B:
Check the firewall information of host B again, and the firewall has already added Host A’s IP to it.
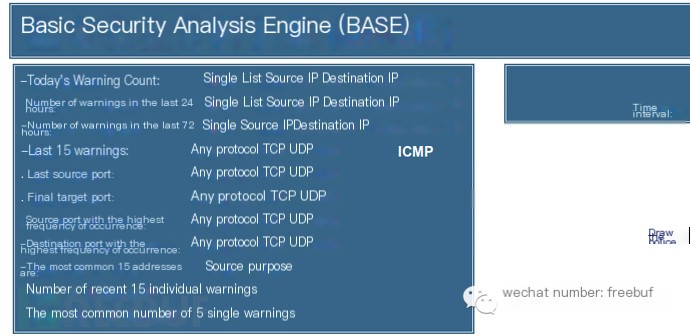
root@bt:~# iptables -L -nChain INPUT (policy ACCEPT)target prot opt source destination DROP all -- 10.10.10.151 0.0.0.0/0 Chain FORWARD (policy ACCEPT)target prot opt source destination Chain OUTPUT (policy ACCEPT)target prot opt source destinationThe alert information generated by BASE:

At this point, WVS on host A is dynamically inoperable. Look at the error log of WVS:
07.01 19:18.37, [Error] Server "http://10.10.10.135:80/" is not responsive.07.01 19:18.37, [Error] Cannot connect.07.01 19:18.37, [Error] Cannot connect. [00020004]Error while connecting to web serverExperience:
Reading the README files of open-source software is a must, as it is equivalent to the product manual, it’s best to take the time to read English carefully.
My Blog:
http://weibo.com/u/2724542745