

Previously, I wrote an article titled “Quick Self-Check to See if a Computer Has Been Hacked (Windows Version).” This time, I will discuss the Linux version, focusing on hack detection.
Introduction
Strictly speaking, Linux is just a kernel. GNU Linux forms a complete operating system, but in this article, we’ll use the more commonly known term “Linux”.
Distributions such as Ubuntu, Debian, RedHat, CentOS, and ArchLinux are collectively referred to as Linux.
The methods discussed in this article are not only applicable to Linux distributions but also to some extent applicable to the Mac OSX operating system.
Abnormal Accounts and Permissions
If a hacker has had the opportunity to run commands, they would often want to maintain this access, known in the industry as persistence.
Creating backdoor accounts is often a pathway to persistence.
Check for Abnormal Accounts
Search Users
Using cat /etc/passwd allows you to view all users and their group information currently on the system. If there are too many accounts to see at a glance,
I typically use the following method to filter them:
cat /etc/passwd | awk -F: '{print $7}' | sort | uniq -cThe purpose of this command is to print all shell types and their counts, and users with shells need to be scrutinized carefully.
Check Users
If an abnormal username (let’s say hacker) is found during the previous step, you can use the following methods to inspect the user in detail:
- View user ID and group information: id hacker
- View recent login information of the user: lastlog -u hacker
- View historical login information: last hacker
- View failed login attempts: lastb hacker
- View comprehensive information: finger hacker
Note: The finger command is not built into some operating systems and can be installed using package management tools, such as:
Ubuntu/Debian: apt-get install finger
CentOS/RedHat: yum install finger
ArchLinux: pacman -S finger
Other non-built-in commands mentioned later are similar.
Check Abnormal Permissions
Typical Linux users will use sudo to allow regular users to execute root operations, so existing regular users should not be taken lightly either. Permissions managed by sudo can be viewed in /etc/sudoers and /etc/sudoers.d, and it is best to regularly check these files to ensure no regular user has gained unexpected permissions. For each regular user,
you can use the command groups username to query their group memberships, and if they belong to the root or sudo group,
or if the group is listed in the /etc/sudoers file, then special attention is needed.
Abnormal Auto-Start Items
The auto-start process in Linux differs based on its service manager, with three common types:
Upstart
Upstart is event-based and replaces the traditional /sbin/init process for handling tasks and services to auto-start.
You can view this type of auto-start file with the following commands:
- View all auto-start items:
initctl list - View a specific auto-start item:
initctl show-config evil
SystemV
SystemV underlies the commonly used service start/stop/status xxx.service command service management system.
You can view this type of auto-start file with the following commands:
- View auto-start scripts:
ls /etc/init.d/ - View runlevel symbolic links:
ls /etc/rc*.d/
SystemD
SystemD is a modern service management system, and most newer Linux versions have migrated to SystemD.
There are two ways to view all auto-start services:
systemctl list-unit-files --type=servicels /lib/systemd/system/*.service /etc/systemd/system/*.service
Older versions of Linux generally used a mix of Upstart and SystemV, while newer versions have mostly migrated to SystemD.
Miscellaneous
Abnormal Scheduled Tasks
Beyond the aforementioned auto-start services, Linux can also use scheduled tasks for persistence. Checking for abnormal scheduled tasks is relatively simple,
as you only need to view the scheduled task files in /etc/crontab and the subdirectory /etc/cron.*.
Bash Initialization
Anyone who has used Linux knows that you can configure initial settings in the $HOME/.bashrc file and apply them to each shell,
which means that scripts there can be run each time a new terminal is opened.
These configuration files include .bashrc, .bash_profile, .bash_login, .profile, etc.
Whether they run and their execution order depends on whether a shell is login or non-login and whether it runs interactively. For bash, the execution process is as follows in the table:
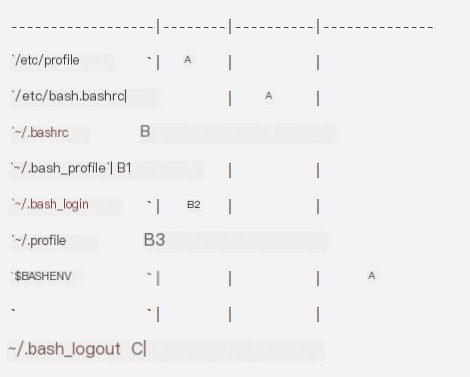 >
>
The execution order is A->B->C, and B[123] indicates that only when the first script exists will it be executed. It is represented as follows in a flowchart:
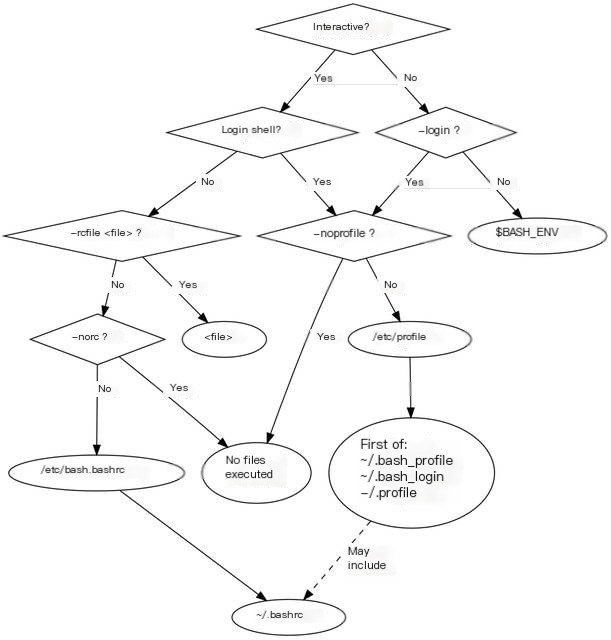 >
>
Refer to other online information regarding login/non-login shell and interactive/non-interactive shell, as it will not be elaborated here.
Simply knowing the shell initialization sequence of the files executed can help identify suspicious commands and detect abnormal information.
Application-Level Auto-Start
Finding all suspicious auto-start items is challenging, as experienced attackers may modify existing auto-start scripts to add additional commands,
thereby minimizing the risk of detection. Some Linux desktop versions are also responsible for running similar auto-start commands. For instance, my favorite, xfce,
allows adding auto-start applications under Settings -> Session Startup -> Application Autostart.
Abnormal Records
Abnormal Command History
Generally, if hackers gain shell access, they will execute certain commands on it, which can be reviewed using the history command to see the commands executed.
Or you can directly check the ~/.bash_history file. A clever hacker may erase traces after executing their malicious tasks, but if you find the history has been maliciously cleared,
or abnormally altered, it should signal us to be on alert.
Abnormal Log Records
Logs, especially system logs, are our excellent allies. The following commands can be used to read log files and output relevant information:
- View the most recent login times and IPs for each user:
lastlog - View login records for each user:
last - View login attempts (including failures) for each user:
lastb - View current logged-in users, IPs, and ongoing commands:
w
Of course, diligent attackers may also hide their traces within these commands, for example, using small tools like hidemyass.
System logs are generally generated by the rsyslogd process, configured in the /etc/rsyslog.conf file and the /etc/rsyslog.d/ directory. Some common logs and their introductions are as follows:
- /var/log/messages: General system logs
- /var/log/kern.log: System kernel logs
- /var/log/boot.log: System boot logs
- /var/log/auth.log: Login-related logs, such as successful and failed ssh/sudo logs
- /var/log/secure: Similar to the above
- /var/log/cron.d: Execution logs for cron scheduled tasks
By reviewing these logs, unexpected traces (if any) can often be discovered.
The Crime Scene
While the main focus of self-checks is identifying clues and indicators from traces of crime, sometimes malicious software left by attackers might still be actively running,
and thus searching for leads at the crime scene is also a good idea.
Abnormal Processes
To find abnormal processes, you can use the top command to view running programs and the resources they occupy, or use ps -ef to list current system processes.
If unfamiliar processes are found, the following commands can be used for detailed inspection:
- View the full command line that started the process:
ps eho command -p $PID - View the directory from which the process was launched:
readlink /proc/$PID/cwd - View the complete environment variables during the process’s start:
strings -f /proc/$PID/environ | cut -f2 -d ' ' - List all files opened by the process:
lsof -p $PID - List all network connections opened by the process:
netstat -pan | grep $PID
Of course, if attackers use some means to hide the process, some clues may still be left behind, such as suspicious LKM modules, which will not be explored further here.
Abnormal Network Traffic
If a malicious process is in operation, it might be communicating with the external network, necessitating packet capture tools for analysis.
For Linux desktop users, Wireshark is an excellent choice, while tcpdump is a great tool for the server side, and knowing how to use it is also essential.
Take Wireshark, for example: opening packet capture for a few minutes, using built-in filtering rules combined with the applications’ opened network connections analyzed above,
can reveal what malicious interactions the application is engaged in with the outside, allowing for timely loss assessments and data protection.
In addition to malicious software-initiated browsing, some may initiate themselves. For instance, an attacker modifying iptables, DNS, HTTP proxy,
or /etc/hosts may lead our normal network requests to be monitored and altered by the attacker. These subtle modifications may not be immediately apparent,
but once we notice our network environment seeming ‘off,’ we need to be more vigilant and thoroughly check it.
Postscript
Those using Linux as a daily desktop operating system generally have some technical skills, but “the higher the road, the more skillful the magic,”
so those who attack Linux typically also possess higher technical skills, making this article slightly more detailed compared to the Windows version of self-check.
As the saying goes, “Knowing the attack, we can know the defense,” many of the self-check methods in this article are also derived from my daily red team experiences, hoping it can help to increase the security awareness and defensive capabilities of our friends.