

1. Main Menu Wireshark: Introduction
Today, Brother Hong should discuss the interface features of Wireshark from an appearance perspective, following the previous explanations and shared path. Make sure to include the keyword “Main Menu Wireshark” in the discussion.
Main Menu Wireshark: 2. Software Interface
From top to bottom, the order is title bar, main menu bar, main menu toolbar, display filter textbox, open area, recently captured and saved files, capture area, capture filter textbox, all network interfaces of this machine, learning area, and user guide, etc.
2.1 Startup Interface
When you start Wireshark for the first time, the following startup interface appears, as shown below:
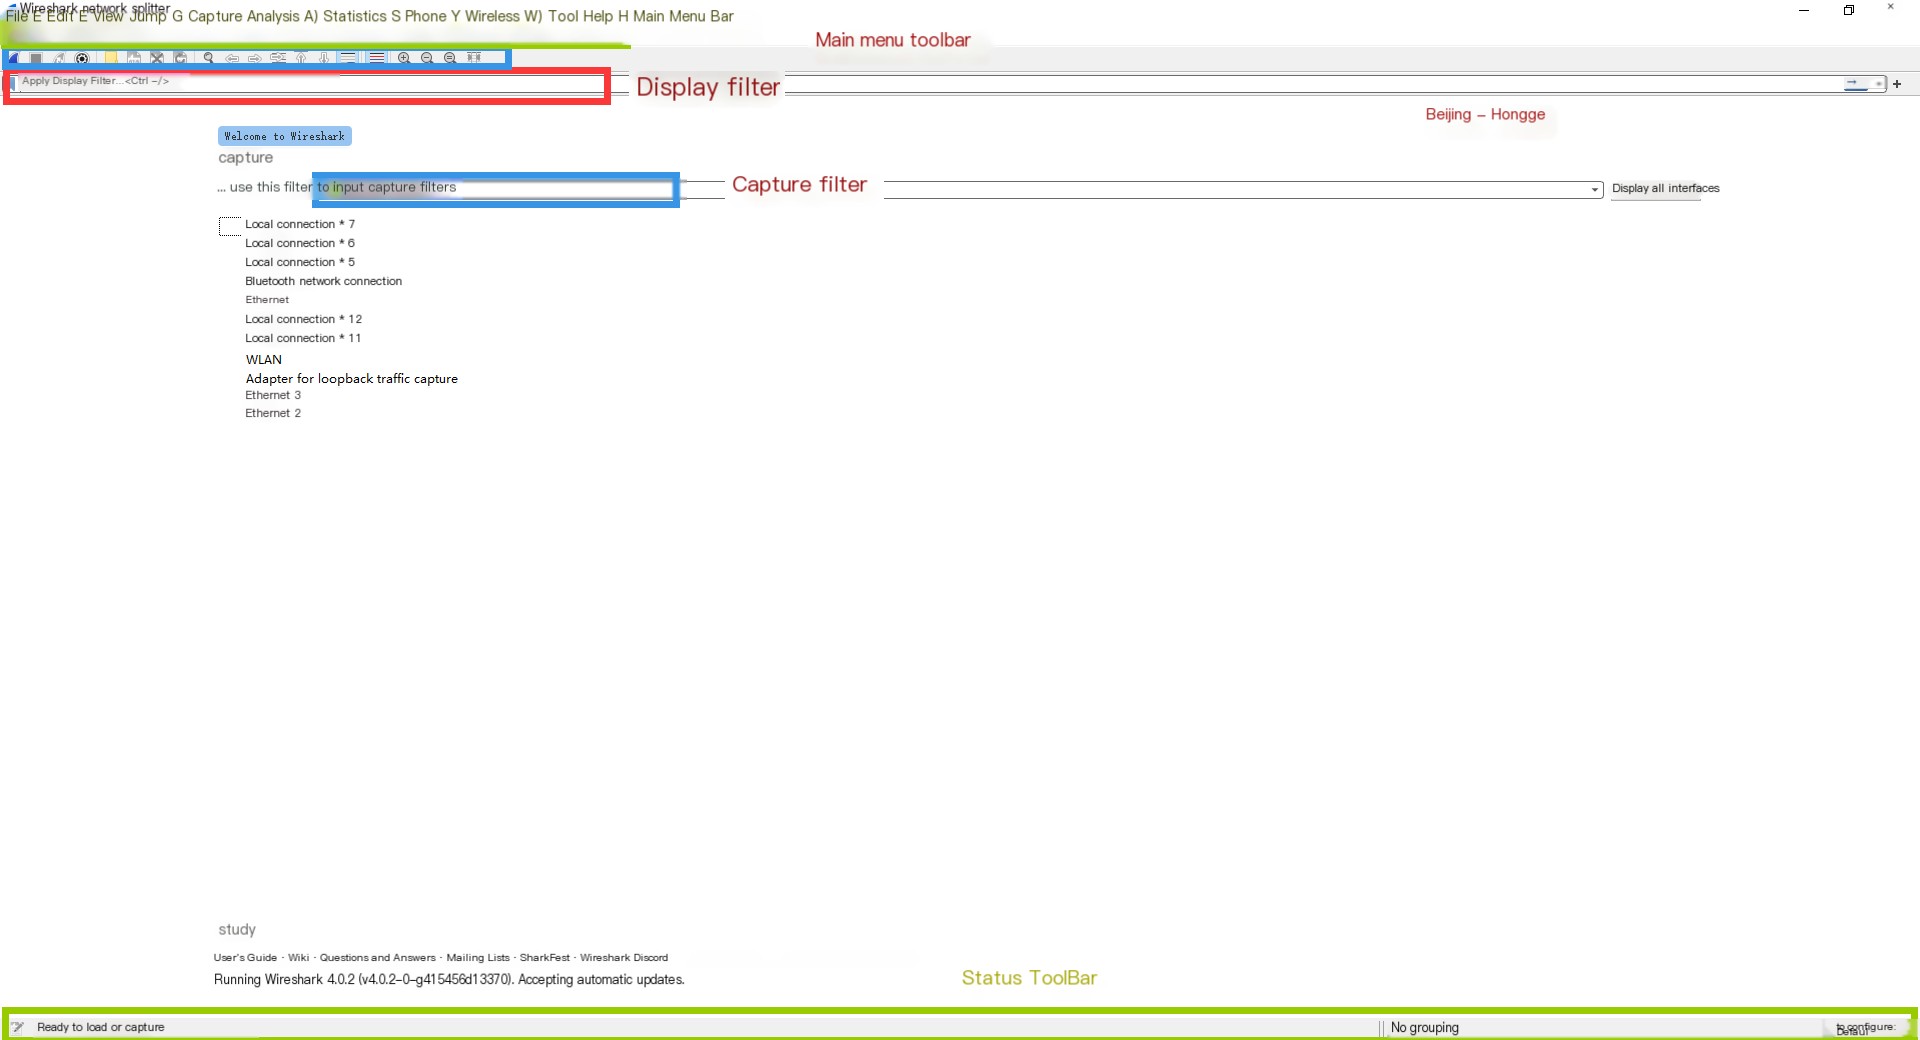
Brother Hong divides the entire interface into four parts:
- Main Menu
- Main Menu Toolbar
- Filtering Tools
- Interface List
- Status Toolbar
2.2 Main Menu
Main Menu: It is located at the top of the main window and contains 11 items. Brother Hong does not intend to describe each item in detail, but rather introduce a few important aspects. As shown below:

2.2.1 File Menu
The English name of the “File” menu is “File”. This menu includes the options to open and merge captured data files, partially or fully save/print/export captured data files, and exit the application, among others. The file menu contains a basic set of I/O operations, allowing you to open and close files, import and export operations, and of course, you can exit Wireshark from here.
Mainly it deals with the operations of packet capture files:
① File open, save.
② Export specific packets: You can choose to export all packets, the packets displayed in the main interface, the packets selected in the main interface, marked packets, packets between the first and the last marked packet, packets set by packet number segment, or not to save ignored packets when saving.
③ Export specific formats (pcap, csv, text txt, XML, json, etc.) Export your CSV format can be opened with Excel for further statistical analysis. As shown below:
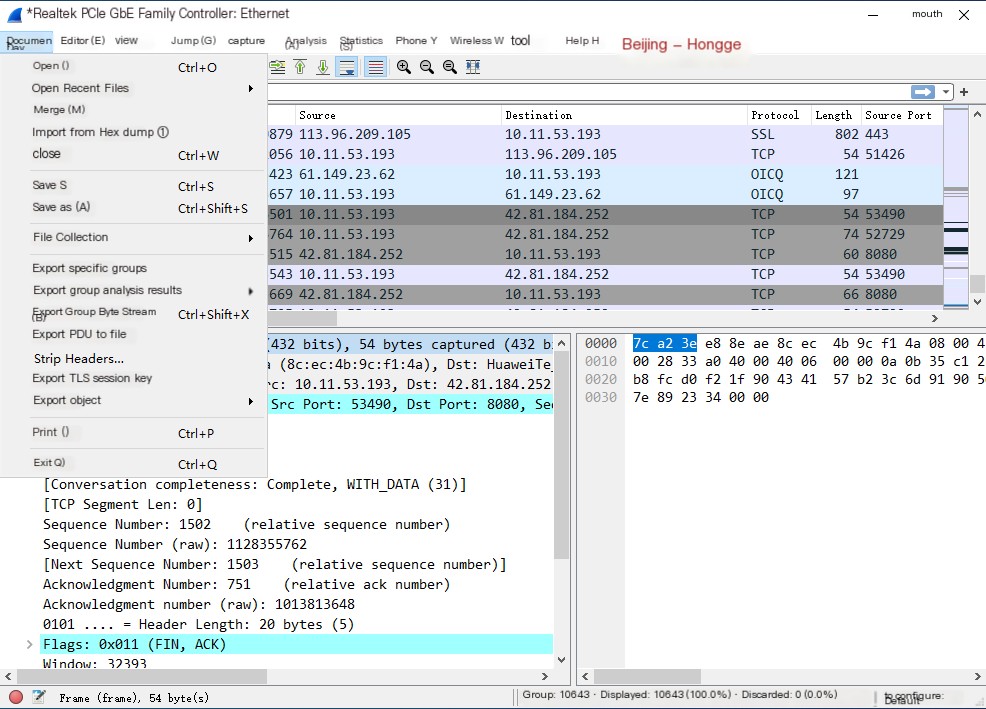
File Menu Item Descriptions:
|
Menu Item |
Shortcut Key |
Description |
|---|---|---|
|
Open… |
Ctrl+O |
This will display the “File Open” dialog where you can load capture files for viewing. |
|
Open Recent |
This allows you to open recently opened capture files. Clicking one of the submenu items will directly open the corresponding capture file. | |
|
Merge… |
This menu item allows you to merge capture files into the currently loaded file. | |
|
Import from Hex Dump… |
This menu item will open the “Import File” dialog, allowing you to import a text file containing hex dumps into a new temporary capture. | |
|
Close |
Ctrl+W |
This menu item closes the current capture. It will first ask you to save (can be disabled via preferences) if the capture hasn’t been saved yet. |
|
Save |
Ctrl+S |
This menu item saves the current capture. If you haven’t set a default capture file name (maybe using the -w option), Wireshark will pop up a “Save Capture File As” dialog. If you have already saved an image of the current capture, this menu item will be grayed out. You cannot save a live capture while capturing is in progress. You must stop capturing to save. |
|
Save As… |
Shift+Ctrl+S |
This menu item allows you to save the current capture file to any desired file. It will pop up a “Save Capture File As” dialog. |
|
File Set → List Files |
This menu item allows you to display a file list of a file set. It will pop up the “Wireshark List File Set” dialog. | |
|
File Set → Next Files |
If the currently loaded file is part of a file set, move to the next file in that set. | |
|
File Set → Previous Files |
If the currently loaded file is part of a file set, move to the previous file in the set. | |
|
Export Specified Packets… |
This menu item allows you to export all (or parts) of the packets from the capture file to a file. It will pop up the Wireshark Export dialog. | |
|
Export Packet Dissections… |
Ctrl+H |
These menu items allow you to export the bytes selected in the packet bytes pane to a text file in various formats, including plain, CSV, and XML. |
|
Export Packet Bytes… | ||
|
Export PDU to File | ||
|
Strip Headers | ||
|
Export TSL Session Keys | ||
|
Export Objects |
These menu items allow you to export captured DICOM, HTTP, IMF, SMB, or TFTP objects to a local file. It pops up a corresponding object list. | |
|
Print… |
Ctrl+P |
This menu item allows you to print all (or some) packets from the capture file. It will pop up the Wireshark Print dialog. |
|
Quit |
Ctrl+Q |
This menu item allows you to quit Wireshark. If you have not saved before, Wireshark will prompt you to save the capture file (can be disabled via preferences). |
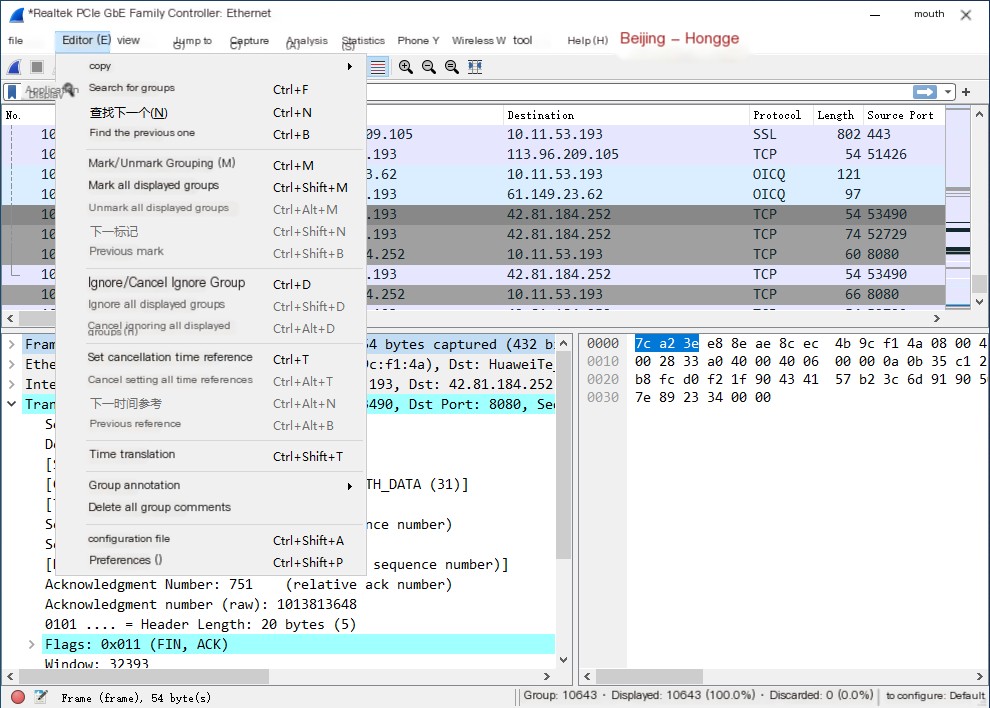
2.2.2 Edit Menu
The English name of the “Edit” menu is “Edit”. This menu contains options to find packets, set time references, mark packets, set profiles, set preferences, etc. Note that there are no cut, copy, and paste options in the “Edit” menu. The most commonly used function in Edit is preferences; the rest are mostly shortcuts, which are self-explanatory, so no further explanation is needed. As shown below:
Edit Menu Item Descriptions:
|
Menu Item |
Shortcut Key |
Description |
|---|---|---|
|
Copy |
These menu items copy the packet list, packet details, or the attributes of the currently selected packet to the clipboard. | |
|
Find Packet… |
Ctrl+F |
This menu item opens a toolbar that lets you find packets based on many possible criteria. |
|
Find Next |
Ctrl+N |
This menu item tries to find the next packet matching the settings in “Find Packet…”. |
|
Find Previous |
Ctrl+B |
This menu item tries to find the previous packet matching the settings in “Find Packet…”. |
|
Mark/Unmark Packet |
Ctrl+M |
This menu item marks the currently selected packet. For more details, see below. |
|
Mark All Displayed Packets |
Ctrl+Shift+M |
This menu item marks all displayed packets. |
|
Unmark All Displayed Packets |
Ctrl+Alt+M |
This menu item unmarks all displayed packets. |
|
Next Mark |
Ctrl+Shift+N |
Find the next marked packet. |
|
Previous Mark |
Ctrl+Shift+B |
Find the previous marked packet. |
|
Ignore/Unignore Packet |
Ctrl+D |
This menu item marks the currently selected packet as ignored. More details below. |
|
Ignore All Displayed |
Ctrl+Shift+D |
This menu item marks all displayed packets as ignored. |
|
Unignore All Displayed |
Ctrl+Alt+B |
This menu item unmarks all ignored packets. |
|
Set/Unset Time Reference |
Ctrl+T |
This menu item sets a time reference on the currently selected packet. More details on time reference packets. |
|
Unset All Time References |
Ctrl+Alt+T |
This menu item removes all time references from packets. |
|
Next Time Reference |
Ctrl+Alt+N |
This menu item tries to find the next time reference packet. |
|
Previous Time Reference |
Ctrl+Alt+B |
This menu item tries to find the previous time reference packet. |
|
Time Shift… |
Ctrl+Shift+T |
Opens the “Time Shift” dialog, where you can adjust the timestamp of some or all packets. |
|
Packet Comment… |
Ctrl+Alt+C |
Opens the “Packet Comment” dialog, where you can add comments to individual packets. Note that the ability to save packet comments depends on your file format. For example, pcapng supports comments, whereas pcap does not. |
|
Delete All Packet Comments |
This removes all comments from all packets. Note that the ability to save capture comments depends on your file format. For example, pcapng supports comments, whereas pcap does not. | |
|
Configuration Profiles… |
Ctrl+Shift+A |
This menu item will pop up a dialog for managing configuration profiles. |
|
Preferences… |
Ctrl+Shift+P or Cmd+, (MacOS) |
This menu item will pop up a dialog that allows you to set preferences for controlling many aspects of Wireshark. You can also save your preferences so that Wireshark will use them the next time it starts. |
- Mark/Unmark: Use this option or “Ctrl + M” to mark/unmark packets. It is helpful when you want to revisit packets later.
- Packet Comments: You can use this option to add notes to selected packets, or use the shortcut “Ctrl + Alt+C” to perform the same action. Comments are helpful for collaborating with others or for remembering things when we process work later.
- Configuration Profiles: It is a great tool for customizing Wireshark to our needs, such as organizing columns by adding new ones or rearranging them. Profiles can be added or downloaded and then imported into Wireshark. The profile can also be changed from the bottom right panel.
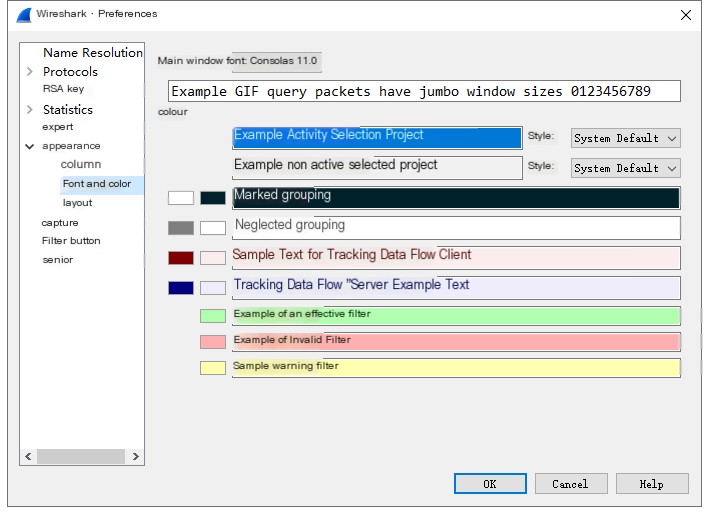
- Preferences: Clicking it opens a prompt window where you can control the GUI’s appearance, set capture options, and other advanced features like adding RSA keys or modifying protocol preferences. This submenu can also be used to customize our profiles.
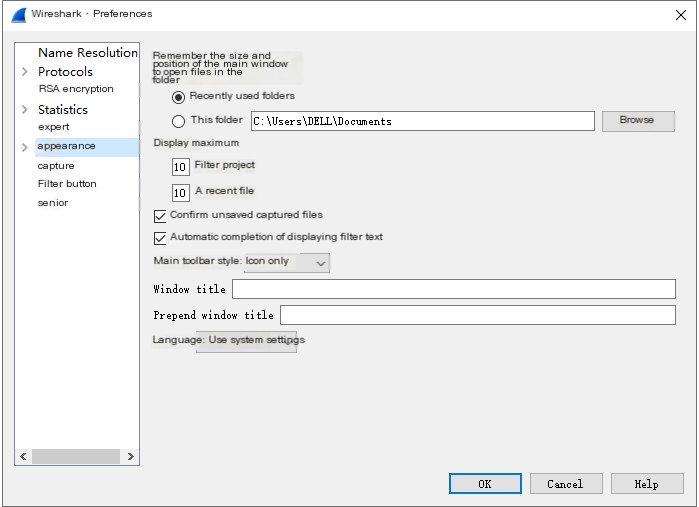
- Protocol configuration is crucial as Wireshark is a tool for analyzing protocols. Sometimes, options need to be configured for protocol presentation and analysis, making this a critical area.
- Appearance allows for the configuration of font, color, layout, and other settings.
- Filters enable the addition of filters; clicking a button applies them directly.
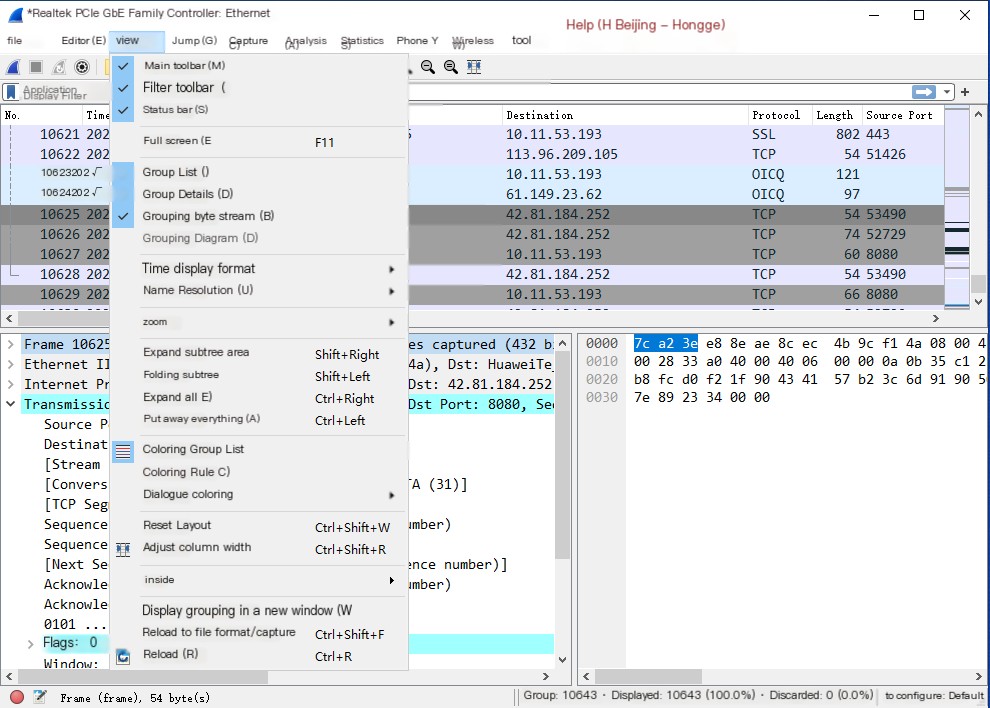
2.2.3 View Menu
The English for the “View” menu is “View”, primarily used to control the display mode of captured data. The “View” menu includes packet coloring options, zooming font options, displaying packets in a new window, expanding/collapsing packet details, and more. This menu deals with the display of tools on the main screen, the time format to use, packet coloring options, zoom options, etc. The most commonly used feature is the time format setting; many others have shortcuts.
For example, you can display time in UTC, rather than showing time in seconds. We can color and un-color packets, and even change coloring rules as needed. As shown below:
View Menu Item Descriptions:
|
Menu Item |
Shortcut Key |
Description |
|---|---|---|
|
Main Toolbar |
This menu item hides or displays the main toolbar. | |
|
Filter Toolbar |
This menu item hides or displays the filter toolbar. | |
|
Wireless Toolbar |
This menu item hides or displays the wireless toolbar. It might not be available on some platforms. | |
|
Statusbar |
This menu item hides or displays the status bar. | |
|
Packet List |
This menu item hides or displays the “Packet List” pane. | |
|
Packet Details |
This menu item hides or displays the “Packet Details” pane. | |
|
Packet Bytes |
This menu item hides or displays the “Packet Bytes” pane. | |
|
Time Display Format → Date and Time of Day: 1970-01-01 01:02:03.123456 |
Selecting this tells Wireshark to display timestamps with date and time. The “Time”, “Date and Time”, “Seconds Since Beginning of Capture”, “Seconds Since Previous Captured Packet”, and “<|disc_score|>1 |