1)Intrusion Detection System
An Intrusion Detection System (IDS) is a network security device that monitors network transmissions in real-time and issues alerts or takes proactive response measures when suspicious transmissions are detected. The distinction between an IDS and other network security devices is that IDS represents a proactive security protection technology.
2)Classification and Deployment of Intrusion Detection Systems
An IDS is a monitoring system for computers or networks that issues warnings once an anomaly is detected through real-time system monitoring. IDS are classified based on information sources and detection methods: based on information sources, there are host-based IDS and network-based IDS; based on detection methods, there are anomaly intrusion detection and misuse intrusion detection.
3)Unlike firewalls, an IDS is a listening device that is not bridged on any link and can operate without network traffic passing through it.
Therefore, the only requirement for deploying an IDS is that it should be attached to the link through which all monitored traffic must pass.
Installing Snort Intrusion Detection System
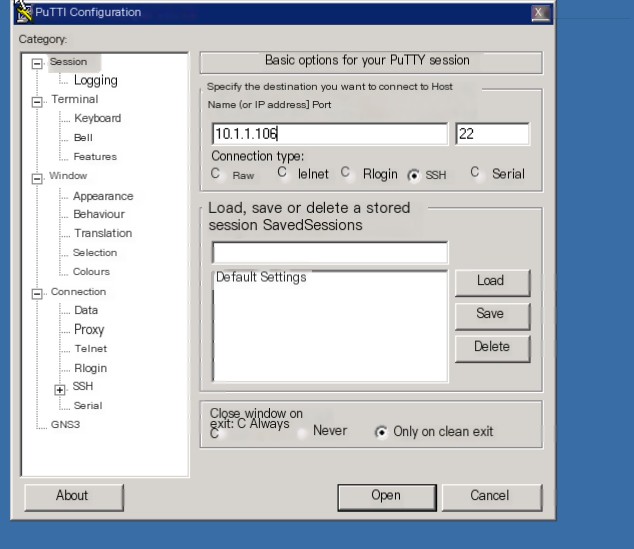
1、Log in to the IDS system
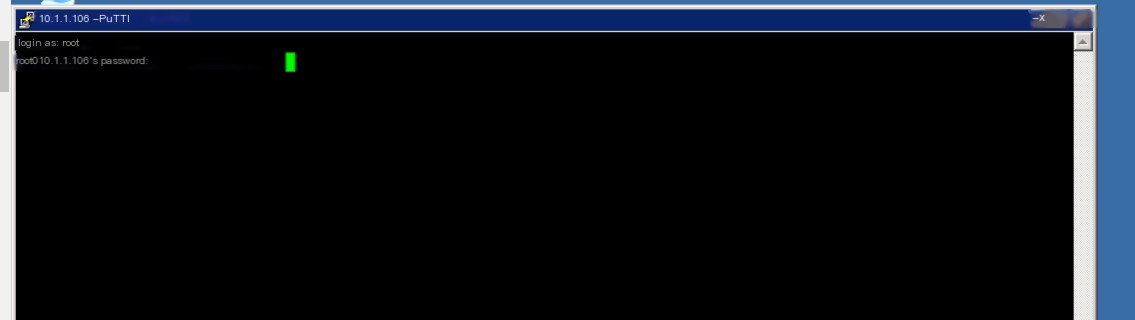
After logging into the test machine, open the PuTTY program on the desktop, enter 10.1.1.106, and then click Open.
Enter username: root, password: bjhit
 >
>
 >
>
2、Install LAMP environment (Omitted)
Enter the following command in PuTTY for installation
apt-get install mysql-server libapache2-mod-php5 php5-mysql libphp-adodb
Note: Due to the long download time, which would delay considerably, this has already been installed in advance.
The password set for MySQL’s root user here is 123456.
3、Install Snort package(Already installed)
#apt-get install snort-mysql
During installation, the following information will be prompted. (This is to fill in the monitored network segment)
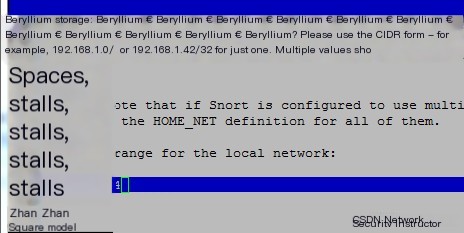
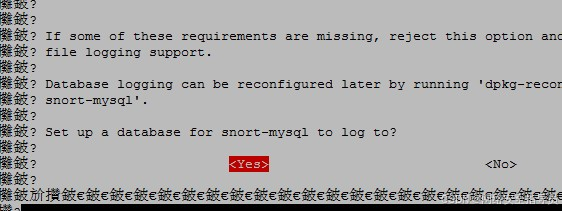
During installation, the following information will be prompted. (This is to fill in the monitored network segment)
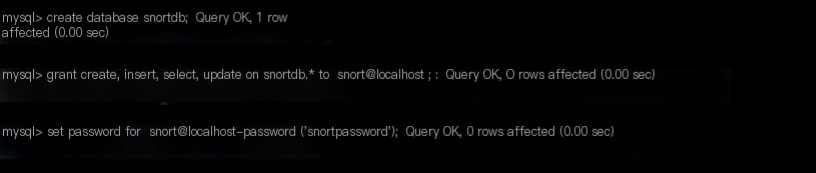
4、Create snortdb Database
root@IDS:~# mysql -u root -p123456 #Login to MySQL

After entering the database, create a database named snortdb.
mysql> create database snortdb;
mysql> grant create, insert, select, update on snortdb.* to snort@localhost;
mysql> set password for snort@localhost=password(‘snortpassword’);
Create a database user with username snort and password snortpassword.
Import the SQL file included in the snort-mysql package into the database.
# cd /usr/share/doc/snort-mysql/
# zcat create_mysql.gz | mysql snortdb -u snort -psnortpassword
# rm /etc/snort/db-pending-config

5、Configure Snort
After the database is configured, you need to configure the Snort configuration file (/etc/snort/snort.conf) to log into the snortdb database.
# vi /etc/snort/snort.conf
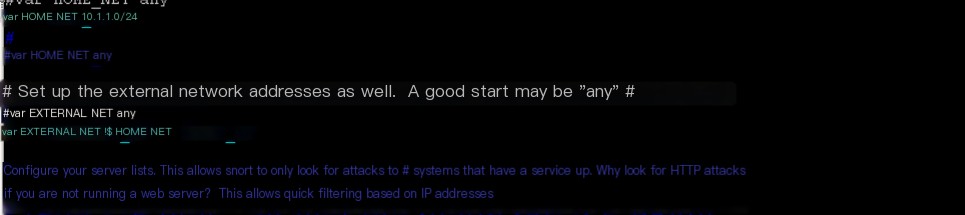
Find the line “var HOME_NET any” in the file and modify it to the network segment to be monitored,
and enable the following lines, as shown below:
#var HOME_NET any
var HOME_NET 10.1.1.0/24
#
#var HOME_NET any
# Set up the external network addresses as well. A good start may be “any”
#var EXTERNAL_NET any
var EXTERNAL_NET !$HOME_NET
——————–
# output database: log, mysql, user=root password=test dbname=db host=localhost
output database: log, mysql, user=snort password=snortpassword dbname=snortdb host=localhost

Check if the snort.conf configuration file is normal:
# snort -c /etc/snort/snort.conf
If a little pig appears, it indicates success, press Ctrl+C to stop it.
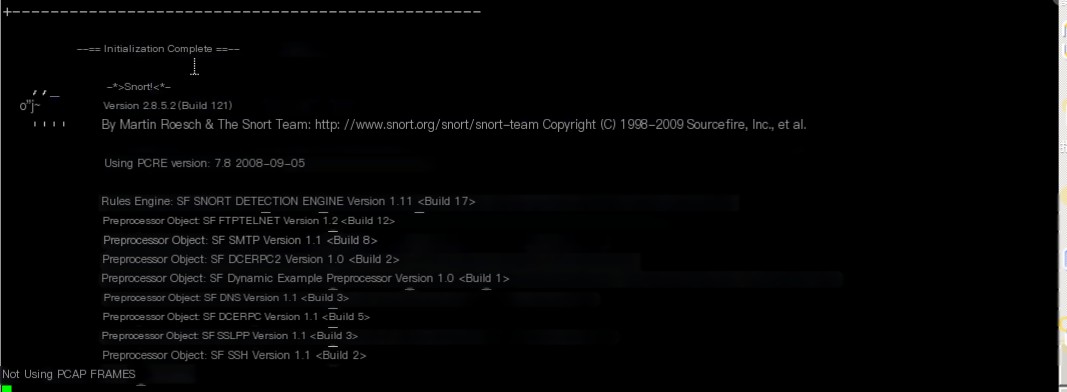
Start snort:
# service snort start

Install and Configure Basic Analysis and Security Engine (BASE)
1、Install acidbase package(Already installed)
apt-get update to update the source list
apt-get install acidbase
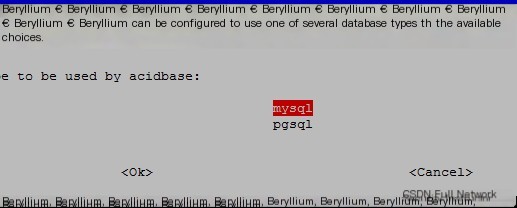
Choose MySQL here, there were two previous dialog boxes, one was ok,
the other was yes, I didn’t take screenshots here.
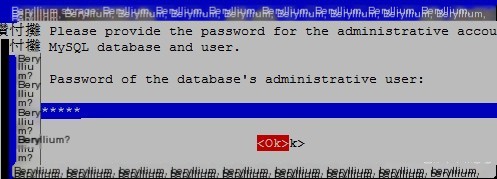
Enter the password 123456 several times here.
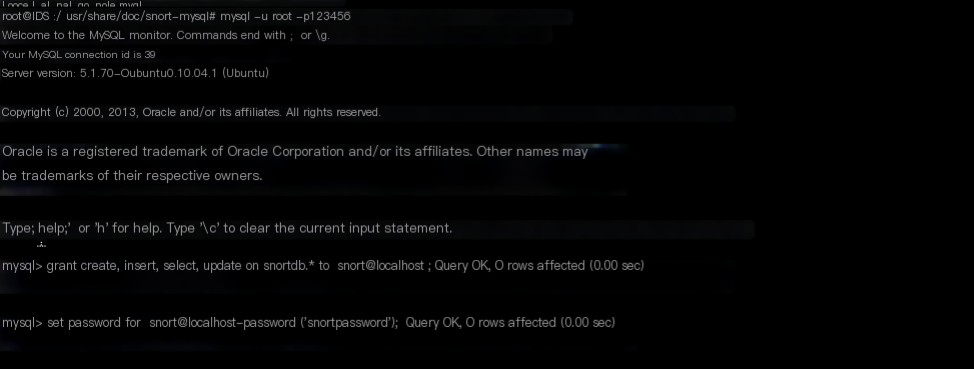
Here we need to recreate the snort user
mysql -u root -p123456
mysql> grant create, insert, select, update on snortdb.* to snort@localhost;
mysql> set password for snort@localhost=password(‘snortpassword’);
2、Configure Apache Files
Copy the acidbase installation directory to the /var/www directory
# cp -r /usr/share/acidbase/ /var/www/
Modify the Apache configuration file: (as shown below)
vi /etc/apache2/sites-available/default
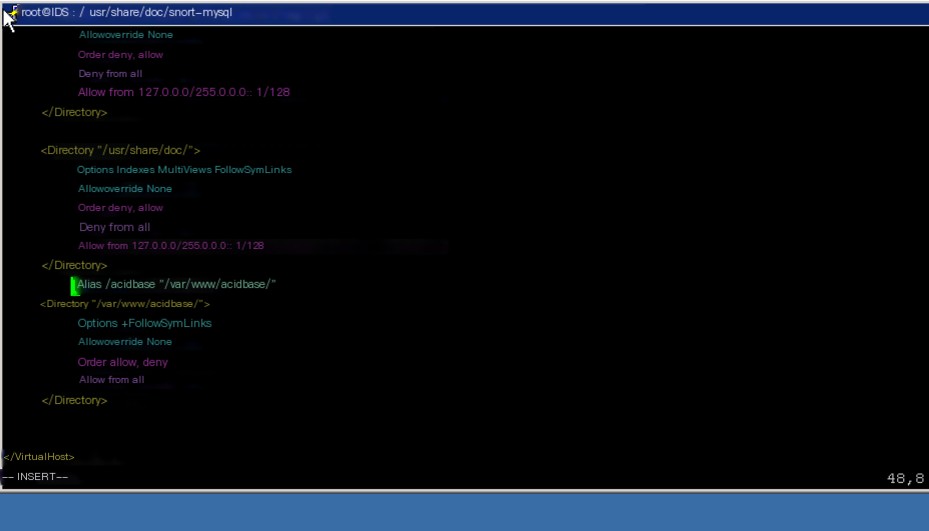
Before the last line in the file, add acidbase-related content (the parts in the red box in the picture above)
After configuring, you need to restart apache2
# service apache2 restart

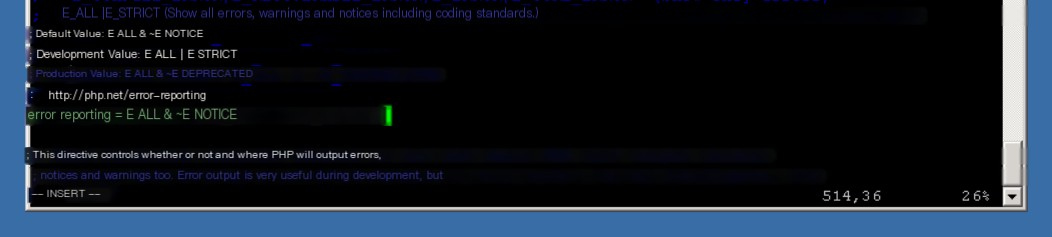
Modify the php.ini file
vi /etc/php5/apache2/php.ini
Set the permissions of the acidbase directory to 777
chmod 777 -R /var/www/*

3、Configure BASE
Rename the existing configuration file, otherwise, the web interface configuration of BASE cannot be used.
# mv /etc/acidbase/base_conf.php /etc/acidbase/base_conf.php-orig
And the symbolic link file
#rm /var/www/acidbase/base_conf.php

Open http://10.1.1.106/acidbase/ in the browser now
Begin configuring our Basic Security Analysis Engine.
Opening the above URL, the following interface appears:
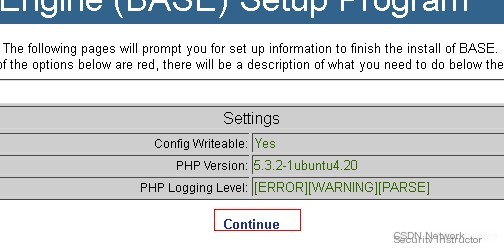
Click the Continue button to enter the Step 1 of 5 interface, as shown below:
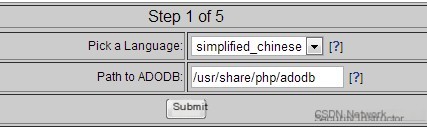
Here I choose Simplified Chinese
Enter the path of ADODB “/usr/share/php/adodb”, and click the submit button.
Reminder: Here you can search for the path of ADODB with the following command
find / -name adodb
After submission, enter the Step 2 of 5 interface, as shown below:
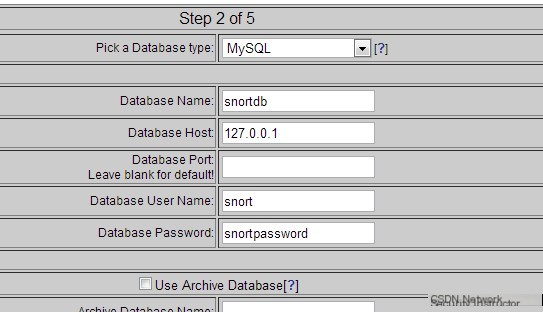
Enter the database information, Pick a Database type: MySQL; Database Name: snortdb; Database Host: 127.0.0.1; Database User Name: snort; Database Password: snortpassword
Click the submit button below to proceed to Step 3 of 5, as shown below:
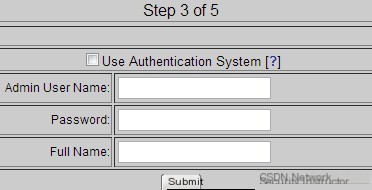
Set user name and password
Click the submit button to enter the Step 4 of 5 interface, as shown below:

Click the part in the red box above to create the tables used by BASE in the database.
If the following appears:
Successfully created ‘acid_ag’
Successfully created ‘acid_ag_alert’
Successfully created ‘acid_ip_cache’
Successfully created ‘acid_event’
Successfully created ‘base_roles’
Successfully INSERTED Admin role
Successfully INSERTED Authenticated User role
Successfully INSERTED Anonymous User role
Successfully INSERTED Alert Group Editor role
Successfully created ‘base_users’
It indicates that the database tables have been successfully created, then click “Now continue to step 5” to enter the management interface, as shown below:
Experiment Step Three
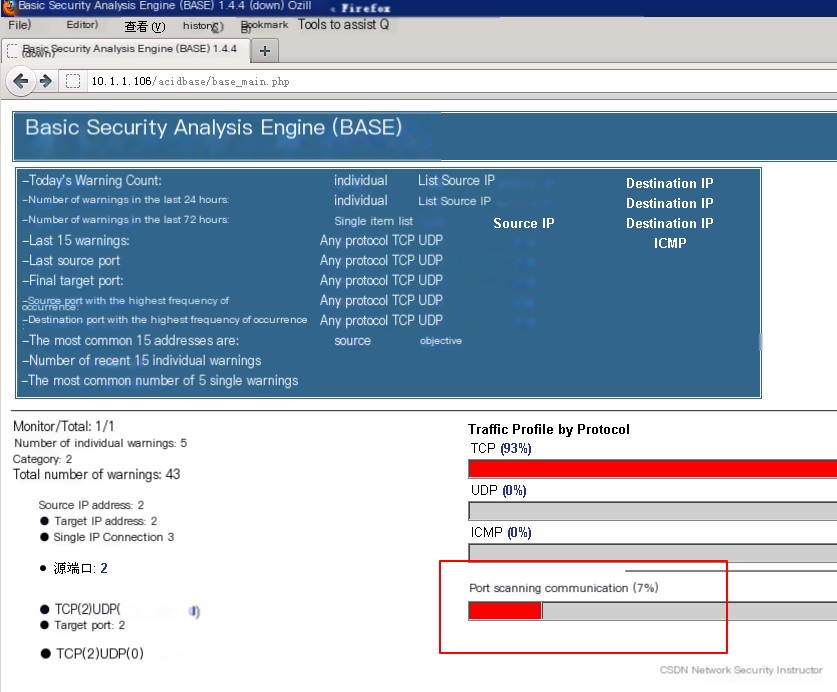
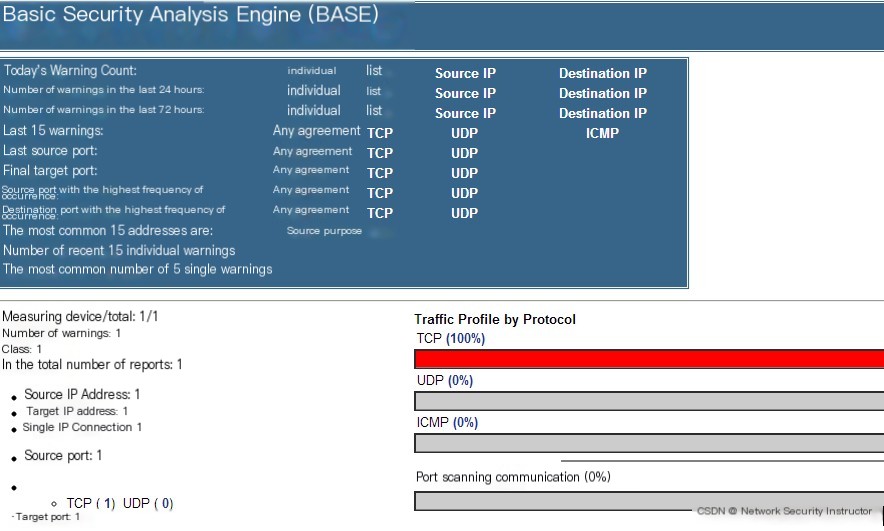
Use the Basic Security Analysis Engine to View Intrusion Logs
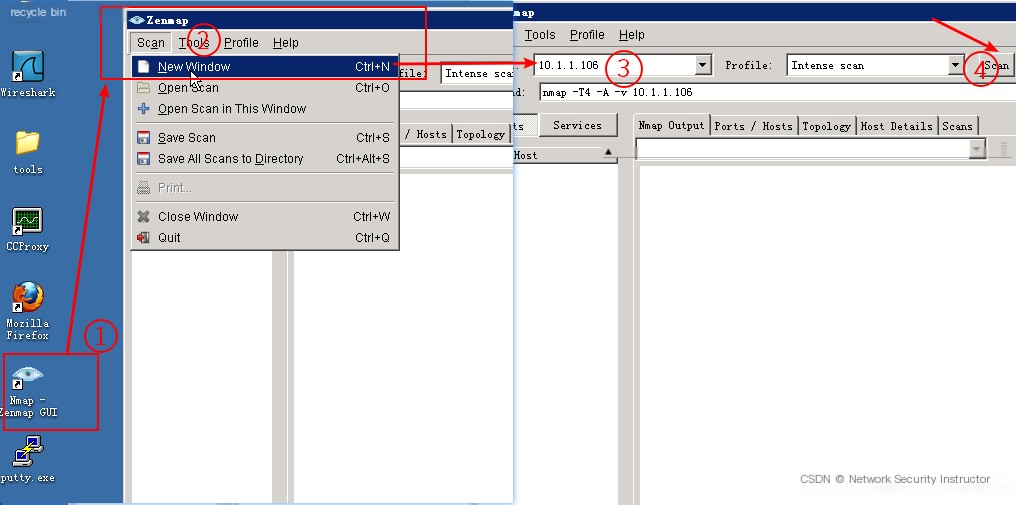
1、Use nmap to perform a port scan on IDS
Use nmap on the desktop to perform a port scan on the IDS host
Refresh the browser page, and you can see that there is data in “Port Scan Communication,” and clicking inside allows you to view details.