
Packet Flow in a Linux Host
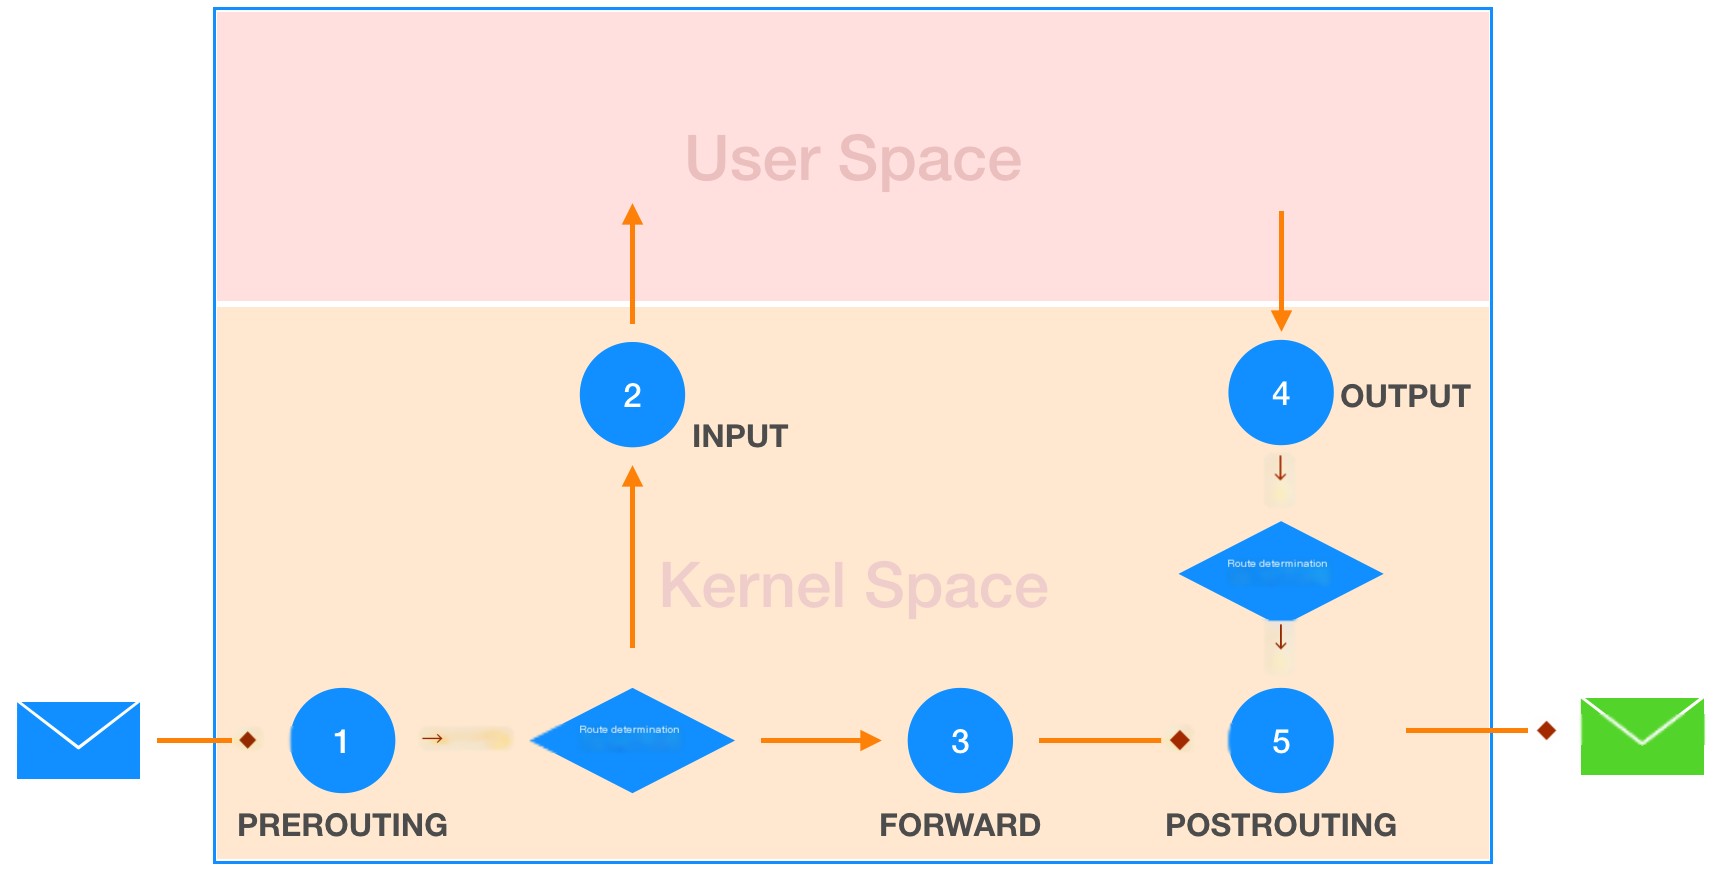
- When a packet arrives at the host, the host needs to determine whether the packet is destined for itself or should be forwarded to another host;
- If it is destined for the host, the packet is sent from kernel space to user space, where the respective program processes it;
- If it is to be forwarded, processing occurs in the kernel space;
- When a packet generated by the host needs to be sent, it is directed to the appropriate network interface card through routing;
- Finally, the network card sends the packet out, leaving the host.
 Packet Flow in a Linux Host
The five points above are where the Linux firewall’s functionality unfolds, represented by five chains in netfilter, namely:
- PREROUTING chain: The packet has just arrived at the host
- INPUT chain: The packet is directed to the user space of the host
- FORWARD chain: The packet is forwarded to another network card in kernel space
- OUTPUT chain: Packet to be sent from user space
- POSTROUTING chain: The packet is about to leave the host
iptables is located in user space and is used to manage and operate netfilter, while netfilter is in kernel space, where the firewall’s real action takes place.
A chain is essentially a hook function that checks packets as they pass through these hook functions.
netfilter
The netfilter includes four tables: filter, nat, mangle, and raw. Netfilter stores the rules from these tables in a section of memory. Each of these four tables has corresponding chains, and each chain has corresponding rules.
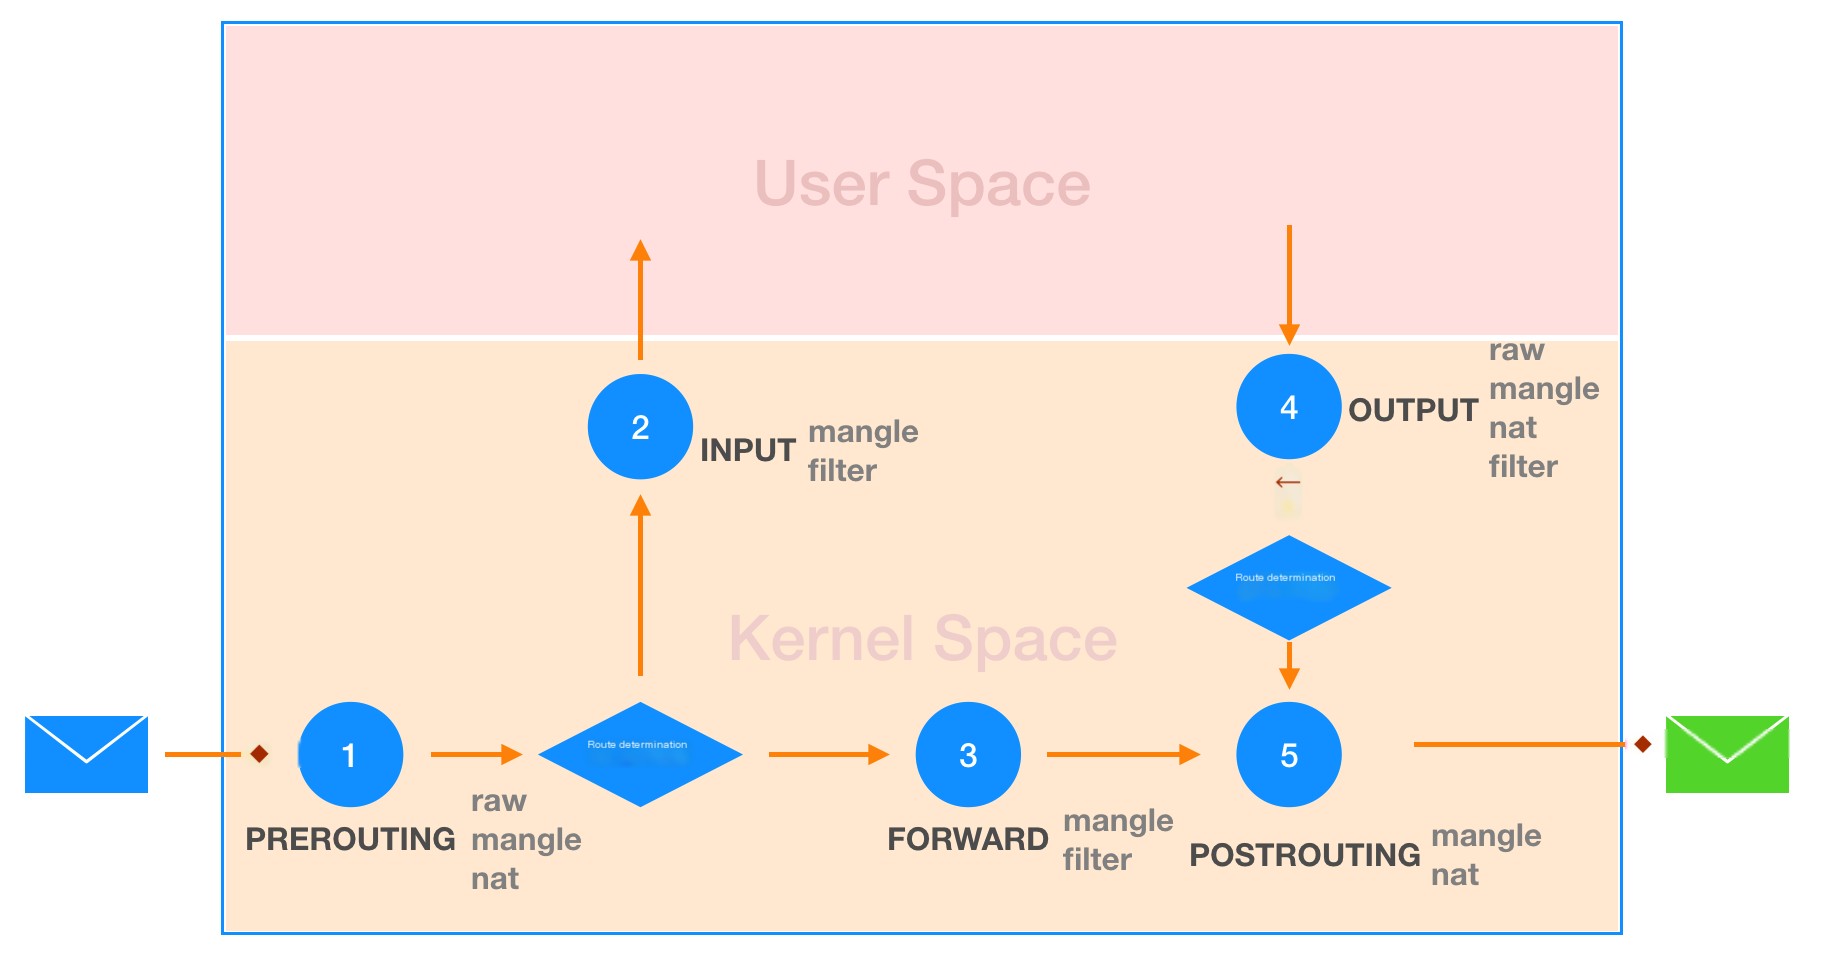 Priority of the Four Tables in netfile
- INPUT chain: Protects the host from malicious traffic entering the host
- OUTPUT chain: Restricts the host itself
- FORWARD chain: Protects “backend” machines; the forward chain filters forwarded traffic and then allows ip_forward to forward it.
When the same chain appears in different tables, the processing priority is handled from high to low: raw->mangle->nat->filter
Process of Filter Table Handling Packets
As the packet enters, routing decides whether it flows into the firewall host or forwards to other machines. For packets entering the host, they pass through the INPUT chain, where a hook function checks them. If the check reveals they are to be explicitly denied or discarded, they are discarded immediately. Those explicitly allowed are passed, while non-matched ones are similarly discarded. The result is communicated to netfilter, i.e., even if packets are rejected or discarded, a notification is given.
When a packet generated in user space is to be sent out, it first passes the OUTPUT chain, where a hook function checks it. If it passes the inspection, it then undergoes routing decision finally exiting through the network card.
For outgoing packets, they go through OUTPUT first, followed by routing decisions. Thus, packets failing the check are discarded directly, saving resources by avoiding unnecessary routing decisions.
iptables Command
Writing iptables Rules
Writing iptables rules involves considering two parts:
- What functionality to achieve: i.e., selecting the corresponding functional table
- Direction of traffic: i.e., choosing the position of the “five chains”
General iptables command format
iptables -t table ①COMMAND chain [rule number] ②Match condition -j Action- table: Defaults to filter and can be omitted; others must be explicitly specified
- ①COMMAND: Divided into four types: add, delete, modify, query
- Add rules or chains
- -A: append, insert the specified rule at the end of the specified chain, meaning this rule will be executed last
- -I: insert, add one or more rules in the specified position of the chain. Default is at the chain’s head, rule number is 1
- -N: –new-chain, create a new chain with the specified name
- Delete rules or chains
- -D: delete, remove one or more rules from the specified chain
- -X: delete user-defined, unreferenced empty chains
- -F: flush all firewall rules
- -Z: zero the data on the chain, reset counters
- Query rules
- -L: list all rules on the chain, or all rules on all chains in the table if no chain is specified
- -v: verbose, display detailed information
- -n: number, show addresses and port numbers in numeric format
- -x: exactly, show exact results of counter techniques
- –line-numbers: show rule numbers
- -L: list all rules on the chain, or all rules on all chains in the table if no chain is specified
- Modify
- -R: replace, replace the rule at rule number in the chain, counting starts at 1
- Add rules or chains
- ②Match Conditions
- Basic Match
- [!] -s address[/mask][,…]: Source IP, omit to represent all addresses; ! indicates negate;
- [!] -d address[/mask][,…]: Destination IP, omit to indicate all addresses;
- [!] -i IFACE: From which network interface card the packet enters
- [!] -o IFACE: From which network interface card the packet exits
- Extended Match
- Implicit Extension
- -p tcp
- [!] {–sport|–dport} port[:port]: Match specific port(port) or range of ports(port:port) for tcp protocol
- [!] [–syn]: Match packets where syn is 1, others are 0; indicates only matching the first of the TCP three-way handshake i.e., connection request
- -p udp
- [!] {–sport|–dport} port[:port]: Match specific port(port) or range of ports(port:port) for udp protocol
- -p icmp
- [!] –icmp-type major[.minor]: major:8, echo request; 0: echo reply;
- During ping, first request then reply: pinging someone sends 8 first then returns 0; someone pinging you enters 8 first then exits 0
- -p tcp
- Explicit Extension
- -m iprange: Match specified IP address range
- [!] –src-range from[-to]: Match given source address range
- [!] –dst-range from[-to]: Match given destination address range
- -m multiport: Match discrete multiple ports (up to 15), only effective when -p tcp or -p udp specified
- [!] –source-ports,–sports port[,port|,port:port]…
- [!] –destination-ports,–dports port[,port|,port:port]…
- [!] –ports port[,port|,port:port]…: No distinction between source and destination, if it’s a port it matches
- -m state: Match state, combined with ip_conntrack to track the status of the session
- [!] –state {INVALID|ESTABLISHED|NEW|RELATED( new connection associated with an existing connection)}
- Example: iptables -A INPUT -m state –state NEW,ESTABLISHED -j ACCEPT
- -m string: Match character string in the packet
- –algo {kmp|bm}: Two algorithms, either can be specified
- –string “string_pattern”
- Example: iptables -A OUTPUT -m string –algo bm –string “taobao.com” -j DROP
- -m mac: Match mac address
- [!] –mac-source address: MAC address format is XX:XX:XX:XX:XX:XX
- -m limit: Use token bucket to limit the rate of filtering connection requests
- –limit RATE[/second/minute/hour/day]: Allowed average number. For example, allow 6 pings per minute, i.e., one ping every 6 seconds. Default is 3/hour
- –limit-burst: Allowed burst of concurrent requests the first time. Once exceeded the first time, responses are given according to RATE. Default value is 5
- Example: Allow 6 pings per minute, but 10 the first time; After that 10, according to RATE, iptables -A INPUT -d ServerIP -p icmp –icmp-type 8 -m limit –limit 6/minute –limit-burst 10 -j ACCEPT
- -m connlimit: Limit upper limit of connections per client
- –connlimit-above n: Perform TARGET when number of connections exceeds n
- Example: Allow only 3 ssh connections for an ssh client at most, refuse beyond. Two ways to write:
- iptables -A INPUT -d ServerIP -p tcp –dport 22-m connlimit –connlimit-above 3-j DROP
- iptables -A INPUT -d ServerIP -p tcp –dport 22-m connlimit ! –connlimit-above 3-j ACCEPT
- This module, although powerful, requires calculation of the number of connections needed for normal web access depending on the environment, and also consider the issue of connection doubling when using NAT conversion addresses.
- -m iprange: Match specified IP address range
- Implicit Extension
- Action: Indicates what should be done with matching packets
- DROP, REJECT, ACCEPT
- DNAT: Destination address translation
- SNAT: Source address translation
- REDIRECT: Port redirection
- MASQUERADE: Address masquerading (also source address translation)
- RETURN: Used for custom chains, return to previous chain after matching completes
Packet State
The state module of iptables defines four packet states: NEW, ESTABLISHED, RELATED, INVALID. These 4 states provided by state are common to tcp/udp/icmp type of packets.
NEW State
To establish a connection, the first packet sent (like the first SYN packet in the TCP three-way handshake) is in the NEW state. If the first connection attempt fails, the subsequent request packets are no longer NEW packets.
Thus, disallowing NEW state packets implies disallowing establishing connections with external entities or external entities establishing connections with the host.
ESTABLISHED State
Whether it’s tcp packets, udp packets, or icmp packets, once the request packet is sent through the firewall, all subsequent packets from both sides are in the ESTABLISHED state, meaning packets sent and returned are ESTABLISHED state packets.
RELATED State
Packets transmitted between connections with no direct association, passively or temporarily established. Packets result in a new connection, due to sending a packet first, all packets of this new connection are in the RELATED state.
FTP passive mode is typical for the RELATED state. Once a command channel has been initiated on port 21 at the FTP server (also known as command connection), regardless of whether a random data port of passive mode or a fixed 20 data port of active mode, it is certain that the establishment of a data channel is commanded by the command channel, so packets transmitted through this data channel are in the RELATED state.
INVALID State
Malicious packets. Packets not in ESTABLISHED, NEW, or RELATED states are in the INVALID state. INVALID packets should be placed as the first rule to prevent malicious cyclical attacks.
NEW, ESTABLISHED, and RELATED States of Gateway Firewalls
Gateway firewalls stand in between clients and servers, filtering or modifying packets.
Regarding its state change, it’s like a “fence-sitter”:
①. Whatever state the packet is in when it is sent from the client to the firewall, the firewall’s state module is set to that state, and packets forwarded to the server maintain that state;
②. The state of packets coming from the server to the firewall, the firewall’s state module sets to that state, and forwards packets with that state.
Essentially, the firewall does not alter the fundamental nature of packet states.
Though technically only the firewall has the authority to determine packet states, summarizing them in this manner aids understanding.
For example, during the first step of the TCP three-way handshake, when a client sends a SYN packet to a server to initiate a connection, this SYN packet reaches the firewall, the state module of which sets its state also to SYN_SENT and considers this packet to be NEW, then forwards it to the server. As forwarded, its state remains NEW. When the server responds with a SYN+ACK packet after receiving the SYN, the firewall responds similarly, setting itself to the SYN_RECV state and considering this packet to be in the ESTABLISHED state before finally forwarding it to the client in the ESTABLISHED state.
The RELATED state works similarly; as long as connections are “fresh-start” packets from both sides, firewalls between clients and servers sway as “fence-sitters” with the packet flow.
In fact, these states and transitions are recorded in the /proc/net/nf_conntrack file, though not easily tracked manually.
Tools for Tracking States
Netfilter is a stateful firewall; the conntrack module tracks each connection’s state, allowing for stringent firewall rules through it. The ip_conntrack provides tracking capability, later renamed nf_conntrack, provided by the nf_conntrack module. Once this module is loaded, the /proc/net/nf_conntrack file records the tracked connection state. Although it tracks all TCP/UDP/ICMP connections, only TCP connection states are saved in this file.
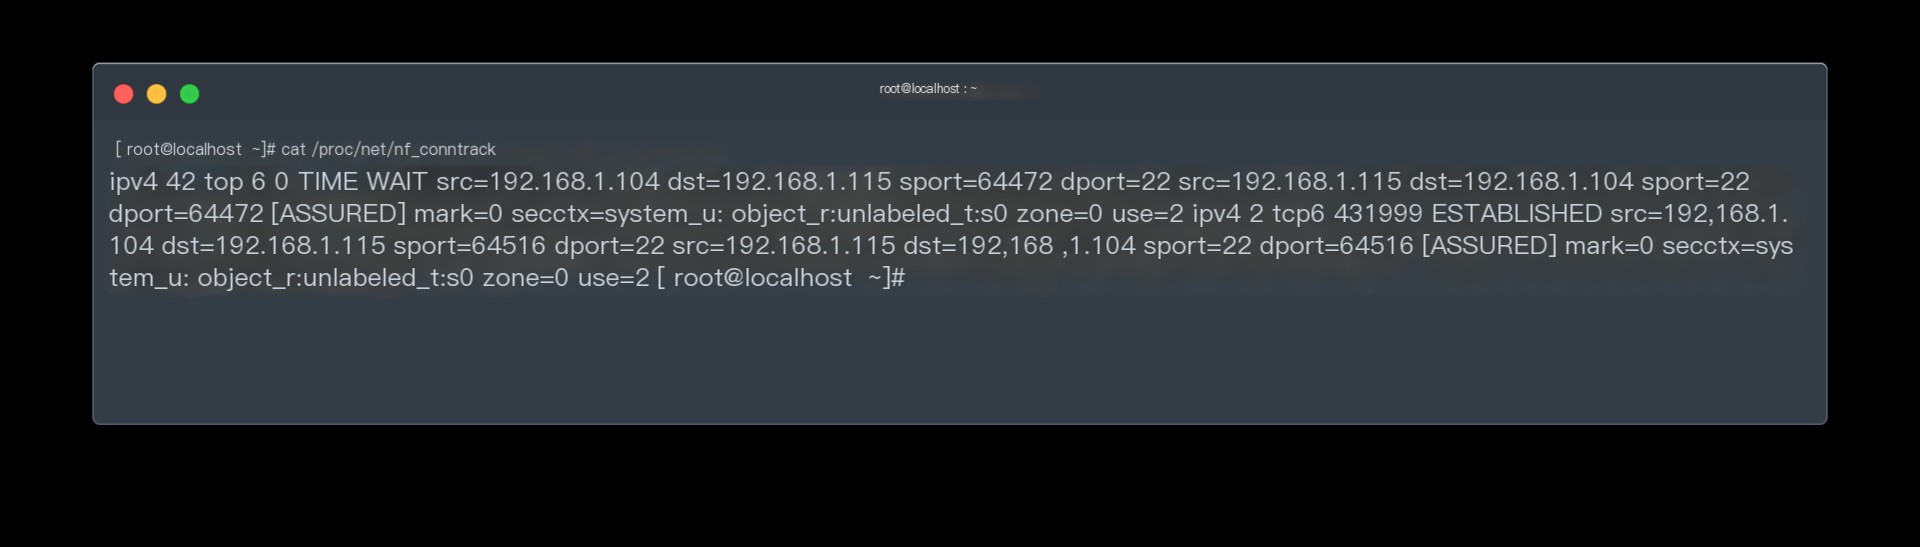 /proc/net/nf_conntrack file displaying TCP connections
The second entry shows an ESTABLISHED connection from 192.168.1.104:64472 to 192.168.1.115:22, as well as the return connection 192.168.1.115:22 to 192.168.1.104:64472.
The ipstate command provided by the iptstate package can also show current network connection statuses
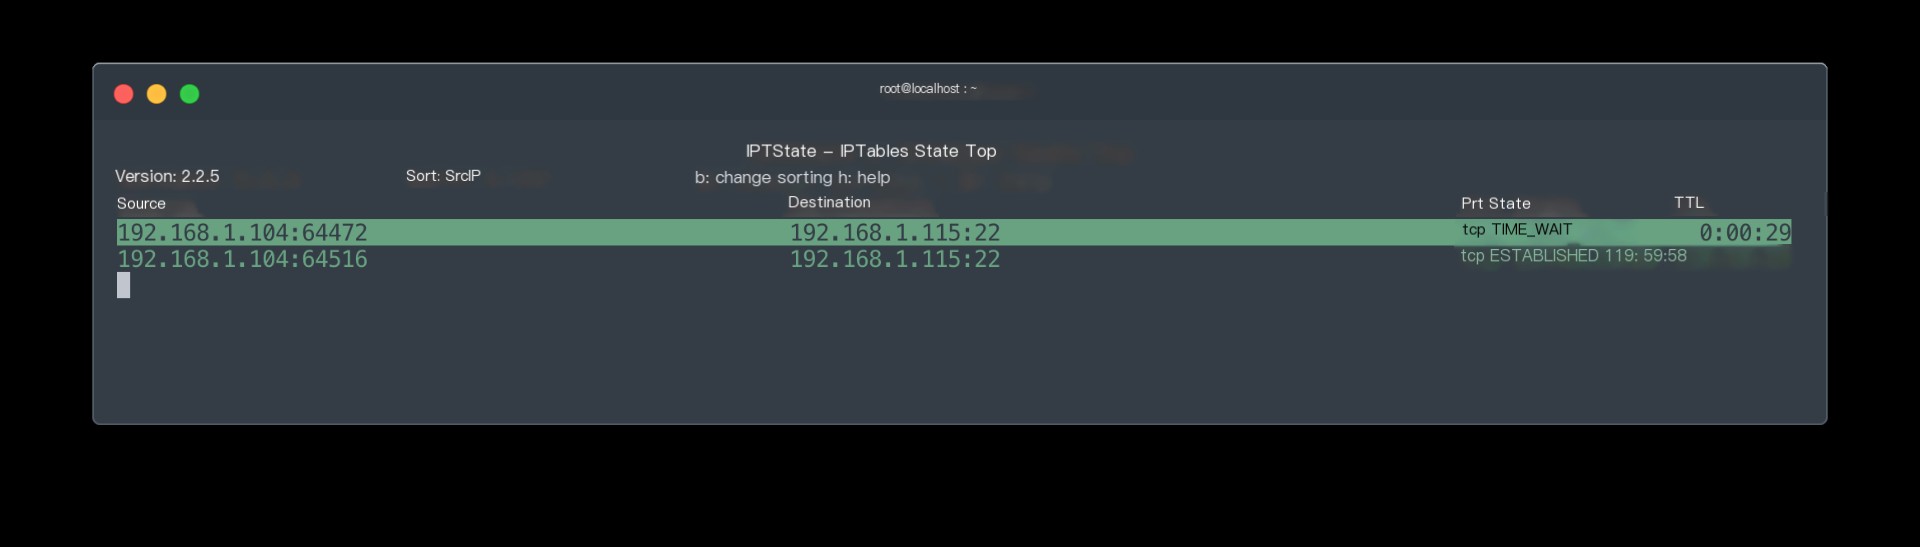 Real-time network connection status shown by iptstate command
The TTL value’s setting position is in files within the /proc/sys/net/netfilter/ directory. TIME_WAIT’s default timeout is 2 minutes, i.e., after waiting TIME_WAIT for 2 minutes, the connection disconnects automatically. It can be modified. (TIME_WAIT is the penultimate phase of the TCP connection’s 4-step termination, after receiving the FIN=1 from the passive-end and sending an ACK from the active-end)
Tracking connections via nf_conntrack also consumes system resources. The maximum number of monitored connections is determined by the /proc/sys/net/netfilter/nf_conntrack_max file. Once the tracked number reaches the maximum, all subsequent connections will be queued and blocked.
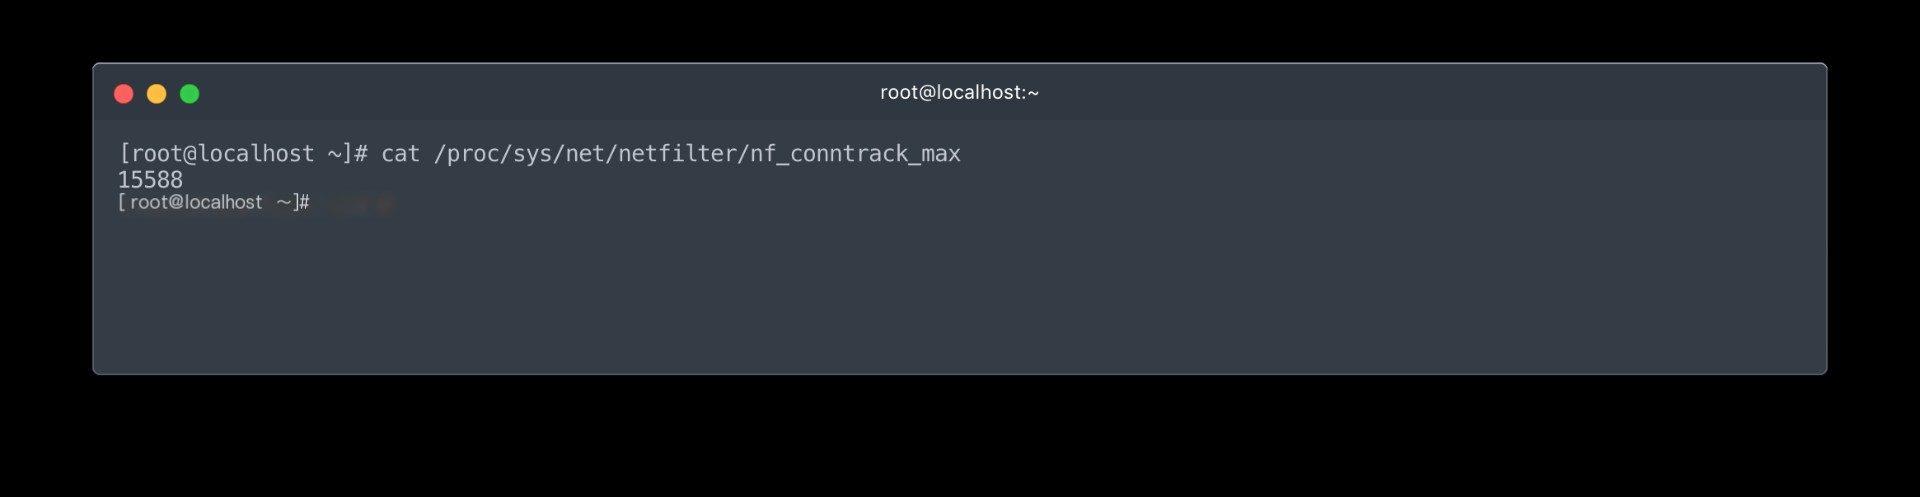 nf_conntrack_max file determining maximum monitored connection count
The nf_conntrack module is not always required to be explicitly loaded; some modules depending on it invoke it when loaded. For instance, when iptables command includes iptables -t nat, the module loads, automatically triggering tracking and potentially reaching the tracking max value.
Managing Rules
Rules edited in iptables are maintained in memory by the kernel, and restarting the iptables “service” clears all rules listed from memory. The iptables “service” by default loads rules from the script configuration file /etc/sysconfig/iptables
Saving Rules
Method One: Save directly to /etc/sysconfig/iptables:
service iptables saveMethod Two: Customize save location
iptables-save >/etc/sysconfig/iptables
iptables-save >/etc/sysconfig/iptables.20190103
Restoring Rules
iptables-restore </etc/sysconfig/iptables
iptables-restore </etc/sysconfig/iptables.20190103
Methods for Managing Rules:
A better way to manage rules is writing them into a script. Write all rules into a shell script and use variables for recurring addresses, such as server addresses or subnets of the internal network.
Advantages of using scripts include:
1. Easier management. Writing into a script allows direct file modification, and once to re-activate rules, execute the script file. It’s best to start the script with iptables -F, so each execution clears existing rules before loading those in the script.
2. Variable use in scripts. If a server address changes, modify just the variable value for that server address.
3. Readability enhancement with comments and category classification of rules, making future changes easier.
4. Simplified rule backup. Even if a hard drive failure causes rule loss, you can easily copy the script and execute it, instead of entering each command individually.
5. Loading rules at startup can be achieved by adding a command to execute this script in /etc/rc.d/rc.local.
6. The script can be added to scheduled tasks.
Custom Chain
A custom chain is referred to by a main chain. The referenced position is specified by “-j” to indicate a jump to a custom chain, matching rules listed in it. Add a return to the main chain at the end of a custom chain, so after custom matching, continue back to the main chain. Once a packet matches the jump to a custom chain, it enters custom chain matching at that position. If it matches none in the custom chain, it defaults to the last RETURN rule, reverting to and continuing matching in the main chain.
Creating a Custom Chain
iptables -N mychainMain Chain Jumping to Custom Chain
iptables -A INPUT -d 192.168.1.115 -j mychainCustom Chain Return to Main Chain
iptables -A mychain -d 192.168.100.8 -j RETURNTo delete a custom chain, clear it first, remove invocation records, then use -X to delete an empty custom chain.
iptables -F mychain
iptables -D INPUT 1
iptables -X mychain
An iptables Script
#!/bin/bash

IPT=/usr/sbin/iptables

IP_TRUSTED=192.168.1.0/255.255.255.0
LOCAL_ADDR=192.168.1.110

WEB=80
SSH=22
MYSQL=3306
VNC=5901

modprobe ipt_MASQUERADE
modprobe ip_conntrack_ftp
modprobe ip_nat_ftp

# DELETE Any Existing Chains In Filter Table
$IPT -F -t filter
$IPT -X -t filter
$IPT -Z -t filter

# Setting Default Policies,just accept output,drop any other
$IPT -P INPUT DROP
$IPT -P OUTPUT ACCEPT
$IPT -P FORWARD DROP

# Setting SSH just trusted ip can connect it
$IPT -t filter -A INPUT -s $IP_TRUSTED -p tcp -m multiport -dport=$SSH,$VNC -j ACCEPT

#This server can ping other host
$IPT -t filter -A INPUT -p icmp --icmp-type=0 -j ACCEPT
#Just trusted ip can ping this server
$IPT -t filter -A INPUT -s $IP_TRUSTED -p icmp -j ACCEPT

# Setting INPUT,this server can connect other server via tcp
$IPT -t filter -A INPUT -m state --state=ESTABLISHED,RELATED -j ACCEPT
$IPT -t filter -A INPUT -p tcp -m multiport -sport=20,21,22,80,3306 -j ACCEPT

# Setting INPUT,this server can connect other server via udp
$IPT -t filter -A INPUT -p udp -m multiport --sport=53,123 -j ACCEPT

# localhost
$IPT -t filter -I INPUT -i lo -j ACCEPT
$IPT -t filter -I OUTPUT -o lo -j ACCEPT

# security
$IPT -A INPUT -d $LOACL_ADDR -p tcp --syn -m connlimit --connlimit-above 15 -j DROP - Basic Match