

As a web development engineer, I deal with the internet every day. Charles, as a network packet capture tool, has almost become standard in web development.
This article is a summary based on my in-depth use of Charles, and differs from other articles introducing Charles. This article won’t detail Charles’s various features (such as remote and rewrite), but instead focuses on analyzing one issue: Under what circumstances will Charles fail to capture packets?
To address this question, I will analyze Charles’s principles and combine them with the official policies of Android/iOS to analyze the issues of packet capture failures using Charles. If you find it useful after reading, be sure to give it a like and support. Thank you, it really means a lot to me!
I. Charles Packet Capture Principle
The principle behind the vast majority of packet capture software on the market is the Man-in-the-Middle attack (MITM).
Wikipedia defines MITM as follows:
“A man-in-the-middle attack in cryptography and computer security is an attack where the attacker establishes independent connections with the communication parties and relays messages between them, making them believe they are directly communicating through a private connection, but in fact, the entire session is completely controlled by the attacker.
The definition above is very clear. I drew a diagram with Charles, and by following the arrows you can understand the flow of HTTP Packets:
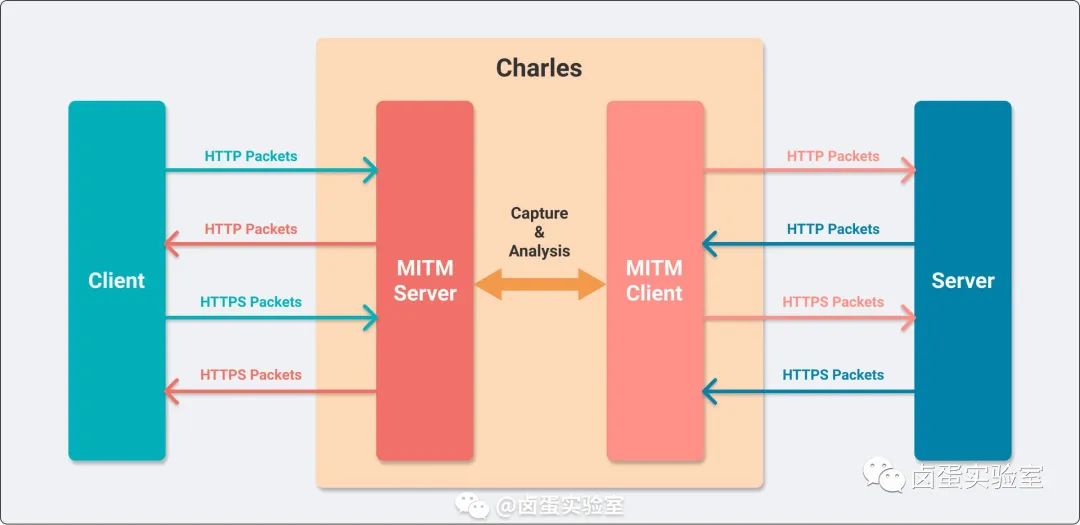
MITM
Theory alone can be dry, so we can look at an example to see how Charles works internally. I accessed an HTTP resource on cdn.staticfile.org in my computer browser, and I captured the specific network packets using Wireshark:

Combining the captured packets from Wireshark and the network analysis by Charles, we can see the flow of this HTTP request:
- The browser (Client) initiates a request from port
56075to the Local Charles listening on port8888(MITM Server), and this connection takes place locally. - After receiving the browser’s request, Charles initiates a new request from port
56076(MITM Client); this packet enters the public network, so the IP is192.168.31.44(my computer’s IP address, to be introduced later); the IP forcdn.staticfile.org(Server) is111.63.183.223, and since it’s an HTTP request, the port is80. 111.63.183.223:80returns an HTTP response to Charles’s proxy client192.168.31.44:56076.- Inside Charles, some processing is done (Capture & Analysis), and then the response packet is sent to
127.0.0.1:56075through port8888, where the browser receives the response.
In the second and third steps, the packets pass through Charles, which can manipulate the packets, such as remote redirection, rewrite, cache packets, and visualize operations.
II. Charles Packet Capture Configuration
To maintain the continuity of the article, I will briefly explain Charles’s packet capture proxy configuration here. If you are very familiar with this, you may skip it; if not, you can bookmark the article for further reference.
Before configuring, let’s briefly review basic network knowledge: If network data wants to be transmitted from A to B, a connection must be established by determining 5 key pieces of information: Source IP Address, Source Port, Transport Layer Protocol, Destination IP Address, and Destination Port. These five key pieces of information are also called the quintuple, and a quintuple uniquely identifies a connection.

Quintuple
If we use Charles to capture packets, we should analyze the quintuple of the proxy connection between the Client and MITM Server:
Source IP Address: The IP address of the application being captured, generally the device IP, typically not modifiedSource Port: The port number of the application being captured, usually assigned by the operating system, cannot be modifiedTransport Layer Protocol: Charles currently proxies mainly HTTP protocol, typically TCPDestination IP Address: Charles’s IP address, typically the computer’s local IP, typically not modifiedDestination Port: Charles’s proxy port, default is8888, modifiable
“⚠️ Note: The above analysis only considers general situations, if you really want to change it, you may, but such hack behavior is not considered in this article
From the above analysis, we can see that to establish the quintuple, we need to focus primarily on two points: Destination IP Address and Destination Port.
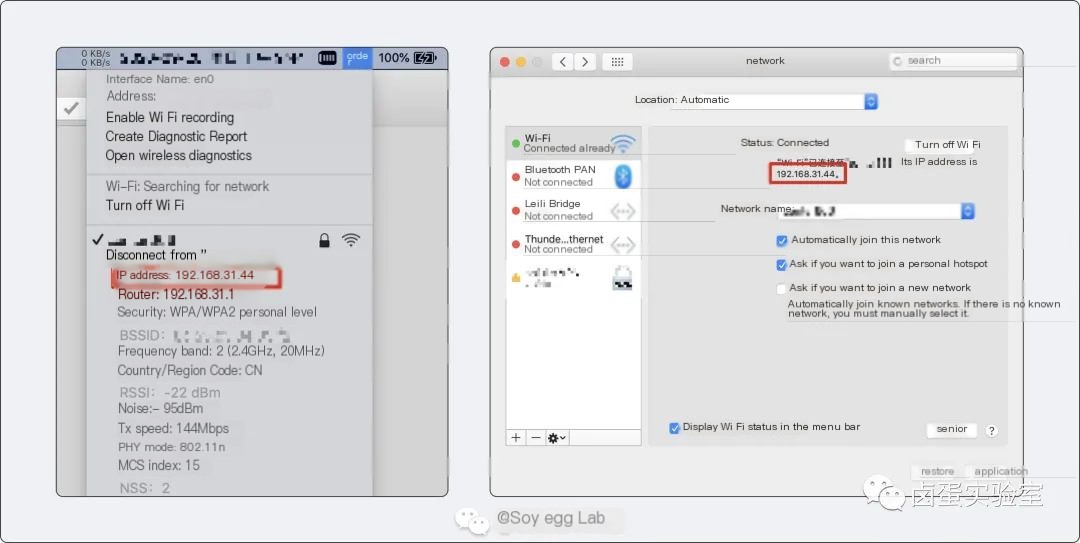
Let’s first analyze the Destination IP Address. Since Charles is installed on the computer, Charles’s IP is the computer’s IP. If you’re on a Mac, you can hold down the option key and click the Wi-Fi icon in the menu bar to get the computer’s IP address. You can also access System Preferences -> Network to get the IP address. My IP address here is 192.168.31.44, and it will be used later.
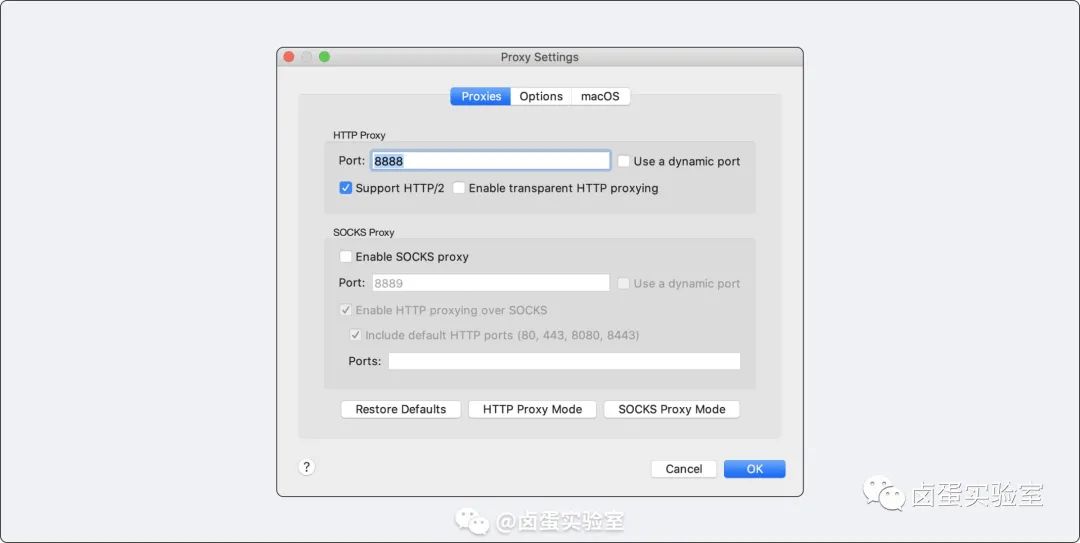
Charles’s proxy port can be viewed and changed from Charles -> Proxy -> Proxy Settings. The port default is 8888, and it is generally not recommended to modify it.
HTTP Proxy Configuration
After determining Charles’s IP and port number, we can configure the HTTP proxy per device.
1. Computer-side HTTP Proxy Configuration
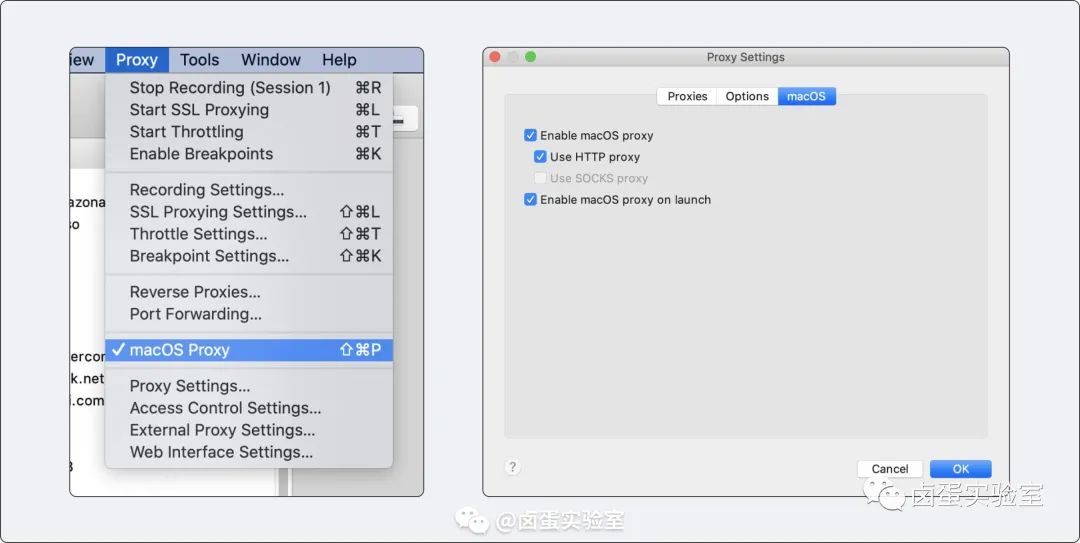
No matter whether you’re using Windows or Mac, Charles as an APP installed on the computer, when proxying local requests, the network data is forwarded locally, so the configuration on the computer side is relatively simple. Just click through the path Charles -> Proxy -> macOS Proxy to enable the proxy.
Since the local proxy is disabled by default, you can also click Proxy Settings in macOS and check Enable macOS proxy on launch so that every time Charles is opened, the proxy will be enabled by default.
2. iOS Proxy Configuration
To capture iOS network packets, simply forward the iOS network packets to the proxy IP and proxy port.
Ensure that both the phone and computer are on the same local network (usually by connecting both to the same Wi-Fi), then open iOS’s Settings -> Wi-Fi, access the settings page of the connected Wi-Fi, scroll to the bottom to select configure proxy, and then configure the proxy manually.
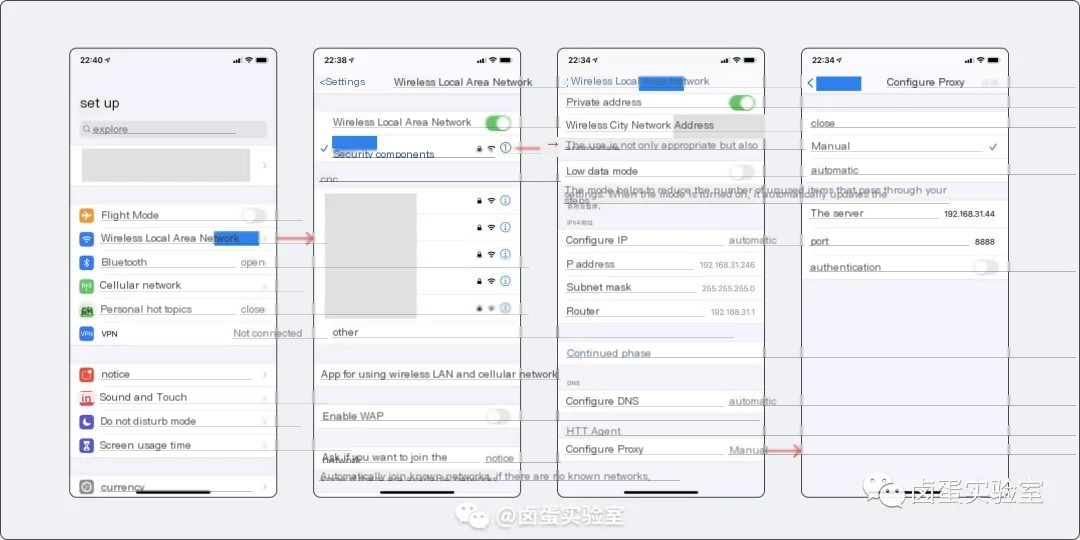
Server to enter is the Charles IP address obtained earlier, 192.168.31.44 in the example; Port is the Charles proxy port from earlier, usually 8888.
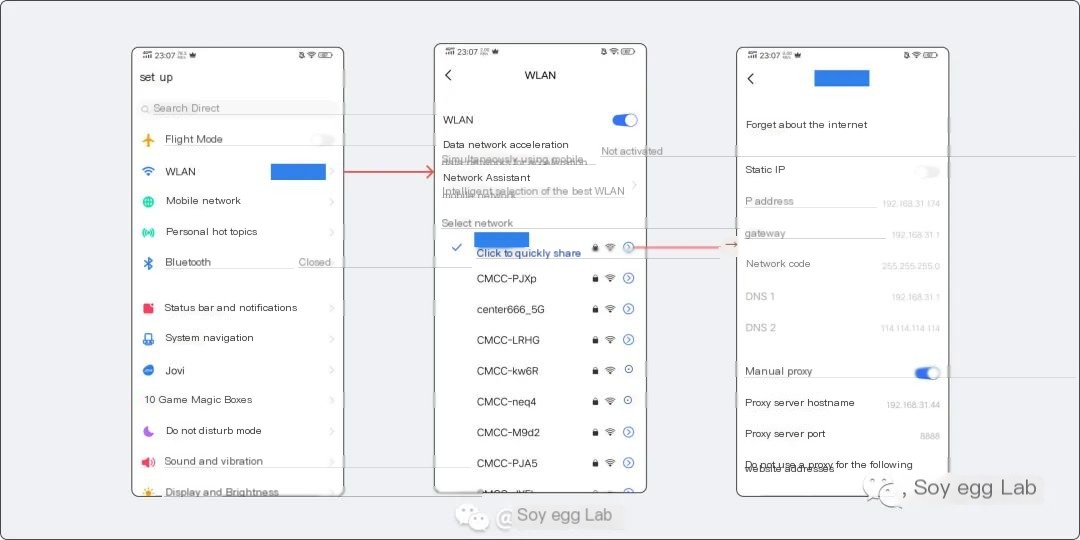
3. Android Proxy Configuration
The Android proxy configuration is similar to iOS, but given the numerous Android manufacturers and non-unified steps unlike iOS, covering them individually isn’t meaningful, so I’ll provide a simple step demonstration:
HTTPS Proxy Configuration
HTTPS is essentially the HTTP protocol + TLS protocol, and from the perspective of connection establishment, it mainly involves adding four TLS handshakes after the TCP three-way handshake, as shown below. In the TLS handshake process, the public key certificate used for encryption is verified, so we need to manually install and trust Charles’s certificate to capture HTTPS packets.
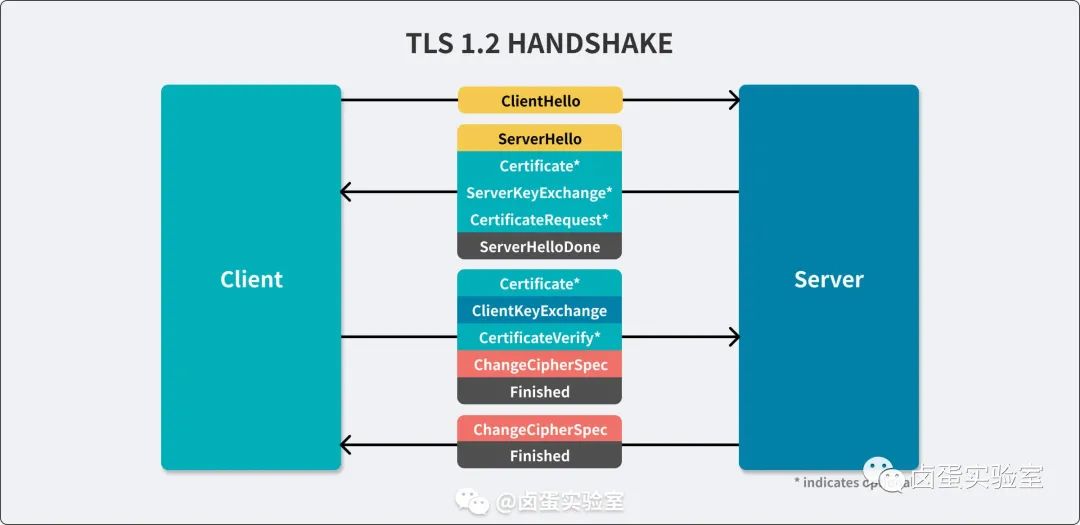
TLS 1.2
The addition of TLS enhances network security but also increases the complexity of packet capture, which I will explain in detail in the next section. Here is a step demonstration of certificate installation.
“⚠️ Note: Ensure that HTTP Proxy is configured before certificate installation
1. Computer-side Certificate Installation
Installation on the computer side is the simplest. First click Charles -> Help -> SSL Proxying -> Install Charles Root Certificate to install the certificate on the computer, then click the certificate just installed, manually trust all permissions, and finally enter the password to save changes.

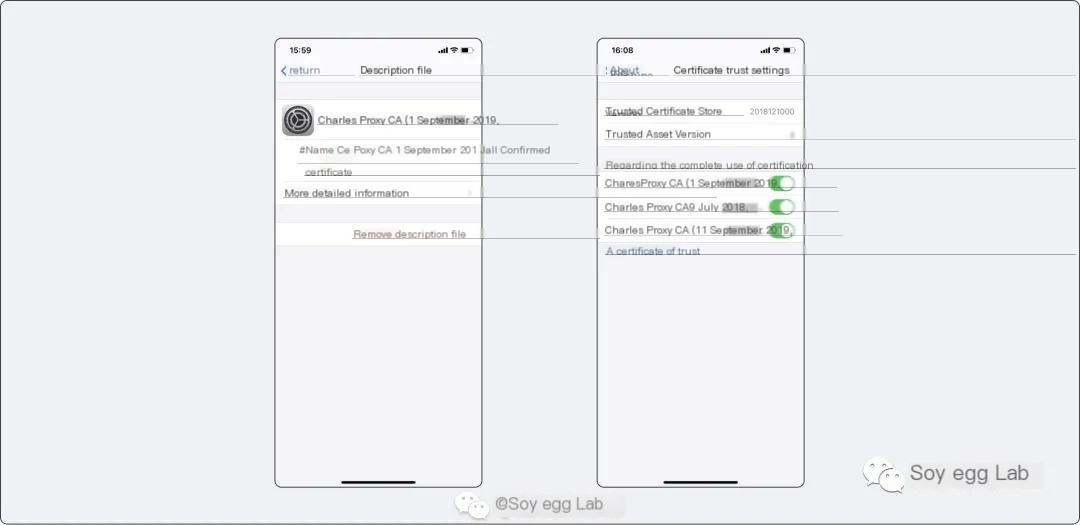
2. iOS Certificate Installation
Installing the certificate on iOS is relatively more complex. First click Charles -> Help -> SSL Proxying -> Install Charles Root Certificate on a Mobile Device, a popup will appear, then follow the instructions to visit chls.pro/ssl on the phone to download and install the Charles CA certificate.
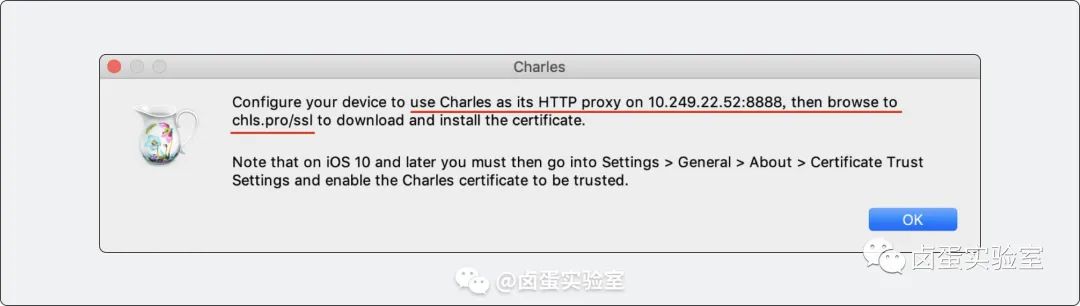
After downloading, manually enable permissions. You need to go to General -> Profiles & Device Management -> Trust to trust the recently downloaded certificate, and then in General -> About -> Certificate Trust Settings -> Enable full trust for root certificates. Once agreed upon, iOS has successfully installed the certificate.
3. Android Certificate Installation
The steps for Android certificate installation are not only cumbersome but also not very effective.
First click Charles -> Help -> SSL Proxying -> Save Charles Root Certificate to save the certificate file in *.cer format.
“⚠️ Note: When Charles saves the certificate file, there are two formats available:
.pemand.cer. The former is a certificate container format, generally encoding the certificate in base64; the latter is usually a binary format certificate, more compatible with the Android system, so we choose the.cerfile.
After saving the file, import the CA certificate into Android via USB or else, and finally click certificate installation.
III. Analysis of Charles Packet Capture Failure Cases
This section is actually the focus of this article, analyzing the reasons for Charles packet capture failure from six directions, from the proxy server to the TLS certificate, covering various knowledge points in computer networks, well worth collecting and learning.
1. Turn off Proxy! Turn off Proxy! Turn off Proxy!
As a programmer, to smoothly access sites like GitHub, we always use some “assistant tools.” These tools generally automatically enable HTTP/HTTPS proxies, thereby occupying ports, leading to Charles proxy failure.
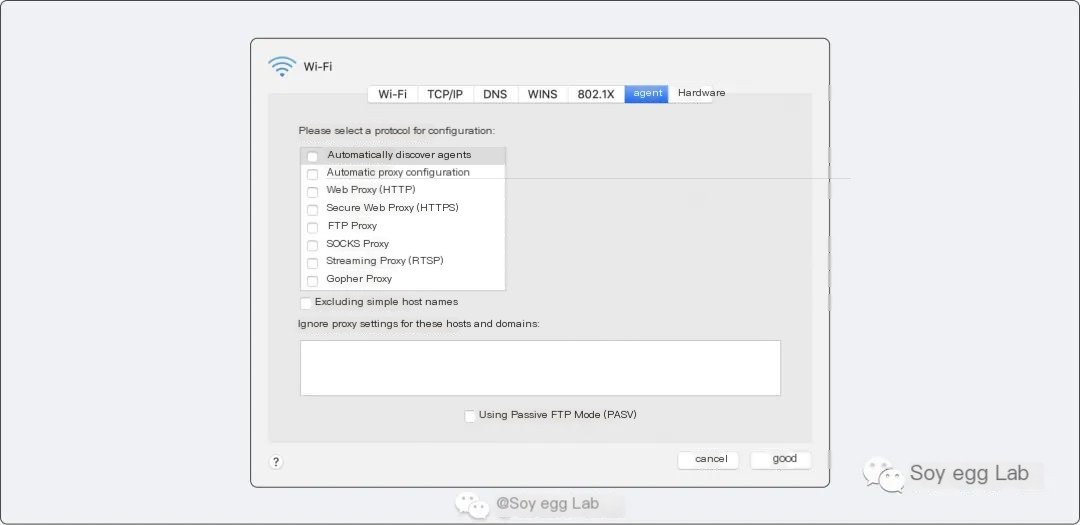
The solution to this problem is simple, before using Charles, turn off assistant tools for both computer and phone, and there won’t be a proxy conflict. We can check the computer’s Wi-Fi proxy interface, ensure that before enabling Charles capture, none of the options below are checked.
Some might consider enabling two proxies locally, data passing through tools first, then being captured by Charles, ultimately reaching the client. While this method is feasible, it tends to be extremely slow and with much delay, therefore it is not recommended.
2. Is the Data Going Through HTTP Protocol?
Before starting this section, let’s see how official documents define Charles:
“Charles is an HTTP proxy / HTTP monitor / Reverse Proxy that enables a developer to view all of the HTTP and SSL / HTTPS traffic between their machine and the Internet.
From this introduction, we can see that Charles is a network tool focused on analyzing HTTP packets, so its support for other protocols is very limited. For instance, most IM or audio and video applications now, for performance and security purposes, generally use self-packaged transmission layer protocols, and these data cannot be detected by Charles.
Through reading Charles’s official documents and my own testing, Charles supports the following protocols:
- HTTP/1.1
- HTTPS
- HTTP/2
- ws (WebSocket)
- wss (WebSocket Secure, TLS encrypted WebSocket)
- SOCKS
“⚠️ Note: Charles does not support HTTP/3, but most websites with HTTP/3 have implemented downgrade processing. For example, when using Chrome to access Google normally, it follows HTTP/3, but when using Charles proxy, the protocol downgrades to HTTP/2
The listed protocols actually cover 90% of the application scenarios in daily business development. If you want to capture packets of other protocols, better use Wireshark.
3. Did You Forget to Turn Off the Black and White List Before Capturing Again?
I think in daily work, you or your colleagues have encountered such a scenario:
“A bug reported by the tester, you connect to Charles planning to analyze HTTP packets to pinpoint whether it’s a frontend or backend issue, but the request doesn’t go through, after panicking, you realize the black and white list was enabled, and requests were all blocked.
The black and white list mentioned above is just a generic term. Specifically to Charles, several configurations might cause misunderstandings:
- In
Proxy Settings‘s Options filtering some websites - In
SSL Proxying Settingsnot matching all websites - Set black and white list in
Block List/Allow List - Did Host mapping in
DNS Spoofing - Redirected requests in
Map Remote - Rewrote requests in
Rewrite - ……
I listed several high-frequency Charles Tools, which might remain enabled after use and be forgotten to be disabled, if there are issues, do you need to troubleshoot these one by one?
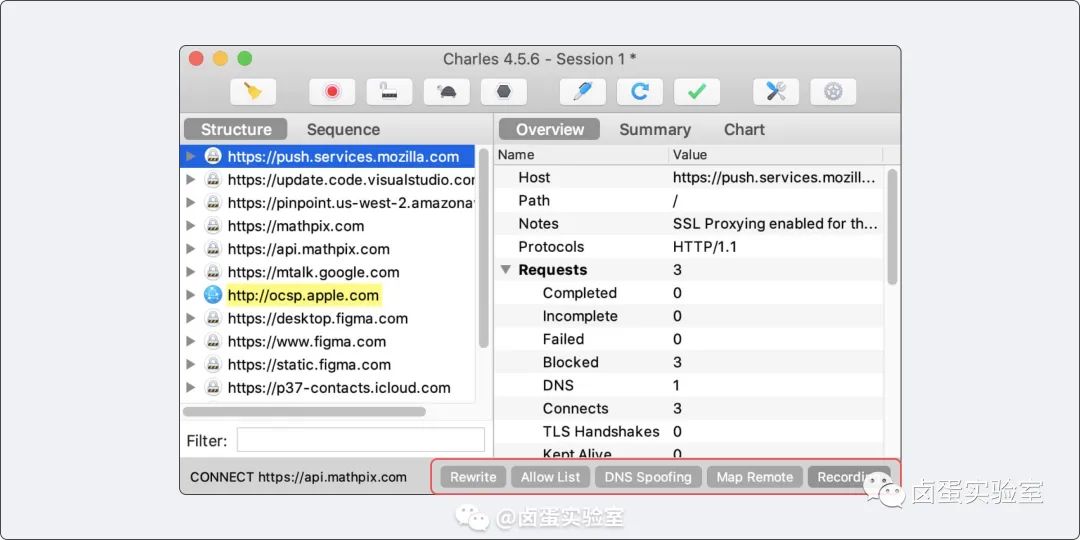
Actually, Charles has a very inconspicuous feature, that is, the bottom-right corner of its UI shows the currently enabled features. If you suspect that Charles is restricting the interface somewhere, just glance at the bottom-right corner enabled features and check them one by one.
4. The Higher the Android Version, the Harder It Is to Capture HTTPS Packets
In the “Installing Certificate on Android” section, I said the step was insignificant mainly due to: User-installed CA certificates do not have ROOT permissions.
First, let’s view a picture, this is Android’s certificate trust page:
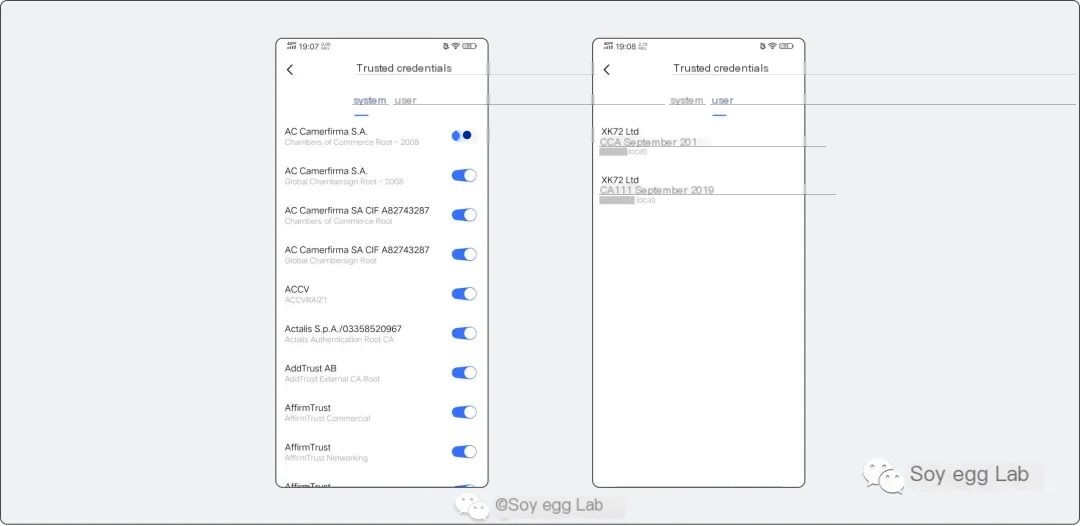
From the above image, we can see that Android systems divide certificate trust into two major categories:
- System CA Certificates: Generally with full permissions
- User CA Certificates: Self-installed by users, with very low permissions
The Charles certificates we self-install belong to user CA certificates. Besides the permissions issue of certificates, different Android versions have different rules for handling permissions:
✅: Below Android 7.0: Trust user CA certificates, can be simply understood as certificates we install directly have ROOT permissions
✅: Above Android 7.0, targetSdkVersion < 24: Trust user CA certificates
❌: Above Android 7.0, targetSdkVersion >= 24: Do not trust user CA certificates
Through the above analysis, we can infer some solutions for Android to trust Charles certificates:
1. ROOT
Directly ROOT Android phone, place Charles’s certificate in the system certificate to enable certificate wash
2. Prepare a phone below Android 7.0
Android 7.0 is a 2016 system, considering the pace of two-year replacement and one-year update cycle of Android phones, finding such a phone is difficult.
3. Prepare an APP installation package with targetSdkVersion < 24
Domestic major app markets in 2019 unified the requirement that APP API versions must be greater than 28, such installation packages are difficult to find, and considering the swift iterations of Internet products, these packages might not be usable.
4. Creative Solutions
When regular methods fail, there are many Android peculiar methods. The community offers various hacks to bypass these limitations, but these aren’t closely related to Charles, so I won’t elaborate. For those interested, you can research further.
The above solutions apply to other apps. If the app you’re capturing is your company’s, the approach is simpler.
Android has a res/xml/network_security_config.xml file, as the name suggests, it’s a configuration file specifically for controlling network security.
For example, in the below configuration, the release package only trusts certificates at the system level, whereas the debug package trusts both system and user certificates. This way, we can happily use Charles to capture packets in the debug environment. Of course, network security configuration encompasses more than just this one aspect, those interested can refer to the Android Developer’s official website[1] for further insight.
<?xml version="1.0" encoding="utf-8"?>
5. Certificate Pinning
Certificate Pinning refers to the client having the server’s real public key certificate built-in.
In HTTPS requests, the public key certificate issued to the client by the server must be identical to the one built into the client for successful request completion. Companies concerned with security generally take this action.
In such cases, when using Charles for packet capture, Charles’s certificate and the client’s certificate differ, and the forged request is rejected, leading to packet capture failure. How should this be addressed?
As previously outlined, there are essentially two paths:
- One is the Hack road—flash the phone, ROOT it, and employ tools to remove the hardcoded certificate in the APP;
- The other is the official road—you have the development rights to this app, generally owning the public key certificate and accompanying private key, allowing you to import the certificate and private key into Charles, resolving the certificate pinning issue.
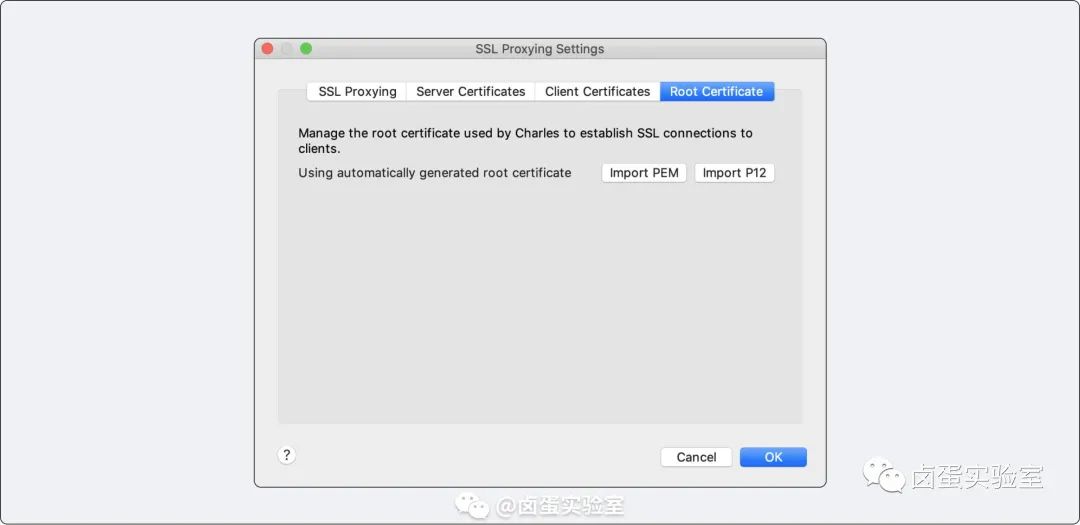
Importing Charles’s public key certificate and private key is relatively simple. Click Charles -> Proxy -> SSL Proxying Setting -> Root Certificate, and import the .pem or p12 file.
“⚠️ Note:
.p12is a file format that includes both the certificate and the key
6. Two-way Certificate Verification
In the vast majority of scenarios, TLS is for the client to authenticate the server’s authenticity, but in highly secure situations (e.g., anonymous social applications), some apps will enable TLS two-way verification, meaning the server must also authenticate the client’s authenticity.
In such circumstances, the client inevitably has a set of built-in public key and private keys. Compared to servers, the APP risks decryption, so public key certificates and private keys are usually extremely concealed, possibly written into .so or hidden in a function obfuscated beyond recognition to increase decryption difficulty.
While I’m not a security expert and haven’t thoroughly researched this topic, this situation hasn’t been encountered in my work. Based on the function panel, Charles seems to support this extreme scenario for packet capture, though I personally haven’t practiced this, so you can experiment with it.
IV. Summary
Charles packet capture is a common professional skill, and if thoroughly researched, you’ll find it involves the network quintuple, proxy services for packet forwarding, MITM from cryptography, and public key certificate knowledge. Overall, mastering these foundational lower-level knowledge areas allows for adept handling of peculiar problems encountered in work.
V. Thank You Everyone
If you found this article helpful, please do not forget to like ? and support the author. Thank you, it really means a lot to me!
You’re welcome to follow the public account “Lu Dan Laboratory“, for some original, non-watered-down content.
Feel free to follow my personal website: supercodepower.com[2], because modifying articles on major platforms often requires re-reviewing, personal blog modification and updates are more convenient.
[1] Android Developer’s official website: https://developer.android.com/training/articles/security-config
[2] supercodepower.com: https://supercodepower.com/